Sharp MX-M503N Quick Start Guide - Page 26
Base Screen Of Copy Mode
 |
View all Sharp MX-M503N manuals
Add to My Manuals
Save this manual to your list of manuals |
Page 26 highlights
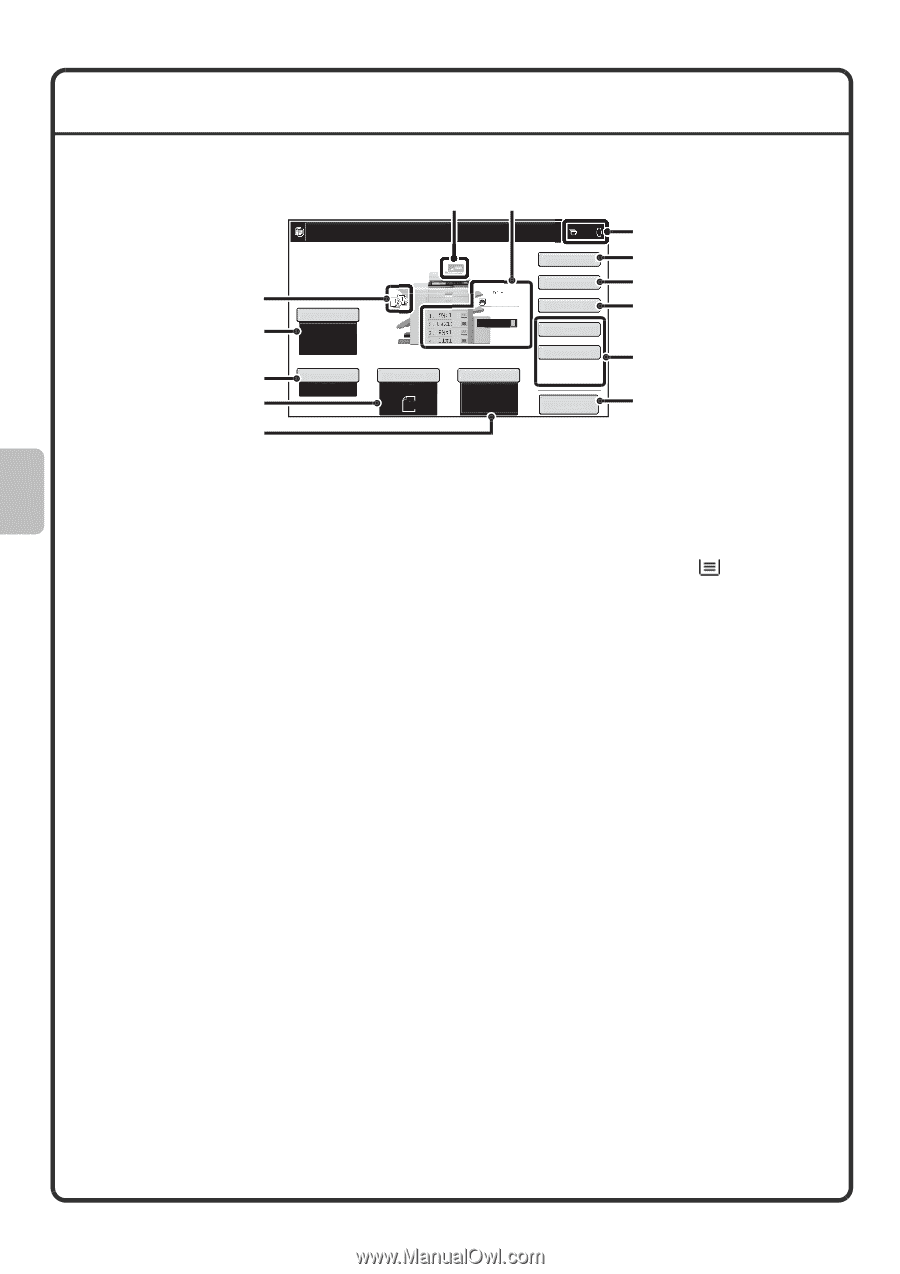
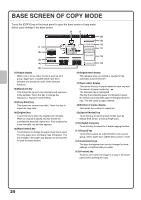
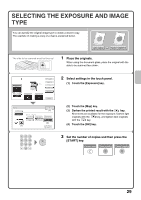
BASE SCREEN OF COPY MODE Touch the [COPY] key in the touch panel to open the base screen of copy mode. Select copy settings in the base screen. (6) (7) Ready to scan for copy. 0 (8) Special Modes (9) (1) Exposure (2) Auto 1. 8½x11 2. 8½x11R 3. 8½x14 4. 11x17 Plain 8½x11 5. 8½x11 2-Sided Copy Output File Quick File (10) (11) (12) (3) Copy Ratio Original Paper Select 100% Auto Auto (4) 8½x11 8½x11 Plain Preview (13) (5) (1) Output display When one or more output functions such as sort, group, staple sort, or saddle stitch have been selected, this shows the icons of the selected functions. (2) [Exposure] key This shows the current copy exposure and exposure mode settings. Touch this key to change the exposure or exposure mode setting. (3) [Copy Ratio] key This shows the current copy ratio. Touch this key to adjust the copy ratio. (4) [Original] key Touch this key to enter the original size manually. When an original is placed, this key shows the automatically detected original size. If the original size is set manually, the set size appears. (5) [Paper Select] key Touch this key to change the paper (tray) that is used. The tray, paper size, and paper type will appear. The tray images in the paper size display can be touched to open the same screen. (6) Original feed display This appears when an original is inserted in the automatic document feeder. (7) Paper select display This shows the size of paper loaded in each tray and the amount of paper remaining . The selected tray is highlighted. The tray that is feeding paper is indicated in green. Do not pull out a tray while paper is being fed from the tray. This will cause a paper misfeed. (8) Number of copies display This shows the number of copies set. (9) [Special Modes] key Touch this key to select special modes such as Margin Shift, Erase, and Dual Page Copy. (10) [2-Sided Copy] key Touch this key to select the 2-sided copying function. (11) [Output] key Touch this to select an output function such as sort, group, offset, staple sort, saddle stitch, punch, or fold. (12) Customized keys The keys that appear here can be changed to show settings or functions that you prefer. (13) [Preview] key Touch to view a preview image of a copy in the touch panel before printing the copy. 24
-
 1
1 -
2
-
3
-
4
-
5
-
6
-
7
-
8
-
9
-
10
-
11
-
12
-
13
-
14
-
15
-
16
-
17
-
18
-
19
-
20
-
 21
21 -
 22
22 -
 23
23 -
 24
24 -
 25
25 -
 26
26 -
 27
27 -
 28
28 -
 29
29 -
 30
30 -
 31
31 -
32
-
33
-
34
-
35
-
36
-
37
-
38
-
39
-
40
-
41
-
42
-
43
-
44
-
45
-
46
-
47
-
48
-
49
-
50
-
51
-
52
-
53
-
54
-
55
-
56
-
57
-
58
-
59
-
60
-
61
-
62
-
63
-
64
-
65
-
66
-
67
-
68
-
69
-
70
-
71
-
72
-
73
-
74
-
75
-
76
-
77
-
78
-
79
-
80
-
81
-
82
-
83
-
84
-
85
-
86
-
87
-
88
-
89
-
90
-
91
-
92
-
93
-
94
-
95
-
96
-
97
-
98
-
99
-
100
-
101
-
102
-
103
-
104
-
105
-
106
-
107
-
108
-
109
-
110
-
111
-
112
-
113
-
114
-
115
-
116
 |
 |