Sharp MX-M503N Quick Start Guide - Page 65
Changing The Resolution
 |
View all Sharp MX-M503N manuals
Add to My Manuals
Save this manual to your list of manuals |
Page 65 highlights
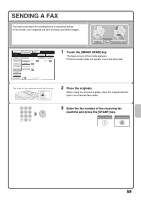
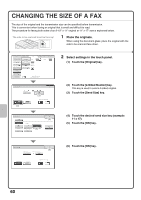
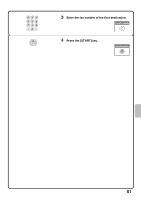
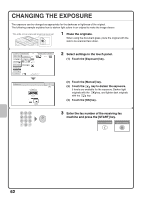
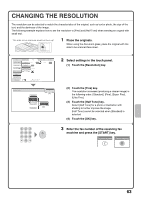
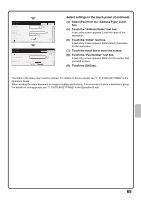
CHANGING THE RESOLUTION The resolution can be selected to match the characteristics of the original, such as text or photo, the size of the text, and the darkness of the image. The following example explains how to set the resolution to [Fine] and [Half Tone] when sending an original with small text. The side to be scanned must be face up! 1 Place the originals. When using the document glass, place the original with the side to be scanned face down. Scan Internet Fax Address Book Original Fax Scan: USB Mem. Scan PC Scan Auto 8½x11 Send: Auto Direct TX Sub Address Address Review Exposure Auto Resolution Standard (1) Special Modes File Quick File Preview Auto Reception Fax Memory:100% Fax/Resolution Standard Fine (2) Super Fine Ultra Fine OK (4) Half Tone (3) 2 Select settings in the touch panel. (1) Touch the [Resolution] key. (2) Touch the [Fine] key. The resolution increases (producing a clearer image) in the following order: [Standard], [Fine], [Super Fine], [Ultra Fine]. (3) Touch the [Half Tone] key. Select [Half Tone] for a photo or illustration with shading to further improve the image. [Half Tone] cannot be selected when [Standard] is selected. (4) Touch the [OK] key. 3 Enter the fax number of the receiving fax machine and press the [START] key. Correct a mistake Cancel scanning 63
-
 1
1 -
2
-
3
-
4
-
5
-
6
-
7
-
8
-
9
-
10
-
11
-
12
-
13
-
14
-
15
-
16
-
17
-
18
-
19
-
20
-
21
-
22
-
23
-
24
-
25
-
26
-
27
-
28
-
29
-
30
-
31
-
32
-
33
-
34
-
35
-
36
-
37
-
38
-
39
-
40
-
41
-
42
-
43
-
44
-
45
-
46
-
47
-
48
-
49
-
50
-
51
-
52
-
53
-
54
-
55
-
56
-
57
-
58
-
59
-
 60
60 -
 61
61 -
 62
62 -
 63
63 -
 64
64 -
 65
65 -
 66
66 -
 67
67 -
 68
68 -
 69
69 -
 70
70 -
71
-
72
-
73
-
74
-
75
-
76
-
77
-
78
-
79
-
80
-
81
-
82
-
83
-
84
-
85
-
86
-
87
-
88
-
89
-
90
-
91
-
92
-
93
-
94
-
95
-
96
-
97
-
98
-
99
-
100
-
101
-
102
-
103
-
104
-
105
-
106
-
107
-
108
-
109
-
110
-
111
-
112
-
113
-
114
-
115
-
116
 |
 |