Sharp PG-LS2000 PG-LX2000 PG-LS2000 Operation Manual - Page 6
Contents, Introduction, Easy Start, Setup, Connections, Useful Features, Basic Operation
 |
View all Sharp PG-LS2000 manuals
Add to My Manuals
Save this manual to your list of manuals |
Page 6 highlights
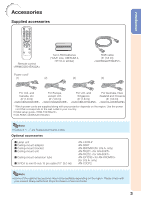
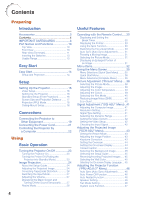
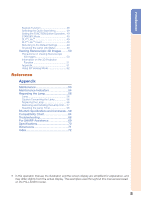
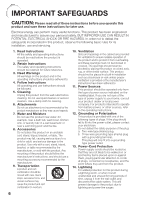
Contents Preparing Introduction Accessories 3 Contents 4 IMPORTANT SAFEGUARDS 6 Part Names and Functions 10 Top View 10 Front View 10 Rear View (Terminals 11 Inserting the Batteries 13 Usable Range 13 Easy Start Easy Start 14 Setup and Projection 14 Setup Setting Up the Projector 16 Video Setup 16 Setting Up the Projector 16 Standard Setup (Front Projection 16 Screen Size and Projection Distance ...... 17 Projection (PRJ) Mode 18 Ceiling-Mount Setup 18 Connections Connecting the Projector to Other Equipment 19 Connecting the Power Cord 21 Controlling the Projector by a Computer 22 Using Basic Operation Turning the Projector On/Off 23 Turning the Projector On 23 Turning the Power Off (Putting the Projector into Standby Mode 23 Image Projection 24 About the Setup Guide 24 Adjusting the Projected Image 24 Correcting Trapezoidal Distortion 26 Switching the Input Mode 27 Adjusting the Volume 27 Displaying the Black Screen and Turning Off the Sound Temporarily ....... 27 Resize Mode 28 4 Useful Features Operating with the Remote Control......30 Displaying and Setting the Break Timer 30 Displaying the Pointer 30 Using the Spot Function 30 Switching the Eco+Quiet Mode 30 Auto Sync (Auto Sync Adjustment) ......... 31 Freezing a Moving Image 31 Selecting the Picture Mode 31 Displaying an Enlarged Portion of an Image 31 Menu Items 32 Using the Menu Screen 35 Menu Selections (Quick Start Menu) .........35 Quick Start Menu 36 Menu Selections (Complete Menu 36 Picture Adjustment ("Picture" Menu) ....38 Selecting the Picture Mode 38 Adjusting the Image 39 Adjusting the Color Temperature 39 Adjusting the Colors 39 Selecting the Film Mode 40 Reducing Image Noise (DNR 40 Eco+Quiet 40 Signal Adjustment ("SIG-ADJ" Menu) ..41 Adjusting the Computer Image 41 Resolution Setting 41 Signal Type Setting 41 Selecting the Dynamic Range 41 Setting the Video System 42 Setting the Video Setup 42 Checking the Input Signal 42 Adjusting the Projected Image ("SCR-ADJ" Menu 43 Setting the Resize Mode 43 Adjusting the Image Position 43 Keystone Correction 43 Setting the Overscan 44 Setting the On-screen Display 44 Closed Caption 44 Selecting the Background Image 45 Selecting the Setup Guide 45 Reversing/Inverting Projected Images ..... 45 Selecting the Wall Color 45 Selecting the On-screen Display Language ... 45 Adjusting the Projector Function ("PRJ-ADJ1/2" Menu 46 Auto Sync (Auto Sync Adjustment) ......... 46 Auto Power Off Function 46 Auto Restart Function 46 Speaker Setting 46 Fan Mode Setting 46 System Lock Function 47
-
 1
1 -
 2
2 -
 3
3 -
 4
4 -
 5
5 -
 6
6 -
 7
7 -
 8
8 -
 9
9 -
 10
10 -
 11
11 -
 12
12 -
13
-
14
-
15
-
16
-
17
-
18
-
19
-
20
-
21
-
22
-
23
-
24
-
25
-
26
-
27
-
28
-
29
-
30
-
31
-
32
-
33
-
34
-
35
-
36
-
37
-
38
-
39
-
40
-
41
-
42
-
43
-
44
-
45
-
46
-
47
-
48
-
49
-
50
-
51
-
52
-
53
-
54
-
55
-
56
-
57
-
58
-
59
-
60
-
61
-
62
-
63
-
64
-
65
-
66
-
67
-
68
-
69
-
70
-
71
-
72
-
73
-
74
-
75
 |
 |
