Sharp PG-M25X PGM25X Operation Manual - Page 35
Installing / Removing the PC Card
 |
View all Sharp PG-M25X manuals
Add to My Manuals
Save this manual to your list of manuals |
Page 35 highlights
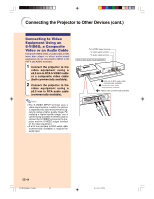
Setup and Connections Installing / Removing the PC Card Installing the PC Card in to INPUT 4 Terminal Insert a PC card such as a wireless LAN card or memory card as shown on the right. Info • We recommend that you recess the Eject button before inserting the PC card. This will prevent accidental ejection during operation. • The input mode will change automatically to INPUT 4, when the PC card has been inserted into INPUT 4 terminal. Eject button The notch Make sure that the Eject button is not out, and that the notch on the card is to the left, when installing the card. Take care when installing the card, as it has both a top part and an under part. Removing the PC Card 1 In the Card menu, select "Eject PC Card". For details see page 68. 2 Remove the card. Note • To prevent unstable operation, it is rec- ommended that you use the EJECT PC CARD function in PC CARD menu before removing the PC card. Eject button 1 Press the Eject button. The Eject button pops out. Press. Pops out. Remove the card from the slot and store it in a safe place. If the Eject button is out, press it once more to set it back in place. 2 Press the Eject button again. The PC Card will protrude from the card slot on the computer. The card comes out a little. Press. PG-M25X#E#p21_32.p65 31 02.4.29, 3:10 PM -31
-
 1
1 -
2
-
3
-
4
-
5
-
6
-
7
-
8
-
9
-
10
-
11
-
12
-
13
-
14
-
15
-
16
-
17
-
18
-
19
-
20
-
21
-
22
-
23
-
24
-
25
-
26
-
27
-
28
-
29
-
 30
30 -
 31
31 -
 32
32 -
 33
33 -
 34
34 -
 35
35 -
 36
36 -
 37
37 -
 38
38 -
 39
39 -
 40
40 -
41
-
42
-
43
-
44
-
45
-
46
-
47
-
48
-
49
-
50
-
51
-
52
-
53
-
54
-
55
-
56
-
57
-
58
-
59
-
60
-
61
-
62
-
63
-
64
-
65
-
66
-
67
-
68
-
69
-
70
-
71
-
72
-
73
-
74
-
75
-
76
-
77
-
78
-
79
-
80
-
81
-
82
-
83
-
84
-
85
-
86
-
87
-
88
-
89
-
90
-
91
-
92
-
93
-
94
-
95
-
96
-
97
-
98
-
99
-
100
-
101
-
102
-
103
-
104
-
105
-
106
-
107
-
108
-
109
-
110
-
111
-
112
-
113
-
114
-
115
-
116
-
117
-
118
-
119
-
120
-
121
-
122
-
123
-
124
-
125
-
126
-
127
-
128
-
129
-
130
 |
 |
