Sony CCD-FX520 Primary User Manual - Page 23
stopping
 |
View all Sony CCD-FX520 manuals
Add to My Manuals
Save this manual to your list of manuals |
Page 23 highlights
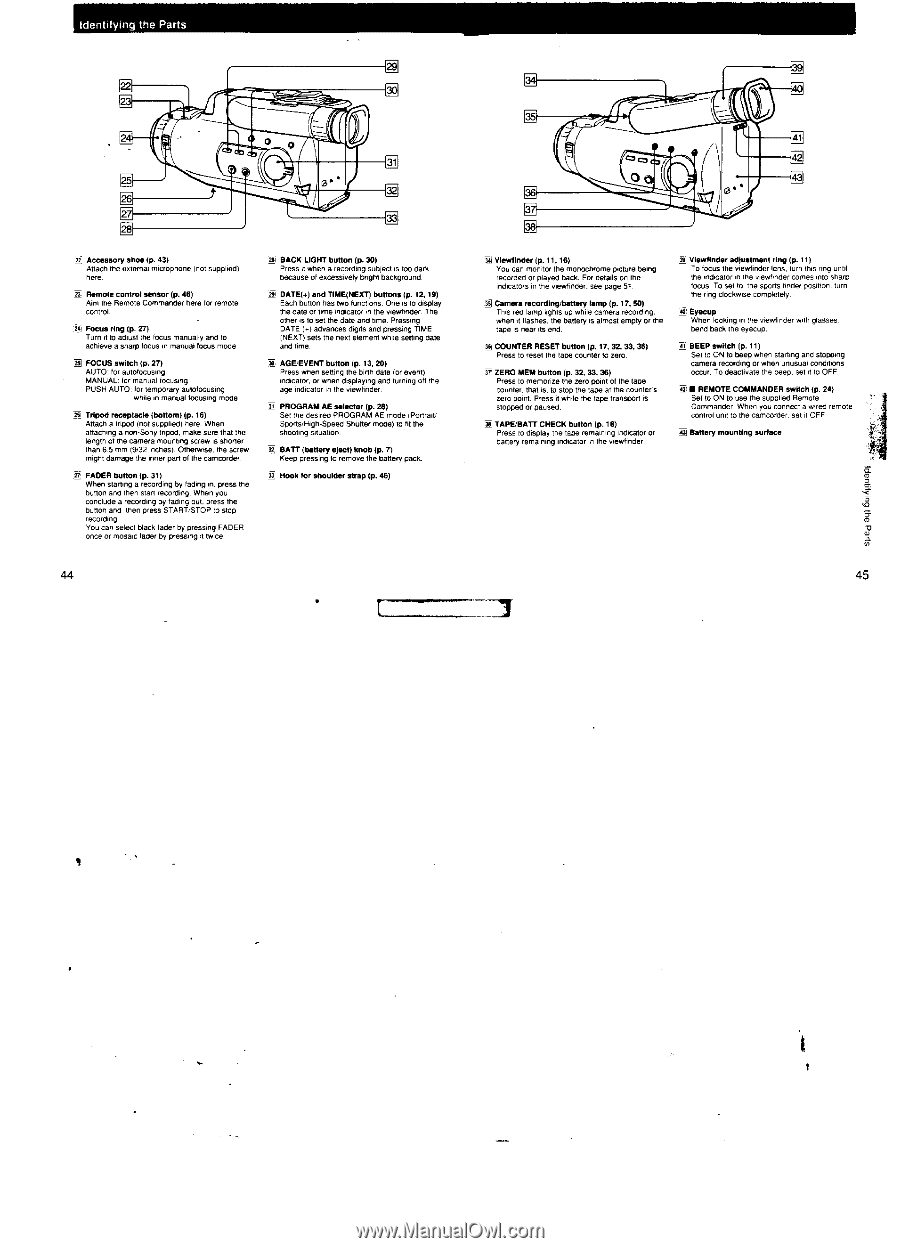
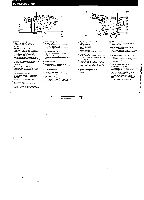
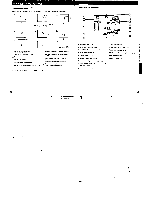
Identifying the Parts 2 0 O 31 25 • 32 27 33 28 Accessory shoe (p. 43) Attach the external microphone (not supplied) here 23 Remote control sensor (p. 46) Aim the Remote Commander here for remote control. • is Focus ring (p. 2T) Turn it to adios, the focus manually and m corsage a sharp focus in merittellecue mode. 82 FOCUS switch (9. 27) AUTO: for autolocusing MANUAL: for manual locueang PUSH AUTO. for temporary aut0/0Cusing white in manual tocusing mode X Tripod receptacle (bottom) (p. 16) Attach a tripod (not supplied) here. When attaching a non-Sony tripod, make sure that Me length of the camera mounting screws shonger than 6 5 mm (9/32 inches) Otherwise. tin tare might damage the inner pan of the camcorder. FADER button Ip. ) When starting a recording by fading in. press the button and then Stan recording. When yaw conclude a recording by fading out. press the button and then press START-STOP to stop recording YOU 000 ".6316643 fader by Passing FADER once or mosaic fader by passing envies. X BACK LIGHT button (p. 30) Press it when a record,ng subi.1is too dark because of excessively bright background 29I DATE(.) and TIME(NEXT) buttons (p. 12, 19) Each button has two functions. One is to display the date or time indicator in the viewfinder. The other is la set the date and time. Pressing DATE (.) advances digits and pressing TIME (NEXT) sets the next element while selling date and time. AGE/EVENT button (p. 13, 20) Press when setting the birth date (or event) moan:, or when displaying and turning off the age indicator in the viewfinder 3, PROGRAM AE selector (p. 28) Set the desired PROGRAM AE mode 1Portriet/ Sports/High-Speed Shutter made) to fit the shooting situation. k BATT (battery eject) knob (p. Keep pressing to remove the battery pack. 36 Hook for shoulder strap (p. 46) 44 35 41 00 O Ge e 43 38 3 38 111 Vlewlinder (p.11,16) You can monitor the rnonocleume inclure being recorded or played back. For details on the indicators in the viewfinder, see page 51 Camera recording/battery lamp (p.17, 50) This red lamp lights up while camera recording when it flashes. the battery is almost empty or the tape is near its end. A. COUNTER RESET button (p. 17, 32, 33, 36) Press to reset the tape counter to zero. r ZERO MEM button (p. 32, 33, 36) Press to memorize the zero point al the tape counter. that is. to stop the tape at the counter's zero point Press it white the tape tranSp0rt la stopped or paused. Si TAPE/BATT CHECK button (p.16) Press to display the tape remaining indicator or battery remaining indicator in the viewfinder X VievAnder adlustment ring (p. 11) To focus the viewfinder lens, tum Ilea trig unto the indicator in the viewfinder comes into sharp focus To set to the sports tinder position. tum the ring clockwise comOdely. w. Eyecup When looking in the viewfinder with glaSSee. bend back the eyecup. Of BEEP Set to switch (p. 11) ON to beep when kering and stopping camera recording or when unusual conditions occur. To deactivate the beep. sett to OFF. g■ REMOTE COMMANDER switch (p. 24) Set to ON to use the suppled Remote Commander. When you connect a (Awed remote control unit to the camcorder, set it OFF ki Battery mounting surface 45
-
 1
1 -
2
-
3
-
4
-
5
-
6
-
7
-
8
-
9
-
10
-
11
-
12
-
13
-
14
-
15
-
16
-
17
-
 18
18 -
 19
19 -
 20
20 -
 21
21 -
 22
22 -
 23
23 -
 24
24 -
 25
25 -
 26
26
 |
 |