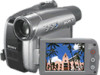
Sony DCR-HC26 Operating Guide - Page 47
Setup Menu Menu, - Clock Set/usb Stream/language, Etc - usb cable
 |
UPC - 027242688711
View all Sony DCR-HC26 manuals
Add to My Manuals
Save this manual to your list of manuals |
Page 47 highlights
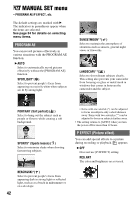
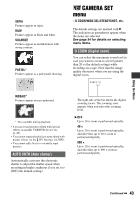
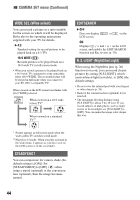
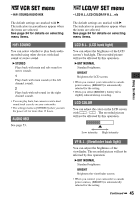
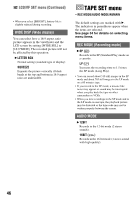
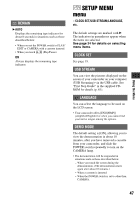
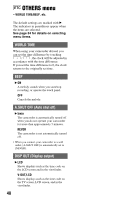
Using the Menu REMAIN B AUTO Displays the remaining tape indicator for about 8 seconds in situations such as those described below. • When you set the POWER switch to PLAY/ EDIT or CAMERA with a cassette inserted. • When you touch (Play/Pause). ON Always displays the remaining tape indicator. SETUP MENU menu - CLOCK SET/USB STREAM/LANGUAGE, etc. The default settings are marked with B. The indicators in parentheses appear when the items are selected. See page 34 for details on selecting menu items. CLOCK SET See page 19. USB STREAM You can view the pictures displayed on the screen of your camcorder on your computer (USB Streaming) via the USB cable. See "First Step Guide" in the supplied CDROM for details (p. 61). LANGUAGE You can select the language to be used on the LCD screen. • Your camcorder offers [ENG[SIMP]] (simplified English) for when you cannot find your native tongue among the options. DEMO MODE The default setting is [ON], allowing you to view the demonstration in about 10 minutes, after you have removed a cassette from your camcorder, and slide the POWER switch repeatedly to turn on the CAMERA lamp. • The demonstration will be suspended in situations such as those described below. - When you touch the screen during the demonstration. (The demonstration starts again after about 10 minutes.) - When a cassette is inserted. - When the POWER switch is set to other than CAMERA. 47
-
 1
1 -
2
-
3
-
4
-
5
-
6
-
7
-
8
-
9
-
10
-
11
-
12
-
13
-
14
-
15
-
16
-
17
-
18
-
19
-
20
-
21
-
22
-
23
-
24
-
25
-
26
-
27
-
28
-
29
-
30
-
31
-
32
-
33
-
34
-
35
-
36
-
37
-
38
-
39
-
40
-
41
-
 42
42 -
 43
43 -
 44
44 -
 45
45 -
 46
46 -
 47
47 -
 48
48 -
 49
49 -
 50
50 -
 51
51 -
 52
52 -
53
-
54
-
55
-
56
-
57
-
58
-
59
-
60
-
61
-
62
-
63
-
64
-
65
-
66
-
67
-
68
-
69
-
70
-
71
-
72
-
73
-
74
-
75
-
76
-
77
-
78
-
79
-
80
-
81
-
82
-
83
-
84
-
85
-
86
-
87
-
88
-
89
-
90
-
91
-
92
 |
 |
