Sony DPP FP30 Operating Instructions - Page 13
Printing images from, the digital camera - printer paper
 |
UPC - 027242659414
View all Sony DPP FP30 manuals
Add to My Manuals
Save this manual to your list of manuals |
Page 13 highlights
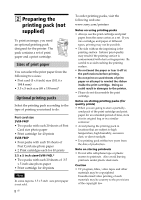
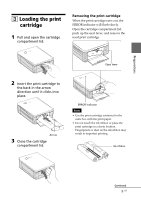
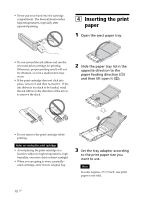
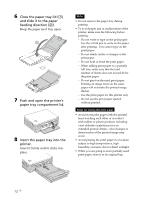
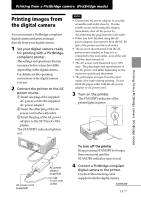
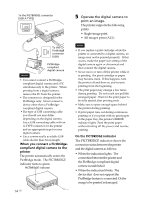
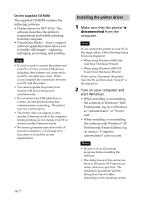
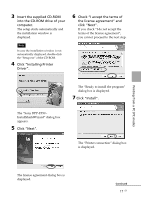
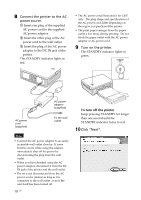
Printing from a PictBridge camera (PictBridge mode) Printing images from the digital camera You can connect a PictBridge-compliant digital camera and print an image directly from your digital camera. 1 Set your digital camera ready for printing with a PictBridgecompliant printer. The settings and operations that are necessary before connection differ depending on the digital camera. For details, see the operating instructions of the digital camera you use. 2 Connect the printer to the AC power source. 1 Insert one plug of the supplied AC power cord to the supplied AC power adaptor. 2 Insert the other plug of the AC power cord to the wall outlet. 3 Insert the plug of the AC power adaptor to the DC IN jack of the printer. The STANDBY indicator lights in red. Notes • Connect the AC power adaptor to an easily accessible wall outlet close by. If some trouble occurs while using the adaptor, immediately shut off the power by disconnecting the plug from the wall outlet. • When you have finished using the AC power adaptor, disconnect it from the DC IN jack of the printer and the wall outlet. • The set is not disconnected from the AC power source (mains) as long as it is connected to the wall outlet , even if the unit itself has been turned off. • The AC power cord illustrated is for 120V only. The plug shape and specifications of the AC power cord differ depending on the region you purchased the printer. • The print paper emerges from the paper outlet a few times during printing. Do not block the paper outlet with the AC power adaptor or AC power cord. 3 Turn on the printer. The STANDBY indicator of the printer lights in green. Printing from a PictBridge camera (PictBridge mode) AC power cord (supplied) AC power adaptor (supplied) To the wall outlet To turn off the printer Keep pressing STANDBY for longer than one second until the STANDBY indicator turns to red. 4 Connect a PictBridge-compliant digital camera to the printer. Use the USB connecting cable supplied with the digital camera. Continued 13 GB
-
 1
1 -
2
-
3
-
4
-
5
-
6
-
7
-
 8
8 -
 9
9 -
 10
10 -
 11
11 -
 12
12 -
 13
13 -
 14
14 -
 15
15 -
 16
16 -
 17
17 -
 18
18 -
19
-
20
-
21
-
22
-
23
-
24
-
25
-
26
-
27
-
28
-
29
-
30
-
31
-
32
-
33
-
34
-
35
-
36
-
37
-
38
-
39
-
40
-
41
-
42
-
43
-
44
-
45
-
46
-
47
-
48
-
49
-
50
 |
 |