Sony DPP FP30 Operating Instructions - Page 14
When you connect a PictBridge, compliant digital camera to the, printer - cartridges
 |
UPC - 027242659414
View all Sony DPP FP30 manuals
Add to My Manuals
Save this manual to your list of manuals |
Page 14 highlights
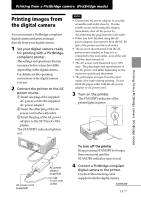
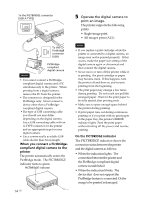
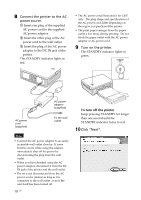
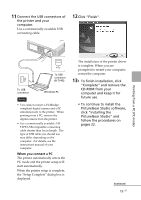
To the PICTBRIDGE connector (USB A-TYPE) To the PictBridge connector (USB) PictBridgecompliant digital camera Notes • You cannot connect a PictBridgecompliant digital camera and a PC simultaneously to the printer. When printing from a digital camera, remove the PC from the printer. • The connector is designed for the PictBridge only. Never connect a device other than a PictBridgecompliant digital camera. • The type of USB connecting cable you should use may differ depending on the digital camera. Use a USB connecting cable with an A-TYPE connector for the printer and an appropriate type for your digital camera. • Use a commercially available USB cable shorter than 3m in length. When you connect a PictBridgecompliant digital camera to the printer The printer automatically enters the PictBridge mode. The PICTBRIDGE indicator turns to green. PICTBRIDGE indicator 14 GB 5 Operate the digital camera to print an image. The printer supports the following prints: • Single-image print. • All images print (ALL) Notes • If you replace a print cartridge while the printer is connected to a digital camera, an image may not be printed properly. If this occurs, make the paper size setting of the digital camera again or disconnect and then connect the digital camera. • Never move or turn off the printer while it is printing; the print cartridge or paper may become stuck. If this happens, turn the printer off and then on, and resume printing from the beginning. • The print paper may emerge a few times during printing. Do not touch nor pull the emerged paper. Wait for the print paper to be fully ejected after printing ends. • Make sure to spare enough space behind the printer during printing. • If print paper runs out during continuous printing or if you print with no print paper in the paper tray, the printer's ERROR indicator lights. Feed the print paper without turning off the power and resume printing. On the PICTBRIDGE indicator The PICTBRIDGE indicator shows the connection status between the printer and the digital camera as follows: • When the indication lights: The connection between the printer and the PictBridge-compliant digital camera is established. • When the indication blinks: The device that does not support the PictBridge feature is connected. Or the image to be printed is damaged.
-
 1
1 -
2
-
3
-
4
-
5
-
6
-
7
-
8
-
 9
9 -
 10
10 -
 11
11 -
 12
12 -
 13
13 -
 14
14 -
 15
15 -
 16
16 -
 17
17 -
 18
18 -
 19
19 -
20
-
21
-
22
-
23
-
24
-
25
-
26
-
27
-
28
-
29
-
30
-
31
-
32
-
33
-
34
-
35
-
36
-
37
-
38
-
39
-
40
-
41
-
42
-
43
-
44
-
45
-
46
-
47
-
48
-
49
-
50
 |
 |
