Sony DSC-H9B Cyber-shot® Handbook - Page 114
Battery pack and power, Shooting still images/movies - troubleshooting
 |
View all Sony DSC-H9B manuals
Add to My Manuals
Save this manual to your list of manuals |
Page 114 highlights
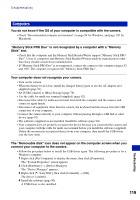
Troubleshooting Battery pack and power The battery pack cannot be inserted. • Insert the battery pack correctly to push the battery eject lever. Cannot turn on the camera. • After installing the battery pack into the camera, it may take a little while to get the camera powered. • Install the battery pack correctly. • The battery pack is discharged. Insert charged battery pack. • The battery pack is dead (page 131). Replace it with a new one. • Use a recommended battery pack. The power turns off suddenly. • If you do not operate the camera for about three minutes while the power is on, the camera turns off automatically to prevent wearing down the battery pack. Turn on the camera again. • The battery pack is dead (page 131). Replace it with a new one. The battery remaining indicator is incorrect. • This phenomenon occurs when you use the camera in an extremely hot or cold location. • The displayed battery remaining differs from the current one. Fully discharge and then charge the battery pack to correct the display. • The battery pack is discharged. Insert a charged battery pack. • The battery pack is dead (page 131). Replace it with a new one. Cannot charge the battery pack. • You cannot charge the battery pack using the AC Adapter (not supplied). Shooting still images/movies The screen does not turn on even when the power is turned on. • The finder is turned on. Turn on the LCD screen using the FINDER/LCD button. The image not clear on the finder. • Adjust the diopter scale properly using the finder adjustment dial. Your camera cannot record images. • Check the free capacity of the internal memory or "Memory Stick Duo". If it is full, do one of the following: - Delete unnecessary images (page 45). - Change the "Memory Stick Duo". 114
-
 1
1 -
2
-
3
-
4
-
5
-
6
-
7
-
8
-
9
-
10
-
11
-
12
-
13
-
14
-
15
-
16
-
17
-
18
-
19
-
20
-
21
-
22
-
23
-
24
-
25
-
26
-
27
-
28
-
29
-
30
-
31
-
32
-
33
-
34
-
35
-
36
-
37
-
38
-
39
-
40
-
41
-
42
-
43
-
44
-
45
-
46
-
47
-
48
-
49
-
50
-
51
-
52
-
53
-
54
-
55
-
56
-
57
-
58
-
59
-
60
-
61
-
62
-
63
-
64
-
65
-
66
-
67
-
68
-
69
-
70
-
71
-
72
-
73
-
74
-
75
-
76
-
77
-
78
-
79
-
80
-
81
-
82
-
83
-
84
-
85
-
86
-
87
-
88
-
89
-
90
-
91
-
92
-
93
-
94
-
95
-
96
-
97
-
98
-
99
-
100
-
101
-
102
-
103
-
104
-
105
-
106
-
107
-
108
-
 109
109 -
 110
110 -
 111
111 -
 112
112 -
 113
113 -
 114
114 -
 115
115 -
 116
116 -
 117
117 -
 118
118 -
 119
119 -
120
-
121
-
122
-
123
-
124
-
125
-
126
-
127
-
128
-
129
-
130
-
131
-
132
-
133
-
134
-
135
-
136
-
137
 |
 |
