Sony DSC-H9B Cyber-shot® Handbook - Page 65
Viewing menu, (Delete): Deleting images, (Slide Show): Playing back a series of images, (Retouch):
 |
View all Sony DSC-H9B manuals
Add to My Manuals
Save this manual to your list of manuals |
Page 65 highlights
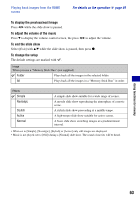
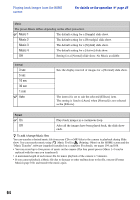
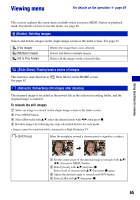
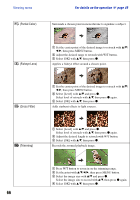
Viewing menu For details on the operation 1 page 49 This section explains the menu items available when you press MENU button in playback mode. For details on how to use the menu, see page 49. (Delete): Deleting images Selects and deletes images on the single-image screen or the index screen. See page 45. (This Image) (Multiple Images) (All In This Folder) Deletes the image that is now selected. Selects and deletes multiple images. Deletes all the images in the selected folder. (Slide Show): Playing back a series of images This item has same function as [ Slide Show] on the HOME screen. See page 62. (Retouch): Retouching still images after shooting The trimmed image is recorded as the newest file in the selected recording folder, and the original image is retained. To retouch the still images 1 Select an image to retouch on the single-image screen or the index screen. 2 Press MENU button. 3 Select [Retouch] with v/V, select the desired mode with b/B, then press z. 4 Retouch images by following the steps (described below) for each mode. • Images cannot be retouched while connected to a High Definition TV. (Soft Focus) Blurs the periphery around a chosen point to signalize a subject. Using functions for viewing 1 Set the center point of the desired image to retouch with v/V/ b/B, then press MENU button. 2 Select [Level] with v/V and press z. Select level of retouch with v/V, then press z again. 3 Adjust the desired range to retouch with W/T button. 4 Select [OK] with v/V, then press z. 65
-
 1
1 -
2
-
3
-
4
-
5
-
6
-
7
-
8
-
9
-
10
-
11
-
12
-
13
-
14
-
15
-
16
-
17
-
18
-
19
-
20
-
21
-
22
-
23
-
24
-
25
-
26
-
27
-
28
-
29
-
30
-
31
-
32
-
33
-
34
-
35
-
36
-
37
-
38
-
39
-
40
-
41
-
42
-
43
-
44
-
45
-
46
-
47
-
48
-
49
-
50
-
51
-
52
-
53
-
54
-
55
-
56
-
57
-
58
-
59
-
 60
60 -
 61
61 -
 62
62 -
 63
63 -
 64
64 -
 65
65 -
 66
66 -
 67
67 -
 68
68 -
 69
69 -
 70
70 -
71
-
72
-
73
-
74
-
75
-
76
-
77
-
78
-
79
-
80
-
81
-
82
-
83
-
84
-
85
-
86
-
87
-
88
-
89
-
90
-
91
-
92
-
93
-
94
-
95
-
96
-
97
-
98
-
99
-
100
-
101
-
102
-
103
-
104
-
105
-
106
-
107
-
108
-
109
-
110
-
111
-
112
-
113
-
114
-
115
-
116
-
117
-
118
-
119
-
120
-
121
-
122
-
123
-
124
-
125
-
126
-
127
-
128
-
129
-
130
-
131
-
132
-
133
-
134
-
135
-
136
-
137
 |
 |