Sony DSC-RX1R Cyber-shot® User Guide (Printable PDF) - Page 117
You cannot use [Auto HDR] and [Picture Effect] with [RAW] and [RAW & JPEG] images.
 |
View all Sony DSC-RX1R manuals
Add to My Manuals
Save this manual to your list of manuals |
Page 117 highlights
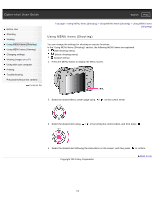
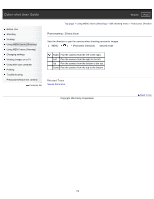
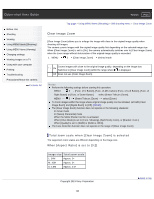
Cyber-shot User Guide Search Print Before Use Shooting Viewing Using MENU items (Shooting) Using MENU items (Viewing) Changing settings Viewing images on a TV Using with your computer Printing Troubleshooting Precautions/About this camera Contents list Top page > Using MENU items (Shooting) > Still shooting menu > Quality Quality Selects the image quality for still images. 1. MENU 1 [Quality] desired mode File format: RAW (Records using the RAW compression format.) Digital processing is not performed on this file format. Select this format to (RAW) process images on a computer for professional purposes. The image size is fixed to the maximum size. The image size is not displayed on the screen. (RAW & JPEG) File format: RAW (Records using the RAW compression format.) + JPEG A RAW image and a JPEG image are created at the same time. This is suitable when you need two image files, a JPEG for viewing, and a RAW for editing. The JPEG image quality is fixed to [Fine]. (Extra fine) (Fine) (Standard) File format: JPEG The image is compressed in the JPEG format when recorded. The compression rate increases and the file size decreases in the following order: [Extra fine], [Fine], and [Standard]. RAW images You need the "Image Data Converter" software in order to open a RAW image recorded on this camera. With this software, a RAW image can be opened and converted to a common format, such as JPEG or TIFF, and its white balance, color saturation, contrast, etc., can be readjusted. Notes You cannot add DPOF (print order) registration to RAW format images. You cannot use [Auto HDR] and [Picture Effect] with [RAW] and [RAW & JPEG] images. Related Topic Still shooting menu items not available in some REC modes "Image Data Converter" Copyright 2013 Sony Corporation Back to top 117
-
 1
1 -
2
-
3
-
4
-
5
-
6
-
7
-
8
-
9
-
10
-
11
-
12
-
13
-
14
-
15
-
16
-
17
-
18
-
19
-
20
-
21
-
22
-
23
-
24
-
25
-
26
-
27
-
28
-
29
-
30
-
31
-
32
-
33
-
34
-
35
-
36
-
37
-
38
-
39
-
40
-
41
-
42
-
43
-
44
-
45
-
46
-
47
-
48
-
49
-
50
-
51
-
52
-
53
-
54
-
55
-
56
-
57
-
58
-
59
-
60
-
61
-
62
-
63
-
64
-
65
-
66
-
67
-
68
-
69
-
70
-
71
-
72
-
73
-
74
-
75
-
76
-
77
-
78
-
79
-
80
-
81
-
82
-
83
-
84
-
85
-
86
-
87
-
88
-
89
-
90
-
91
-
92
-
93
-
94
-
95
-
96
-
97
-
98
-
99
-
100
-
101
-
102
-
103
-
104
-
105
-
106
-
107
-
108
-
109
-
110
-
111
-
 112
112 -
 113
113 -
 114
114 -
 115
115 -
 116
116 -
 117
117 -
 118
118 -
 119
119 -
 120
120 -
 121
121 -
 122
122 -
123
-
124
-
125
-
126
-
127
-
128
-
129
-
130
-
131
-
132
-
133
-
134
-
135
-
136
-
137
-
138
-
139
-
140
-
141
-
142
-
143
-
144
-
145
-
146
-
147
-
148
-
149
-
150
-
151
-
152
-
153
-
154
-
155
-
156
-
157
-
158
-
159
-
160
-
161
-
162
-
163
-
164
-
165
-
166
-
167
-
168
-
169
-
170
-
171
-
172
-
173
-
174
-
175
-
176
-
177
-
178
-
179
-
180
-
181
-
182
-
183
-
184
-
185
-
186
-
187
-
188
-
189
-
190
-
191
-
192
-
193
-
194
-
195
-
196
-
197
-
198
-
199
-
200
-
201
-
202
-
203
-
204
-
205
-
206
-
207
-
208
-
209
-
210
-
211
-
212
-
213
-
214
-
215
-
216
-
217
-
218
-
219
-
220
-
221
-
222
-
223
-
224
-
225
-
226
-
227
-
228
-
229
-
230
-
231
-
232
-
233
-
234
-
235
-
236
-
237
-
238
-
239
-
240
-
241
-
242
-
243
-
244
-
245
-
246
-
247
-
248
-
249
-
250
-
251
-
252
-
253
-
254
-
255
-
256
-
257
-
258
-
259
-
260
-
261
-
262
-
263
-
264
-
265
-
266
-
267
 |
 |