Sony DSC-RX1R Cyber-shot® User Guide (Printable PDF) - Page 228
Importing images to a computer, Importing images to a Windows computer without using PlayMemories
 |
View all Sony DSC-RX1R manuals
Add to My Manuals
Save this manual to your list of manuals |
Page 228 highlights
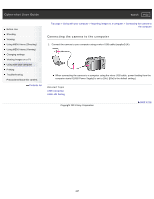
Cyber-shot User Guide Search Print Before Use Shooting Viewing Using MENU items (Shooting) Using MENU items (Viewing) Changing settings Viewing images on a TV Using with your computer Printing Troubleshooting Precautions/About this camera Contents list Top page > Using with your computer > Importing images to a computer > Importing images to a computer Importing images to a computer "PlayMemories Home" allows you to easily import images. For details on "PlayMemories Home" functions, see the "PlayMemories Home Help Guide". Importing images to a Windows computer without using "PlayMemories Home" When the AutoPlay Wizard appears after making a USB connection between the camera and a computer, click [Open folder to view files] [OK] [DCIM] or [MP_ROOT] copy the desired images to the computer. If the Device Stage screen appears with Windows 7 or Windows 8, double-click [Browse Files] media icon folder in which the image you want to import is stored. Importing images to a Mac computer without using "PlayMemories Home" Connect the camera to your Mac computer. Double-click the newly recognized icon on the desktop the folder in which the image you want to import is stored. Then drag and drop the image file on to the hard disk icon. Notes Use "PlayMemories Home" for operations such as when importing AVCHD movies to a computer. (Windows) Use the "iMovie" software bundled with Mac for operations such as importing AVCHD movies to a computer. (Mac) If operations are performed on an AVCHD movie file or folder on the camera from a PC while the camera is connected to a PC, it may destroy the image file or playback may become impossible. Do not delete or copy AVCHD movies on the camera's memory card from a PC. Sony bears no responsibility for the result of operations of this type. Copyright 2013 Sony Corporation Back to top 228
-
 1
1 -
2
-
3
-
4
-
5
-
6
-
7
-
8
-
9
-
10
-
11
-
12
-
13
-
14
-
15
-
16
-
17
-
18
-
19
-
20
-
21
-
22
-
23
-
24
-
25
-
26
-
27
-
28
-
29
-
30
-
31
-
32
-
33
-
34
-
35
-
36
-
37
-
38
-
39
-
40
-
41
-
42
-
43
-
44
-
45
-
46
-
47
-
48
-
49
-
50
-
51
-
52
-
53
-
54
-
55
-
56
-
57
-
58
-
59
-
60
-
61
-
62
-
63
-
64
-
65
-
66
-
67
-
68
-
69
-
70
-
71
-
72
-
73
-
74
-
75
-
76
-
77
-
78
-
79
-
80
-
81
-
82
-
83
-
84
-
85
-
86
-
87
-
88
-
89
-
90
-
91
-
92
-
93
-
94
-
95
-
96
-
97
-
98
-
99
-
100
-
101
-
102
-
103
-
104
-
105
-
106
-
107
-
108
-
109
-
110
-
111
-
112
-
113
-
114
-
115
-
116
-
117
-
118
-
119
-
120
-
121
-
122
-
123
-
124
-
125
-
126
-
127
-
128
-
129
-
130
-
131
-
132
-
133
-
134
-
135
-
136
-
137
-
138
-
139
-
140
-
141
-
142
-
143
-
144
-
145
-
146
-
147
-
148
-
149
-
150
-
151
-
152
-
153
-
154
-
155
-
156
-
157
-
158
-
159
-
160
-
161
-
162
-
163
-
164
-
165
-
166
-
167
-
168
-
169
-
170
-
171
-
172
-
173
-
174
-
175
-
176
-
177
-
178
-
179
-
180
-
181
-
182
-
183
-
184
-
185
-
186
-
187
-
188
-
189
-
190
-
191
-
192
-
193
-
194
-
195
-
196
-
197
-
198
-
199
-
200
-
201
-
202
-
203
-
204
-
205
-
206
-
207
-
208
-
209
-
210
-
211
-
212
-
213
-
214
-
215
-
216
-
217
-
218
-
219
-
220
-
221
-
222
-
 223
223 -
 224
224 -
 225
225 -
 226
226 -
 227
227 -
 228
228 -
 229
229 -
 230
230 -
 231
231 -
 232
232 -
 233
233 -
234
-
235
-
236
-
237
-
238
-
239
-
240
-
241
-
242
-
243
-
244
-
245
-
246
-
247
-
248
-
249
-
250
-
251
-
252
-
253
-
254
-
255
-
256
-
257
-
258
-
259
-
260
-
261
-
262
-
263
-
264
-
265
-
266
-
267
 |
 |