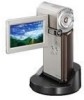
Sony HDR TG1E Operating Instructions - Page 16
To remove your camcorder from the, Handycam Station, To charge the battery pack using only
 |
View all Sony HDR TG1E manuals
Add to My Manuals
Save this manual to your list of manuals |
Page 16 highlights
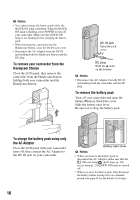
b Notes • You cannot charge the battery pack while the QUICK ON lamp is flashing. When the QUICK ON lamp is flashing, press POWER to turn off your camcorder. Make sure the QUICK ON lamp is not flashing before charging the battery pack. • When inserting the camcorder into the Handycam Station, close the DC IN jack cover. • Disconnect the AC Adaptor from the DC IN jack holding both the Handycam Station and the DC plug. To remove your camcorder from the Handycam Station Close the LCD panel, then remove the camcorder from the Handycam Station holding both your camcorder and the Handycam Station. DC IN jack Open the jack cover DC plug With the v mark on the bottom b Notes • Disconnect the AC Adaptor from the DC IN jack holding both the camcorder and the DC plug. To remove the battery pack Turn off your camcorder and open the battery/Memory Stick Duo cover. Slide the battery eject lever. Be sure not to drop the battery pack. To charge the battery pack using only the AC Adaptor Close the LCD panel with your camcorder turns off, then connect the AC Adaptor to the DC IN jack on your camcorder. Battery eject lever b Notes • When you remove the battery pack or disconnect the AC Adaptor, make sure that the (Movie) lamp/ (Still) lamp (p. 19)/ access lamp (p. 21)/QUICK ON lamp are turned off. • When you store the battery pack, fully discharge the battery before storing it for an extended period (see page 94 for the details of storage). 16
-
 1
1 -
2
-
3
-
4
-
5
-
6
-
7
-
8
-
9
-
10
-
 11
11 -
 12
12 -
 13
13 -
 14
14 -
 15
15 -
 16
16 -
 17
17 -
 18
18 -
 19
19 -
 20
20 -
 21
21 -
22
-
23
-
24
-
25
-
26
-
27
-
28
-
29
-
30
-
31
-
32
-
33
-
34
-
35
-
36
-
37
-
38
-
39
-
40
-
41
-
42
-
43
-
44
-
45
-
46
-
47
-
48
-
49
-
50
-
51
-
52
-
53
-
54
-
55
-
56
-
57
-
58
-
59
-
60
-
61
-
62
-
63
-
64
-
65
-
66
-
67
-
68
-
69
-
70
-
71
-
72
-
73
-
74
-
75
-
76
-
77
-
78
-
79
-
80
-
81
-
82
-
83
-
84
-
85
-
86
-
87
-
88
-
89
-
90
-
91
-
92
-
93
-
94
-
95
-
96
-
97
-
98
-
99
-
100
-
101
-
102
-
103
-
104
-
105
-
106
-
107
-
108
-
109
 |
 |
