Sony HDR TG1E Operating Instructions - Page 21
Step 5: Inserting a “Memory Stick PRO Duo
 |
View all Sony HDR TG1E manuals
Add to My Manuals
Save this manual to your list of manuals |
Page 21 highlights
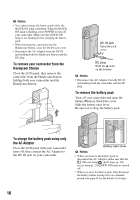
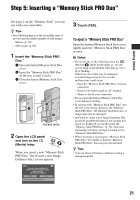
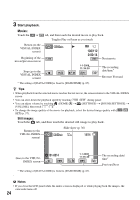
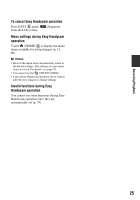
Getting Started Step 5: Inserting a "Memory Stick PRO Duo" See page 2 on the "Memory Stick" you can use with your camcorder. z Tips • See following pages on the recordable time of movies and recordable number of still images. - Movies (p. 10) - Still images (p. 66) 1 Insert the "Memory Stick PRO Duo." 1 Open the battery/Memory Stick Duo cover. 2 Insert the "Memory Stick PRO Duo" all the way in until it clicks. 3 Close the battery/Memory Stick Duo cover. Access lamp 2 Open the LCD panel and turn on the (Movie) lamp. When you insert a new "Memory Stick PRO Duo," the [Create a new Image Database File.] screen appears. 3 Touch [YES]. To eject a "Memory Stick PRO Duo" Open the battery/Memory Stick Duo cover, lightly push the "Memory Stick PRO Duo" in once. b Notes • Do not do any of the following when the (Movie)/ (Still) mode lamps (p. 19), the access lamp or the QUICK ON lamp (p. 15) is lit or flashing. Otherwise, the media may be damaged, recorded images may be lost or other malfunctions could occur. - Eject the "Memory Stick PRO Duo" from the camcorder - Remove the battery pack or AC Adaptor - Shake or knock your camcorder • Do not open the battery/Memory Stick Duo cover during recording. • If you force the "Memory Stick PRO Duo" into the slot in the wrong direction, the "Memory Stick PRO Duo," the Memory Stick Duo slot, or image data may be damaged. • If [Failed to create a new Image Database File. It may be possible that there is not enough free space.] is displayed on step 3, format the "Memory Stick PRO Duo" (p. 58). Note that formatting will delete all data recorded on the "Memory Stick PRO Duo." • When inserting or ejecting the "Memory Stick PRO Duo," be careful so that the "Memory Stick PRO Duo" does not pop out and drop. z Tips • You can shoot still images without creating a management file. 21
-
 1
1 -
2
-
3
-
4
-
5
-
6
-
7
-
8
-
9
-
10
-
11
-
12
-
13
-
14
-
15
-
 16
16 -
 17
17 -
 18
18 -
 19
19 -
 20
20 -
 21
21 -
 22
22 -
 23
23 -
 24
24 -
 25
25 -
 26
26 -
27
-
28
-
29
-
30
-
31
-
32
-
33
-
34
-
35
-
36
-
37
-
38
-
39
-
40
-
41
-
42
-
43
-
44
-
45
-
46
-
47
-
48
-
49
-
50
-
51
-
52
-
53
-
54
-
55
-
56
-
57
-
58
-
59
-
60
-
61
-
62
-
63
-
64
-
65
-
66
-
67
-
68
-
69
-
70
-
71
-
72
-
73
-
74
-
75
-
76
-
77
-
78
-
79
-
80
-
81
-
82
-
83
-
84
-
85
-
86
-
87
-
88
-
89
-
90
-
91
-
92
-
93
-
94
-
95
-
96
-
97
-
98
-
99
-
100
-
101
-
102
-
103
-
104
-
105
-
106
-
107
-
108
-
109
 |
 |
