Sony HTIS100 Operating Instructions - Page 22
Step 4: Connecting the Antenna (Aerial), Connecting the AM loop antenna aerial - speaker stand
 |
UPC - 027242731332
View all Sony HTIS100 manuals
Add to My Manuals
Save this manual to your list of manuals |
Page 22 highlights
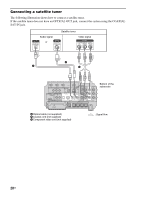
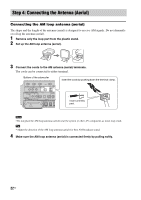
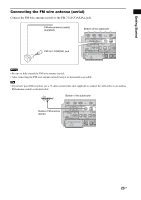
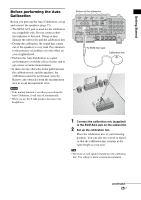
Step 4: Connecting the Antenna (Aerial) Connecting the AM loop antenna (aerial) The shape and the length of the antenna (aerial) is designed to receive AM signals. Do not dismantle or roll up the antenna (aerial). 1 Remove only the loop part from the plastic stand. 2 Set up the AM loop antenna (aerial). 3 Connect the cords to the AM antenna (aerial) terminals. The cords can be connected to either terminal. Bottom of the subwoofer Insert the cords by pushing down the terminal clamp. BD IN DVD IN IR REMOTE SAT IN ANTENNA FM IR IN IR OUT1 IR OUT2 DMPORT ECM-AC2 IR-R100 DC 5V 0.7A MAX 75 COAXIAL OPTICAL TV OUT HDMI AM ASSIGNABLE COAXIAL EZW-T100 TV IN DVD IN SAT IN DIGITAL SPEAKER SAT IN A ONLY F CENTER FRONT R FRONT L Insert until this part. Note • Do not place the AM loop antenna (aerial) near the system or other AV component, as noise may result. Tip • Adjust the direction of the AM loop antenna (aerial) for best AM broadcast sound. 4 Make sure the AM loop antenna (aerial) is connected firmly by pulling softly. 22US
-
 1
1 -
2
-
3
-
4
-
5
-
6
-
7
-
8
-
9
-
10
-
11
-
12
-
13
-
14
-
15
-
16
-
 17
17 -
 18
18 -
 19
19 -
 20
20 -
 21
21 -
 22
22 -
 23
23 -
 24
24 -
 25
25 -
 26
26 -
 27
27 -
28
-
29
-
30
-
31
-
32
-
33
-
34
-
35
-
36
-
37
-
38
-
39
-
40
-
41
-
42
-
43
-
44
-
45
-
46
-
47
-
48
-
49
-
50
-
51
-
52
-
53
-
54
-
55
-
56
-
57
-
58
-
59
-
60
-
61
-
62
-
63
-
64
-
65
-
66
-
67
-
68
-
69
-
70
-
71
-
72
-
73
-
74
-
75
-
76
-
77
-
78
-
79
-
80
-
81
-
82
-
83
-
84
-
85
-
86
-
87
-
88
-
89
-
90
-
91
-
92
-
93
-
94
-
95
-
96
-
97
-
98
-
99
-
100
-
101
-
102
-
103
-
104
-
105
-
106
-
107
-
108
-
109
-
110
-
111
-
112
-
113
-
114
-
115
-
116
-
117
-
118
-
119
-
120
-
121
-
122
-
123
-
124
-
125
-
126
-
127
-
128
-
129
-
130
-
131
-
132
-
133
-
134
-
135
-
136
-
137
-
138
-
139
-
140
-
141
-
142
-
143
-
144
-
145
-
146
-
147
-
148
-
149
-
150
-
151
-
152
-
153
-
154
-
155
-
156
-
157
-
158
-
159
-
160
-
161
-
162
-
163
-
164
-
165
-
166
-
167
-
168
 |
 |
