Sony HTIS100 Operating Instructions - Page 66
Inserting the wireless, transmitter/transceiver, Remove the screws and detach the slot, cover.
 |
UPC - 027242731332
View all Sony HTIS100 manuals
Add to My Manuals
Save this manual to your list of manuals |
Page 66 highlights
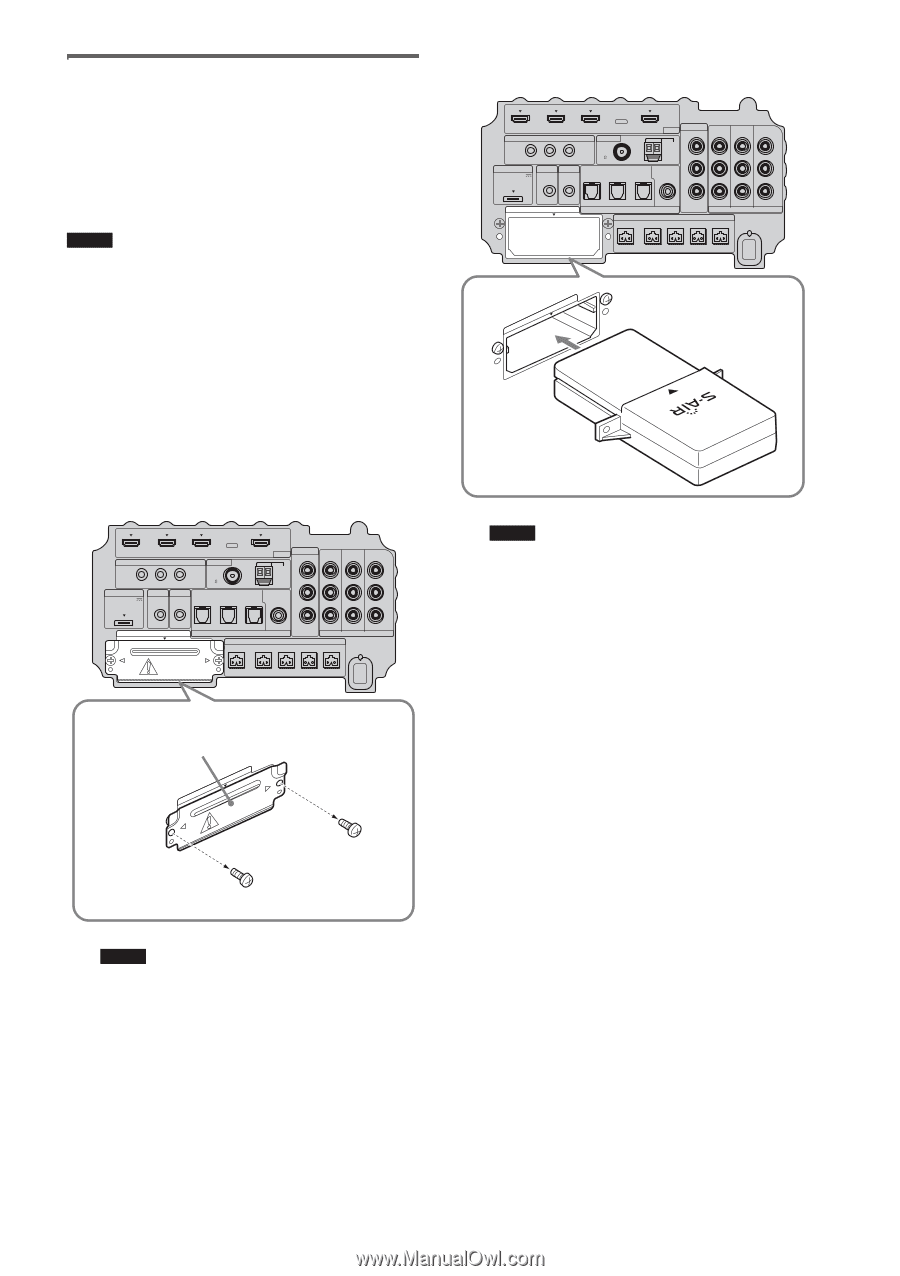
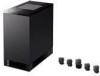
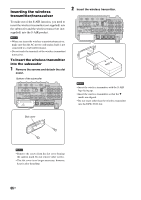
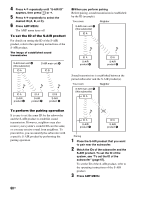
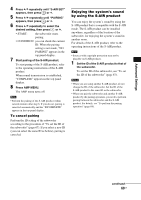
Inserting the wireless transmitter/transceiver To make use of the S-AIR function, you need to insert the wireless transmitter (not supplied) into the subwoofer and the wireless transceiver (not supplied) into the S-AIR product. Notes • When you insert the wireless transmitter/transceiver, make sure that the AC power cord (mains lead) is not connected to a wall outlet (mains). • Do not touch the terminals of the wireless transmitter/ transceiver. To insert the wireless transmitter into the subwoofer 1 Remove the screws and detach the slot cover. Bottom of the subwoofer BD IN DVD IN IR REMOTE SAT IN ANTENNA FM TV OUT HDMI AM VIDEO VIDEO IN DVD IN SAT IN MONITOR OUT Y IR IN IR OUT1 IR OUT2 DMPORT ECM-AC2 IR-R100 DC 5V 0.7A MAX 75 COAXIAL OPTICAL ASSIGNABLE L COAXIAL R EZW-T100 TV IN DVD IN SAT IN DIGITAL SPEAKER SAT IN AUDIO IN ASSIGNABLE ONLY FOR SS-IS15 PB/ CB PR/ CR COMPONENT VIDEO CENTER FRONT R FRONT L SUR R SUR L 2 Insert the wireless transmitter. BD IN DVD IN IR REMOTE SAT IN ANTENNA FM TV OUT HDMI AM VIDEO VIDEO IN DVD IN SAT IN MONITOR OUT Y IR IN IR OUT1 IR OUT2 DMPORT ECM-AC2 IR-R100 DC 5V 0.7A MAX EZW-T100 75 COAXIAL OPTICAL ASSIGNABLE L COAXIAL TV IN DVD IN SAT IN DIGITAL SPEAKER R SAT IN AUDIO IN ASSIGNABLE ONLY FOR SS-IS15 PB/ CB PR/ CR COMPONENT VIDEO CENTER FRONT R FRONT L SUR R SUR L EZW-T100 Notes • Insert the wireless transmitter with the S-AIR logo facing up. • Insert the wireless transmitter so that the V marks are aligned. • Do not insert other than the wireless transmitter into the EZW-T100 slot. Slot cover EZW-T100 Notes • Remove the screws from the slot cover bearing the caution mark. Do not remove other screws. • The slot cover is no longer necessary; however, keep it after detaching. 66US
-
 1
1 -
2
-
3
-
4
-
5
-
6
-
7
-
8
-
9
-
10
-
11
-
12
-
13
-
14
-
15
-
16
-
17
-
18
-
19
-
20
-
21
-
22
-
23
-
24
-
25
-
26
-
27
-
28
-
29
-
30
-
31
-
32
-
33
-
34
-
35
-
36
-
37
-
38
-
39
-
40
-
41
-
42
-
43
-
44
-
45
-
46
-
47
-
48
-
49
-
50
-
51
-
52
-
53
-
54
-
55
-
56
-
57
-
58
-
59
-
60
-
 61
61 -
 62
62 -
 63
63 -
 64
64 -
 65
65 -
 66
66 -
 67
67 -
 68
68 -
 69
69 -
 70
70 -
 71
71 -
72
-
73
-
74
-
75
-
76
-
77
-
78
-
79
-
80
-
81
-
82
-
83
-
84
-
85
-
86
-
87
-
88
-
89
-
90
-
91
-
92
-
93
-
94
-
95
-
96
-
97
-
98
-
99
-
100
-
101
-
102
-
103
-
104
-
105
-
106
-
107
-
108
-
109
-
110
-
111
-
112
-
113
-
114
-
115
-
116
-
117
-
118
-
119
-
120
-
121
-
122
-
123
-
124
-
125
-
126
-
127
-
128
-
129
-
130
-
131
-
132
-
133
-
134
-
135
-
136
-
137
-
138
-
139
-
140
-
141
-
142
-
143
-
144
-
145
-
146
-
147
-
148
-
149
-
150
-
151
-
152
-
153
-
154
-
155
-
156
-
157
-
158
-
159
-
160
-
161
-
162
-
163
-
164
-
165
-
166
-
167
-
168
 |
 |