Sony HTIS100 Operating Instructions - Page 26
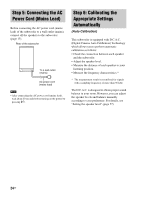
Performing the Auto, Calibration, Press, Press AMP MENU., repeatedly until A. CAL - home theater system
 |
UPC - 027242731332
View all Sony HTIS100 manuals
Add to My Manuals
Save this manual to your list of manuals |
Page 26 highlights
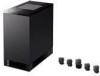
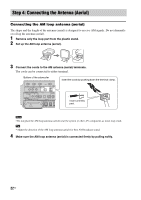
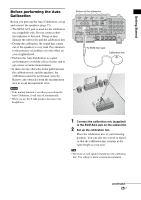
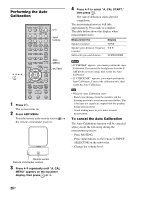
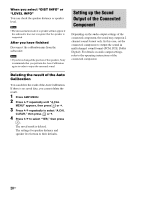
Performing the Auto Calibration C, X, x, c, TV ?/1 THEATER TV INPUT AV ?/1 ?/1 SYSTEM STANDBY TV BD DVD SAT SOUND FIELD VIDEO TUNER/BAND DMPORT BD/DVD TOP MENU MENU F1 F2 JUMP PICTURE WIDE FAVORITE GUIDE 123 TONE 456 NIGHT MODE 789 CLEAR DISPLAY AMP MENU 0 ENTER TOOLS/ OPTIONS MUTING F TV VOL MASTER VOL G g ?/1 Input buttons AMP MENU MUTING f RETURN/EXIT MENU/HOME TV CH - TV CH + PRESET - REPLAY ADVANCE PRESET + .< > < TUNING m TUNING + H M TV X x 1 Press ?/1. The system turns on. 2 Press AMP MENU. Point the remote at the remote sensor ( ) on the remote commander receiver. 4 Press x/X to select "A. CAL START," then press . The Auto Calibration starts after the countdown. The measurement process will take approximately 30 seconds to complete. The table below shows the display when measurement starts. Measurement for Display Speaker existance TONE Speaker gain, distance, frequency T.S.P. response Subwoofer gain and distance SUBWOOFER Notes • If "PHONES" appears, you cannot perform the Auto Calibration. Disconnect the headphones from the SAIR product you are using, then restart the Auto Calibration. • If "CHECK MIC" appears, you cannot perform the Auto Calibration. Connect the calibration mic, then restart the Auto Calibration. Tip • When the Auto Calibration starts: - Stand some distance from the speakers and the listening position to avoid measurement failure. This is because test signals are output from the speakers during measurement. - Avoid making noise to get a more accurate measurement. To cancel the Auto Calibration The Auto Calibration function will be canceled when you do the following during the measurement process: - Press MUTING. - Press input buttons on the remote or INPUT SELECTOR on the subwoofer. - Change the volume level. Remote sensor Remote commander receiver 3 Press x/X repeatedly until "A. CAL MENU" appears on the top panel display, then press or c. 26US
-
 1
1 -
2
-
3
-
4
-
5
-
6
-
7
-
8
-
9
-
10
-
11
-
12
-
13
-
14
-
15
-
16
-
17
-
18
-
19
-
20
-
 21
21 -
 22
22 -
 23
23 -
 24
24 -
 25
25 -
 26
26 -
 27
27 -
 28
28 -
 29
29 -
 30
30 -
 31
31 -
32
-
33
-
34
-
35
-
36
-
37
-
38
-
39
-
40
-
41
-
42
-
43
-
44
-
45
-
46
-
47
-
48
-
49
-
50
-
51
-
52
-
53
-
54
-
55
-
56
-
57
-
58
-
59
-
60
-
61
-
62
-
63
-
64
-
65
-
66
-
67
-
68
-
69
-
70
-
71
-
72
-
73
-
74
-
75
-
76
-
77
-
78
-
79
-
80
-
81
-
82
-
83
-
84
-
85
-
86
-
87
-
88
-
89
-
90
-
91
-
92
-
93
-
94
-
95
-
96
-
97
-
98
-
99
-
100
-
101
-
102
-
103
-
104
-
105
-
106
-
107
-
108
-
109
-
110
-
111
-
112
-
113
-
114
-
115
-
116
-
117
-
118
-
119
-
120
-
121
-
122
-
123
-
124
-
125
-
126
-
127
-
128
-
129
-
130
-
131
-
132
-
133
-
134
-
135
-
136
-
137
-
138
-
139
-
140
-
141
-
142
-
143
-
144
-
145
-
146
-
147
-
148
-
149
-
150
-
151
-
152
-
153
-
154
-
155
-
156
-
157
-
158
-
159
-
160
-
161
-
162
-
163
-
164
-
165
-
166
-
167
-
168
 |
 |