Sony NEX-VG30H "Handycam" Handbook - Page 45
Recording in mirror mode, Recording at a different angle, Adjusting the White Balance
 |
View all Sony NEX-VG30H manuals
Add to My Manuals
Save this manual to your list of manuals |
Page 45 highlights
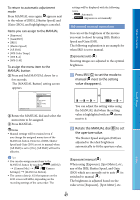
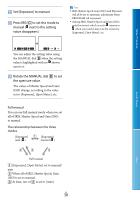
Table of Contents When you connect your camcorder with an HDMI cable (sold separately), the sound of high definition image quality (HD) movies recorded in 5.1ch sound is automatically output in 5.1ch sound. The sound of standard definition image quality (STD) movies is converted to 2ch. Tips You can select the recording sound from [5.1ch Surround] ( ) or [2ch Stereo] ( ) ([Audio Mode], p. 75). You can create a disc, which contains the movies recorded on your camcorder, on a computer using the supplied software "PlayMemories Home." If you play the disc on a 5.1ch surround system, you can enjoy realistic sound. Recording in mirror mode Low angles (START/STOP button on the grip) Search image Open the LCD panel 90 degrees to the camcorder (), then rotate it 180 degrees to the lens side (). Tips A mirror-image of the subject appears on the LCD screen, but the image will be normal when recorded. The camcorder can display an image on either the LCD screen or viewfinder. Recording at a different angle Your camcorder can record in the following angles according to the object. Low angle (START/STOP button on the LCD panel) Tips If you lean close to the viewfinder while [VF/ Panel] is set to [Auto] (p. 84), the eye sensor may turn off the LCD screen. You can avoid this by setting [VF/Panel] to [Panel]. Adjusting the White Balance You can set White Balance (color balance) for accurate white reproduction according to the color temperature of the light source. You can also use this function to adjust color according to the lens you are using. Press WHITE BALANCE. WHITE BALANCE button US 45 Index
-
 1
1 -
2
-
3
-
4
-
5
-
6
-
7
-
8
-
9
-
10
-
11
-
12
-
13
-
14
-
15
-
16
-
17
-
18
-
19
-
20
-
21
-
22
-
23
-
24
-
25
-
26
-
27
-
28
-
29
-
30
-
31
-
32
-
33
-
34
-
35
-
36
-
37
-
38
-
39
-
 40
40 -
 41
41 -
 42
42 -
 43
43 -
 44
44 -
 45
45 -
 46
46 -
 47
47 -
 48
48 -
 49
49 -
 50
50 -
51
-
52
-
53
-
54
-
55
-
56
-
57
-
58
-
59
-
60
-
61
-
62
-
63
-
64
-
65
-
66
-
67
-
68
-
69
-
70
-
71
-
72
-
73
-
74
-
75
-
76
-
77
-
78
-
79
-
80
-
81
-
82
-
83
-
84
-
85
-
86
-
87
-
88
-
89
-
90
-
91
-
92
-
93
-
94
-
95
-
96
-
97
-
98
-
99
-
100
-
101
-
102
-
103
-
104
-
105
-
106
-
107
-
108
-
109
-
110
-
111
-
112
-
113
-
114
-
115
-
116
 |
 |
