Sony RDR-GX310 Operating Instructions - Page 25
Select Guide CH - TV CH, and press, Select Set G-Code Channels
 |
View all Sony RDR-GX310 manuals
Add to My Manuals
Save this manual to your list of manuals |
Page 25 highlights
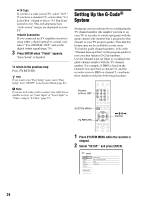
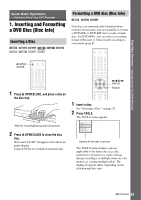
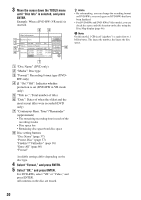
Hookups and Settings 3 Select "Settings," and press ENTER. 4 Select "Set G-Code Channels," and press ENTER. Settings - Set G-Code Channels Guide CH - - ---- TV CH - - Channel list 5 Select "Guide CH - TV CH," and press ENTER. Settings - Set G-Code Channels Guide CH TV CH -- -- ---- -- -- 6 Enter the guide channel number assigned in the program guide using the number buttons, and press SET. Settings - Set G-Code Channels Guide CH TV CH 33 - - ---- - - 33 To return to the previous step Press O RETURN. To check the channel settings When displaying the "Set G-Code Channels" menu, select "Channel List," then press ENTER. The display lists the channels for which the guide channel number does not match the TV channel number. Settings - G-Code Channel List Page1 Guide CH 2 - 4 - 6 - 10 - 11 - 25 - 28 - TV CH 21 32 9 121 13 36 2 Guide CH 45 - 53 - - - - - - - - - - - - - - - - Close TV CH 18 5 - - - - - - To go to the next page, press m. To return to the previous page, press M. 7 Enter the TV channel number using the number buttons, and press SET. Settings - Set G-Code Channels Guide CH TV CH 33 - - ---- -- 5 If you made Hookup A (page 13) or Hookup C (page 15), enter the TV channel number on your cable box. If you made Hookup B (page 14), enter the cable box output channel. See the instructions supplied with your cable box to confirm the cable box's output channel. 8 Repeat steps 5 to 7 for each guide channel number that does not match the TV channel number. 9 Press SYSTEM MENU repeatedly to exit the menu. 25
-
 1
1 -
2
-
3
-
4
-
5
-
6
-
7
-
8
-
9
-
10
-
11
-
12
-
13
-
14
-
15
-
16
-
17
-
18
-
19
-
 20
20 -
 21
21 -
 22
22 -
 23
23 -
 24
24 -
 25
25 -
 26
26 -
 27
27 -
 28
28 -
 29
29 -
 30
30 -
31
-
32
-
33
-
34
-
35
-
36
-
37
-
38
-
39
-
40
-
41
-
42
-
43
-
44
-
45
-
46
-
47
-
48
-
49
-
50
-
51
-
52
-
53
-
54
-
55
-
56
-
57
-
58
-
59
-
60
-
61
-
62
-
63
-
64
-
65
-
66
-
67
-
68
-
69
-
70
-
71
-
72
-
73
-
74
-
75
-
76
-
77
-
78
-
79
-
80
-
81
-
82
-
83
-
84
-
85
-
86
-
87
-
88
-
89
-
90
-
91
-
92
-
93
-
94
-
95
-
96
-
97
-
98
-
99
-
100
-
101
-
102
-
103
-
104
 |
 |
