Sony RDR-GX310 Operating Instructions - Page 78
Audio Settings (Audio), Audio DRC Dynamic Range Control DVDs
 |
View all Sony RDR-GX310 manuals
Add to My Manuals
Save this manual to your list of manuals |
Page 78 highlights
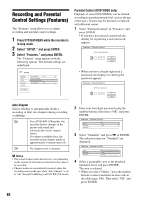
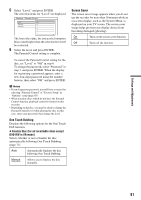
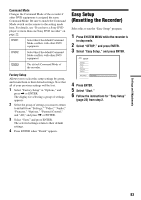
Audio Settings (Audio) The "Audio" setup allows you to adjust the sound according to the playback and connection conditions. 1 Press SYSTEM MENU while the recorder is in stop mode. 2 Select "SETUP," and press ENTER. 3 Select "Audio," and press ENTER. The "Audio" setup appears with the following options. The default settings are underlined. SETUP Settings Video Audio Features Options Audio ATT : Audio DRC : Downmix : Audio Connection Off Standard Dolby Surround Easy Setup Audio ATT (attenuation) If the playback sound is distorted, set this item to "On." The recorder reduces the audio output level. This function affects the output of the following jacks: - LINE OUT (R-AUDIO-L) jacks On Select this when the playback sound from the speakers is distorted. Off Normally select this position. Audio DRC (Dynamic Range Control) (DVDs only) Makes the sound clear when the volume is turned down when playing a DVD that conforms to "Audio DRC." This affects the output from the following jacks: - LINE OUT (R-AUDIO-L) jacks - DIGITAL OUT (OPTICAL or COAXIAL) jack only when "Dolby Digital" is set to "D-PCM" (page 79). Standard Normally select this position. TV Mode Makes low sounds clear even if you turn the volume down. Wide Range Gives you the feeling of being at a live performance. Downmix (DVDs only) Switches the method for mixing down to two channels when you play a DVD which has rear sound elements (channels) or is recorded in Dolby Digital format. For details on the rear signal components, see "4. Displaying the Playing Time and Play Information" on page 34. This function affects the output of the following jacks: - LINE OUT (R-AUDIO-L) jacks - DIGITAL OUT (OPTICAL or COAXIAL) jack when "Dolby Digital" is set to "D-PCM" (page 79). Dolby Surround Normally select this position. Multi-channel audio signals are output to two channels for enjoying surround sounds. Normal Multi-channel audio signals are downmixed to two channels for use with your stereo. 78
-
 1
1 -
2
-
3
-
4
-
5
-
6
-
7
-
8
-
9
-
10
-
11
-
12
-
13
-
14
-
15
-
16
-
17
-
18
-
19
-
20
-
21
-
22
-
23
-
24
-
25
-
26
-
27
-
28
-
29
-
30
-
31
-
32
-
33
-
34
-
35
-
36
-
37
-
38
-
39
-
40
-
41
-
42
-
43
-
44
-
45
-
46
-
47
-
48
-
49
-
50
-
51
-
52
-
53
-
54
-
55
-
56
-
57
-
58
-
59
-
60
-
61
-
62
-
63
-
64
-
65
-
66
-
67
-
68
-
69
-
70
-
71
-
72
-
 73
73 -
 74
74 -
 75
75 -
 76
76 -
 77
77 -
 78
78 -
 79
79 -
 80
80 -
 81
81 -
 82
82 -
 83
83 -
84
-
85
-
86
-
87
-
88
-
89
-
90
-
91
-
92
-
93
-
94
-
95
-
96
-
97
-
98
-
99
-
100
-
101
-
102
-
103
-
104
 |
 |
