Sony RDR-GX310 Operating Instructions - Page 36
Changing the Name of a Recorded Program, Select Title Name, and press ENTER.
 |
View all Sony RDR-GX310 manuals
Add to My Manuals
Save this manual to your list of manuals |
Page 36 highlights
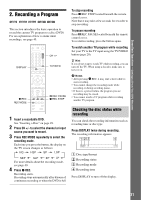
5. Changing the Name of a Recorded Program You can label a DVD, title, or program by entering characters. You can enter up to 64 characters for a title or disc name, but the actual number of characters displayed in the menus such as the Title List will vary. The steps below explain how to change the name of the recorded program. TITLE LIST 123 456 789 0
-
 1
1 -
2
-
3
-
4
-
5
-
6
-
7
-
8
-
9
-
10
-
11
-
12
-
13
-
14
-
15
-
16
-
17
-
18
-
19
-
20
-
21
-
22
-
23
-
24
-
25
-
26
-
27
-
28
-
29
-
30
-
 31
31 -
 32
32 -
 33
33 -
 34
34 -
 35
35 -
 36
36 -
 37
37 -
 38
38 -
 39
39 -
 40
40 -
 41
41 -
42
-
43
-
44
-
45
-
46
-
47
-
48
-
49
-
50
-
51
-
52
-
53
-
54
-
55
-
56
-
57
-
58
-
59
-
60
-
61
-
62
-
63
-
64
-
65
-
66
-
67
-
68
-
69
-
70
-
71
-
72
-
73
-
74
-
75
-
76
-
77
-
78
-
79
-
80
-
81
-
82
-
83
-
84
-
85
-
86
-
87
-
88
-
89
-
90
-
91
-
92
-
93
-
94
-
95
-
96
-
97
-
98
-
99
-
100
-
101
-
102
-
103
-
104
 |
 |

36
5. Changing the Name of a
Recorded Program
You can label a DVD, title, or program by entering
characters. You can enter up to 64 characters for a
title or disc name, but the actual number of
characters displayed in the menus such as the Title
List will vary. The steps below explain how to
change the name of the recorded program.
1
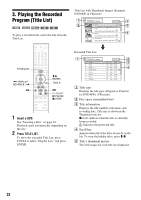
Press TITLE LIST.
2
Select a title, and press ENTER.
The sub-menu appears.
3
Select “Title Name,” and press ENTER.
The display for entering characters appears.
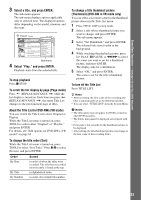
4
Press
<
/
M
/
m
/
,
to move the cursor to
the right of the screen and select “A”
(upper-case), “a” (lower-case), or
“Symbol,” and press ENTER.
The characters of the selected type are
displayed.
5
Press
<
/
M
/
m
/
,
to select the character
you want to enter, and press ENTER.
The selected character appears at the top of
the display.
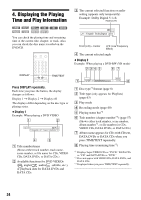
Example: Input Title Name
The type of characters will change according
to the language you select in “Easy Setup.”
Some languages allow you to enter an accent
mark.
To enter a letter with an accent mark, select an
accent followed by the letter.
Example: Select “ ` ” and then “a” to enter “à.”
To insert a space, select “Space.”
6
Repeat steps 4 and 5 to enter the
remaining characters.
To erase a character, move the cursor to the
right of the character at the input row. Select
“Back” and press ENTER.
To insert a character, move the cursor to the
right of the point where you want to insert the
character. Select the character and press
ENTER.
To erase all of the characters, select “Clear
All” and press ENTER.
7
Select “Finish,” and press ENTER.
To cancel the setting, select “Cancel.”
z
Hints
•
You can erase all displayed characters by pressing and
holding CLEAR for 2 seconds or more.
•
You can switch between “A” (upper-case), “a” (lower-
case), or “Symbol” even if you press INPUT SELECT.
1
2
3
4
6
7
8
9
5
0
<
/
M
/
m
/
,
,
ENTER
TITLE LIST
"A"
Cancel
Finish
Space
Clear All
Back
1
2
3
4
5
6
7
8
9
0
Input Title Name
Symbol
"a"
Cancel
Finish
1
2
3
4
5
6
7
8
9
0
Input Title Name
-
c
f
"A"
Symbol
"a"
Space
Clear All
Back
Input row