Sony RDR-GX310 Operating Instructions - Page 79
Audio Connection, Settings and Adjustments
 |
View all Sony RDR-GX310 manuals
Add to My Manuals
Save this manual to your list of manuals |
Page 79 highlights
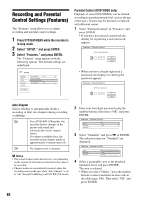
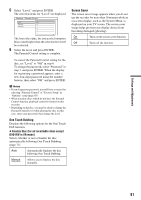
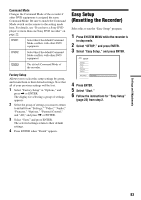
Settings and Adjustments Audio Connection The following setup items switch the method of outputting audio signals when you connect a component such as an amplifier (receiver) with a digital input jack. For connection details, see "Step 4: Connecting the Audio Cords" on page 18. Select "Dolby Digital," "DTS," and "48kHz/ 96kHz PCM" after setting "Digital Out" to "On." If you connect a component that does not accept the selected audio signal, a loud noise (or no sound) will come out from the speakers, and may affect your ears or cause speaker damage. 1 Select "Audio Connection" in "Audio," and press ENTER. Audio - Audio Connection Digital Out : Dolby Digital : DTS : 48kHz/96kHz PCM : On D-PCM Off 48kHz/16bit 2 Select "Digital Out," and press ENTER. On Normally select this position. Off The influence of the digital circuit upon the analog circuit is minimal. 3 Select "On," and press ENTER. 4 Set the digital output signal. • Dolby Digital (DVDs only) Selects the type of Dolby Digital signal. D-PCM Select this when the recorder is connected to an audio component lacking a built-in Dolby Digital decoder. The surround effects of output signals are determined by the "Downmix" setting item in "Audio" setup. Dolby Digital Select this when the recorder is connected to an audio component with a built-in Dolby Digital decoder. • DTS (DVD VIDEO only) Selects whether or not to output DTS signals. On Select this when the recorder is connected to an audio component with a built-in DTS decoder. Off Select this when the recorder is connected to an audio component without a built-in DTS decoder. • 48kHz/96kHz PCM (DVD VIDEO only) Selects the sampling frequency of the audio signal. 48kHz/ 16bit The DVD video audio signal is converted to 48kHz/16bit and output. 96kHz/ 24bit All signals containing 96kHz/ 24bit are output without conversion. However, the signals are output at 48kHz/16bit if copyright-protected signals are contained. b Note "48kHz/96kHz PCM" setting has no effect when audio signals are output from the LINE OUT (R-AUDIO-L) jacks. If the sampling frequency is 96kHz, signals are simply converted to 96kHz analog signals and output. 79
-
 1
1 -
2
-
3
-
4
-
5
-
6
-
7
-
8
-
9
-
10
-
11
-
12
-
13
-
14
-
15
-
16
-
17
-
18
-
19
-
20
-
21
-
22
-
23
-
24
-
25
-
26
-
27
-
28
-
29
-
30
-
31
-
32
-
33
-
34
-
35
-
36
-
37
-
38
-
39
-
40
-
41
-
42
-
43
-
44
-
45
-
46
-
47
-
48
-
49
-
50
-
51
-
52
-
53
-
54
-
55
-
56
-
57
-
58
-
59
-
60
-
61
-
62
-
63
-
64
-
65
-
66
-
67
-
68
-
69
-
70
-
71
-
72
-
73
-
 74
74 -
 75
75 -
 76
76 -
 77
77 -
 78
78 -
 79
79 -
 80
80 -
 81
81 -
 82
82 -
 83
83 -
 84
84 -
85
-
86
-
87
-
88
-
89
-
90
-
91
-
92
-
93
-
94
-
95
-
96
-
97
-
98
-
99
-
100
-
101
-
102
-
103
-
104
 |
 |
