Sony RDR-GX310 Operating Instructions - Page 31
Recording a Program, Checking the disc status while recording, recording
 |
View all Sony RDR-GX310 manuals
Add to My Manuals
Save this manual to your list of manuals |
Page 31 highlights
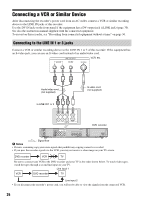
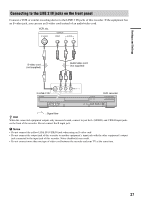
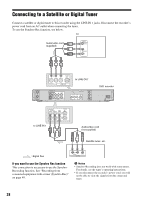
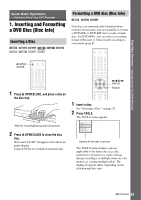
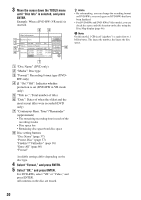
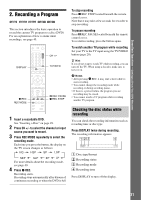
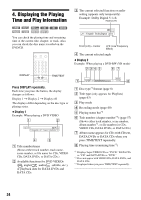
Seven Basic Operations - Getting to Know Your DVD Recorder 2. Recording a Program +RW -RWVR -RWVideo +R -R This section introduces the basic operation to record the current TV program to a disc (DVD). For an explanation of how to make timer recordings, see page 40. DISPLAY 123 456 789 0 CH +/- TV/VIDEO z REC REC MODE X REC PAUSE x REC STOP 1 Insert a recordable DVD. See "Inserting a Disc" on page 29. 2 Press CH +/- to select the channel or input source you want to record. 3 Press REC MODE repeatedly to select the recording mode. Each time you press the button, the display on the TV screen changes as follows: HQ HSP SP LSP SEP SLP EP LP For more details about the recording mode, see page 40. 4 Press z REC. Recording starts. Recording stops automatically after 8 hours of continuous recording or when the DVD is full. To stop recording Press x REC STOP located beneath the remote control cover. Note that it may take a few seconds for recorder to stop recording. To pause recording Press X REC PAUSE located beneath the remote control cover. To restart recording, press the button again. To watch another TV program while recording Set your TV to the TV input using the TV/VIDEO button (page 20). z Hint If you do not want to watch TV while recording, you can turn off the TV. When using a decoder, make sure to leave it on. b Notes • After pressing z REC, it may take a short while to start recording. • You cannot change the recording mode while recording or during recording pause. • If there is a power failure, the program you are recording may be erased. • You cannot watch a TV program while recording another TV program. Checking the disc status while recording You can check the recording information such as recording time or disc type. Press DISPLAY twice during recording. The recording information appears. A Disc type/format B Recording status C Recording mode D Recording time Press DISPLAY to turn off the display. 31
-
 1
1 -
2
-
3
-
4
-
5
-
6
-
7
-
8
-
9
-
10
-
11
-
12
-
13
-
14
-
15
-
16
-
17
-
18
-
19
-
20
-
21
-
22
-
23
-
24
-
25
-
 26
26 -
 27
27 -
 28
28 -
 29
29 -
 30
30 -
 31
31 -
 32
32 -
 33
33 -
 34
34 -
 35
35 -
 36
36 -
37
-
38
-
39
-
40
-
41
-
42
-
43
-
44
-
45
-
46
-
47
-
48
-
49
-
50
-
51
-
52
-
53
-
54
-
55
-
56
-
57
-
58
-
59
-
60
-
61
-
62
-
63
-
64
-
65
-
66
-
67
-
68
-
69
-
70
-
71
-
72
-
73
-
74
-
75
-
76
-
77
-
78
-
79
-
80
-
81
-
82
-
83
-
84
-
85
-
86
-
87
-
88
-
89
-
90
-
91
-
92
-
93
-
94
-
95
-
96
-
97
-
98
-
99
-
100
-
101
-
102
-
103
-
104
 |
 |
