Sony STR-DA4400ES Operating Instructions (Large File - 23.37 MB) - Page 128
To cancel programming, Press RM SET UP to finish
 |
View all Sony STR-DA4400ES manuals
Add to My Manuals
Save this manual to your list of manuals |
Page 128 highlights
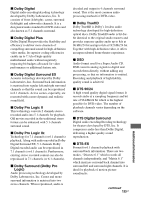
Program the sequence of the operation RM SET UP Input buttons N, x, X, M, m, ., > MACRO 1 MACRO 2 1 Press MACRO 1 or MACRO 2 for more than 1 second while pressing RM SET UP. The RM SET UP button flashes and one of the input buttons lights up (as the initial setting, the VIDEO1 button lights). 2 Press the input button for the component for which you want to program the sequence of operation(s). 3 Press the buttons you want to program in the same sequence as you want the operation(s) to be performed. Press Operations to be programmed N, x, X, M, m, ., > Performs the operation of the button. The input Switches inputs. button for more than 1 second MACRO 1 or MACRO 2 Make a one second interval. When you want to make a longer interval, press MACRO 1 or MACRO 2 repeatedly. The input button selected in step 2 flashes twice, then lights up again. 4 Repeat steps 2 and 3 when you want to program operations for other components. 5 Press RM SET UP to finish the programming process. Tip If the RM SET UP button flashes five times in step 1, and the macro programming process does not start, replace the batteries with new ones. To cancel programming Press RM SET UP. Also, not pressing any button for 60 seconds cancels the settings. The previous command remains valid. 128GB
-
 1
1 -
2
-
3
-
4
-
5
-
6
-
7
-
8
-
9
-
10
-
11
-
12
-
13
-
14
-
15
-
16
-
17
-
18
-
19
-
20
-
21
-
22
-
23
-
24
-
25
-
26
-
27
-
28
-
29
-
30
-
31
-
32
-
33
-
34
-
35
-
36
-
37
-
38
-
39
-
40
-
41
-
42
-
43
-
44
-
45
-
46
-
47
-
48
-
49
-
50
-
51
-
52
-
53
-
54
-
55
-
56
-
57
-
58
-
59
-
60
-
61
-
62
-
63
-
64
-
65
-
66
-
67
-
68
-
69
-
70
-
71
-
72
-
73
-
74
-
75
-
76
-
77
-
78
-
79
-
80
-
81
-
82
-
83
-
84
-
85
-
86
-
87
-
88
-
89
-
90
-
91
-
92
-
93
-
94
-
95
-
96
-
97
-
98
-
99
-
100
-
101
-
102
-
103
-
104
-
105
-
106
-
107
-
108
-
109
-
110
-
111
-
112
-
113
-
114
-
115
-
116
-
117
-
118
-
119
-
120
-
121
-
122
-
 123
123 -
 124
124 -
 125
125 -
 126
126 -
 127
127 -
 128
128 -
 129
129 -
 130
130 -
 131
131 -
 132
132 -
 133
133 -
134
-
135
-
136
-
137
-
138
-
139
-
140
-
141
-
142
-
143
-
144
-
145
-
146
-
147
-
148
-
149
-
150
-
151
-
152
-
153
-
154
-
155
-
156
-
157
-
158
-
159
-
160
-
161
-
162
-
163
-
164
-
165
-
166
-
167
-
168
-
169
-
170
-
171
-
172
-
173
-
174
-
175
-
176
-
177
-
178
-
179
-
180
-
181
-
182
-
183
-
184
-
185
-
186
-
187
-
188
-
189
-
190
-
191
-
192
-
193
-
194
-
195
-
196
-
197
-
198
-
199
-
200
-
201
-
202
-
203
-
204
-
205
-
206
-
207
-
208
-
209
-
210
-
211
-
212
-
213
-
214
-
215
-
216
-
217
-
218
-
219
-
220
-
221
-
222
-
223
-
224
-
225
-
226
-
227
-
228
-
229
-
230
-
231
-
232
-
233
-
234
-
235
-
236
-
237
-
238
-
239
-
240
-
241
-
242
-
243
-
244
-
245
-
246
-
247
-
248
-
249
-
250
-
251
-
252
-
253
-
254
-
255
-
256
-
257
-
258
-
259
-
260
-
261
-
262
-
263
-
264
-
265
-
266
-
267
-
268
-
269
-
270
-
271
-
272
-
273
-
274
-
275
-
276
-
277
-
278
-
279
-
280
-
281
-
282
-
283
-
284
-
285
-
286
-
287
-
288
-
289
-
290
-
291
-
292
-
293
-
294
-
295
-
296
-
297
-
298
 |
 |
