Sony STR-DA4400ES Operating Instructions (Large File - 23.37 MB) - Page 89
Using Other Features, Using “BRAVIA” Sync features
 |
View all Sony STR-DA4400ES manuals
Add to My Manuals
Save this manual to your list of manuals |
Page 89 highlights
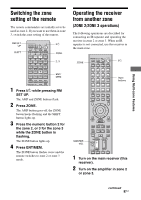
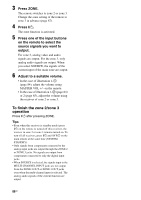
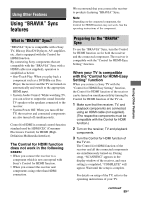
Using Other Features Using Other Features Using "BRAVIA" Sync features What is "BRAVIA" Sync? "BRAVIA" Sync is compatible with a Sony TV, Blu-ray Disc/DVD player, AV amplifier, etc., that is equipped with the Control for HDMI function. By connecting Sony components that are compatible with the "BRAVIA" Sync with a HDMI cable (not supplied), operation is simplified as below: • One-Touch Play: When you play back a component such as a DVD/Blu-ray Disc Player, the receiver and the TV are turned on automatically and switch to the appropriate HDMI input. • System Audio Control: While watching TV, you can select to output the sound from the TV speaker or the speakers connected to the receiver. • System Power Off: When you turn off the TV, the receiver and connected components are also turned off simultaneously. Control for HDMI is a mutual control function standard used by HDMI CEC (Consumer Electronics Control) for HDMI (HighDefinition Multimedia Interface). The Control for HDMI function does not work in the following cases: • When you connect the receiver to a component which is not correspond with Sony's Control for HDMI function. • When you connect the receiver and components using other than HDMI connection. We recommend that you connect the receiver to products featuring "BRAVIA" Sync. Note Depending on the connected component, the Control for HDMI function may not work. See the operating instructions of the component. Preparing for the "BRAVIA" Sync To use the "BRAVIA" Sync, turn the Control for HDMI function on for both the receiver and the connected component. The receiver is compatible with the "Control for HDMI-Easy Setting" function. When your TV is compatible with the "Control for HDMI-Easy Setting" function When you connect a Sony TV with the "Control for HDMI-Easy Setting" function, the Control for HDMI function of the receiver can be turned on simultaneously by turning the Control for HDMI function of the TV on. 1 Make sure that the receiver, TV, and playback components are connected using an HDMI cable (not supplied). (The respective components must be compatible with the Control for HDMI function.) 2 Turn on the receiver, TV and playback components. 3 Turn the Control for HDMI function of the TV on. The Control for HDMI function of the receiver and all the connected components are simultaneously turned on. During setup, "SCANNING" appears in the display window of the receiver, and once setting is completed, "COMPLETE" will appear. Wait until the setup is complete. For details on setup of the TV, refer to the operating instructions of your TV. continued 89GB
-
 1
1 -
2
-
3
-
4
-
5
-
6
-
7
-
8
-
9
-
10
-
11
-
12
-
13
-
14
-
15
-
16
-
17
-
18
-
19
-
20
-
21
-
22
-
23
-
24
-
25
-
26
-
27
-
28
-
29
-
30
-
31
-
32
-
33
-
34
-
35
-
36
-
37
-
38
-
39
-
40
-
41
-
42
-
43
-
44
-
45
-
46
-
47
-
48
-
49
-
50
-
51
-
52
-
53
-
54
-
55
-
56
-
57
-
58
-
59
-
60
-
61
-
62
-
63
-
64
-
65
-
66
-
67
-
68
-
69
-
70
-
71
-
72
-
73
-
74
-
75
-
76
-
77
-
78
-
79
-
80
-
81
-
82
-
83
-
 84
84 -
 85
85 -
 86
86 -
 87
87 -
 88
88 -
 89
89 -
 90
90 -
 91
91 -
 92
92 -
 93
93 -
 94
94 -
95
-
96
-
97
-
98
-
99
-
100
-
101
-
102
-
103
-
104
-
105
-
106
-
107
-
108
-
109
-
110
-
111
-
112
-
113
-
114
-
115
-
116
-
117
-
118
-
119
-
120
-
121
-
122
-
123
-
124
-
125
-
126
-
127
-
128
-
129
-
130
-
131
-
132
-
133
-
134
-
135
-
136
-
137
-
138
-
139
-
140
-
141
-
142
-
143
-
144
-
145
-
146
-
147
-
148
-
149
-
150
-
151
-
152
-
153
-
154
-
155
-
156
-
157
-
158
-
159
-
160
-
161
-
162
-
163
-
164
-
165
-
166
-
167
-
168
-
169
-
170
-
171
-
172
-
173
-
174
-
175
-
176
-
177
-
178
-
179
-
180
-
181
-
182
-
183
-
184
-
185
-
186
-
187
-
188
-
189
-
190
-
191
-
192
-
193
-
194
-
195
-
196
-
197
-
198
-
199
-
200
-
201
-
202
-
203
-
204
-
205
-
206
-
207
-
208
-
209
-
210
-
211
-
212
-
213
-
214
-
215
-
216
-
217
-
218
-
219
-
220
-
221
-
222
-
223
-
224
-
225
-
226
-
227
-
228
-
229
-
230
-
231
-
232
-
233
-
234
-
235
-
236
-
237
-
238
-
239
-
240
-
241
-
242
-
243
-
244
-
245
-
246
-
247
-
248
-
249
-
250
-
251
-
252
-
253
-
254
-
255
-
256
-
257
-
258
-
259
-
260
-
261
-
262
-
263
-
264
-
265
-
266
-
267
-
268
-
269
-
270
-
271
-
272
-
273
-
274
-
275
-
276
-
277
-
278
-
279
-
280
-
281
-
282
-
283
-
284
-
285
-
286
-
287
-
288
-
289
-
290
-
291
-
292
-
293
-
294
-
295
-
296
-
297
-
298
 |
 |
