Sony STR-DA90ESG Operating Instructions - Page 10
nominal, impedance, IMPEDANCE, SELECTOR, speaker, drive, SPEAKERS, selector, Notes, Front, Speakers
 |
View all Sony STR-DA90ESG manuals
Add to My Manuals
Save this manual to your list of manuals |
Page 10 highlights
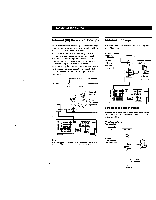
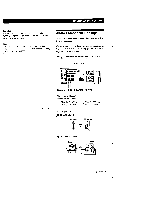
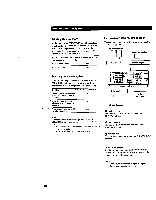
Hooking Up the System Selecting the impedance Set the IMPEDANCE SELECTOR for all the speakers as indicated in the table below. Check the instruction manual of your speakers if you're not sure of the impedance. (This information is usually printed on a label on the back of the speaker.) If nominal impedance of Set IMPEDANCE SELECTOR your speaker is to Between 4 and 8 ohms 4 8 ohms or higher 8 For even more powerful amplification You can enjoy more powerful sond by connecting three additional amplifiers. • Front speakers 0 Center Speaker First amplifier Second amplifier Selecting the speaker system If you conned only one set of front speakers, set the SPEAKERS selector on the front panel to A. If you connect two sets of front speakers, see the following: To drive Set SPEAKERS selector to Speaker system A (connected A to the FRONT SPEAKERS A terminals) Speaker system B (connected B to the FRONT SPEAKERS B terminals) Both speaker systems A and B (parallel connection) A+B Notes When you connect 2 sets of front speakers and set the SPEAKERS selector on the front panel to A + B, make sure that: • The nominal impedance of the both sets of speakers are 8 ohms or higher. • The IMPEDANCE SELECTOR is set to 4 SI. 0 MM E 0.4 1-4 0 0 0 0 000 Third amplifier _1_ L Active Woofer(s) 0 Rear Speakers 0 Front Speakers The front signals are output from the PRE OUT FRONT terminals. o Center Speaker The center signals are output from the PRE OUT CENTER terminal. o Rear Speakers The rear signals are output from the PRE OUT REAR terminals. To adjust the volume - Set the volume of the additional amplifiers to the maximum position, and adjust the volume with the volume control of the receiver. Note For best results, we recommend that you use equivalent amplifiers to boost front, center, and rear outputs. 10
-
 1
1 -
2
-
3
-
4
-
 5
5 -
 6
6 -
 7
7 -
 8
8 -
 9
9 -
 10
10 -
 11
11 -
 12
12 -
 13
13 -
 14
14 -
 15
15 -
16
-
17
-
18
-
19
-
20
-
21
-
22
-
23
-
24
-
25
-
26
-
27
-
28
-
29
-
30
-
31
-
32
-
33
-
34
-
35
-
36
-
37
-
38
-
39
-
40
-
41
-
42
-
43
-
44
-
45
-
46
-
47
-
48
-
49
-
50
-
51
-
52
-
53
-
54
-
55
-
56
-
57
-
58
-
59
-
60
-
61
-
62
 |
 |
