Sony STR-DA90ESG Operating Instructions - Page 45
rintikial, nettUtal, lormistr-r, iliPitillt7rEomom, armussmummumws, ELINIIIIPEMMINIONINN, NUAIMMINI
 |
View all Sony STR-DA90ESG manuals
Add to My Manuals
Save this manual to your list of manuals |
Page 45 highlights
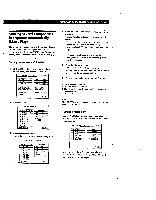
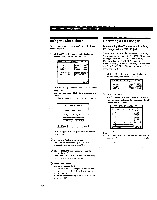
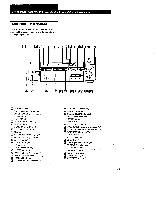
Additional Operations and Settings Indexing a CD You can specify the names up to 12 characters for each CD (up to 200 discs) or group of discs in a CD changer. 1 Click SETUP in the main menu, then click CD INDEX. 2 • To name a disc, click TITLE. And then Click 1. or 4. to display the number of the disc to be named, then click the disc. CD INDEX SETTING 9 10 t RETURN I DATA LOAD I TRLE GROUP SELECT I6 EXIT • To name a group, click GROUP, then click the group to be named. CD INDEX SETTING GROUP 1 2 GROUP 2 4 3 • GROUP 3 DATA 4 ; LOAD 5 e GROUP 7 TITLE GROUP 8 GROUP 8 SELECT 9 GROUP 9 10 GROUP 10 RETURN I IP EXIT 3 Create the new name by clicking each character. The name is automatically stored. To enter a space, click the space bar. If you made a mistake, click for yto move the cursor to the character to be changed, then click the correct character. CD INDEX SETTING Grouping CDs You can assign your CDs to one or more groups. • 1 Click SETUP in the main menu, then click CD INDEX. 2 Click SELECT, then click the disc you want to assign to a new group. If the disc you want does not appear, click * or liUW NrEMaU'NM=WIW OR:-r.7:,77.7:.1::1*r1icnn7Ae1tlti.t1ikUk1ia.ta8ai1lll DATA liEaNloiLrUPmrINAmiuIItIIsiIIIilIPsslIMtmE7tMrMur-MIEmrIIIkIoNmI-I:II:mO;uISIImINNIoIIIwINImIMINsIII 6lit1E2EM50E 111=111 3 Click the names of the groups to which you want to assign the CD. illIEMLIGIMIMIIM IIIIKIIIMJC.67211MIIIII litillitlf MEMNON IIIMIIIII IIININI IIIIMINED2AUINIIII Itifillil l INLIIIME:XQUIMMINI IIIIRESI IIIIIIM IIIIIIII II To remove the CD from one or more groups Click the highlighted group name so that it goes out in step 3. You can assign the CD to one or more group For example, to assign the CD to both "GROUP 1" and "GROUP 4," click both group names in step 3. A B C F G H K M P A U Vw CAPS RETURN I D E N 0 S T 4 5 6 7 8 9 0 IE EXIT Space bar (continued) 45
-
 1
1 -
2
-
3
-
4
-
5
-
6
-
7
-
8
-
9
-
10
-
11
-
12
-
13
-
14
-
15
-
16
-
17
-
18
-
19
-
20
-
21
-
22
-
23
-
24
-
25
-
26
-
27
-
28
-
29
-
30
-
31
-
32
-
33
-
34
-
35
-
36
-
37
-
38
-
39
-
 40
40 -
 41
41 -
 42
42 -
 43
43 -
 44
44 -
 45
45 -
 46
46 -
 47
47 -
 48
48 -
 49
49 -
 50
50 -
51
-
52
-
53
-
54
-
55
-
56
-
57
-
58
-
59
-
60
-
61
-
62
 |
 |
