Sony STR-DA90ESG Operating Instructions - Page 51
Recording
 |
View all Sony STR-DA90ESG manuals
Add to My Manuals
Save this manual to your list of manuals |
Page 51 highlights
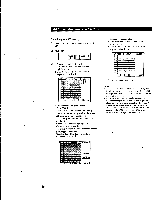
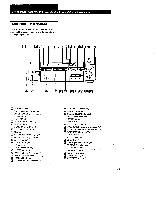
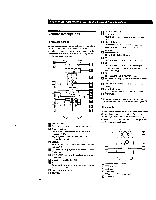
Front Panel Operations (Remote Short-cuts: USA and Canada only) Tuning preset stations (Preset Tuning) 1 Turn FUNCTION to display "TUNER". 2 Press SHIFT to select a memory page (A, B or C). 3 Press PRESET TUNING + or - repeatedly to select the station you want. Each time you press the buttons, the preset numbers change as follows: •al.L0C9...C24-.C1 Note If the AC power cord is disconnected for about 1 week, the preset stations will be cleared. Preset the stations again. Recording For the on-screen operations, see page 29. 1 Turn FUNCTION to select the playback component you want to record. 2 Insert a blank tape into the recording component and adjust the recording level, if necessary. 3 Start recording on the recording component, then start playing the playback component. To stop recording Stop both components. Replacing audio while recording a video component (Front panel only) 1 Follow steps 1 to 3 of "Playing audio and video components at the same time" on page 49. 2 Insert a blank video tape into the recording VCR. 3 Start recording on the recording VCR, then start playing both the video and audio components you want to record. To change the video component in step 3 Press MODE to display "V: ...." (VISUAL MODE) and select the other video component within 8 seconds. To record other audio on a specific part of video 1 Pause the video component at the point where you want to record the other audio. 2 Press MODE to display "A:...." (AUDIO MODE), then select the audio component you want. 3 Start recording on the recording VCR, release the pause mode and start playing the audio component. To resume recording the original sound, press MODE to display "A:..." (AUDIO MODE) and select the original source. (continued) 51
-
 1
1 -
2
-
3
-
4
-
5
-
6
-
7
-
8
-
9
-
10
-
11
-
12
-
13
-
14
-
15
-
16
-
17
-
18
-
19
-
20
-
21
-
22
-
23
-
24
-
25
-
26
-
27
-
28
-
29
-
30
-
31
-
32
-
33
-
34
-
35
-
36
-
37
-
38
-
39
-
40
-
41
-
42
-
43
-
44
-
45
-
 46
46 -
 47
47 -
 48
48 -
 49
49 -
 50
50 -
 51
51 -
 52
52 -
 53
53 -
 54
54 -
 55
55 -
 56
56 -
57
-
58
-
59
-
60
-
61
-
62
 |
 |
