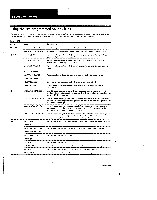
Sony STR-DA90ESG Operating Instructions - Page 29
recording, control, recorder, after, return, Digital, Notes, click, RECORDER, controls, while,
 |
View all Sony STR-DA90ESG manuals
Add to My Manuals
Save this manual to your list of manuals |
Page 29 highlights
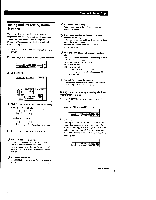
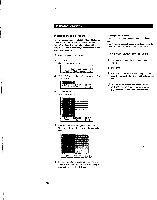
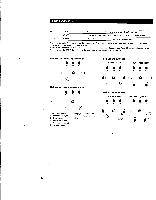
Playback/Recording Recording You can control both playback and recording components using the receiver's on-screen display. If necessary, see the instructions of your recording component. MI Recording to audio tape or MD 1 Click FUNCTION in the main menu. 2 Click the playback component you want (e.g., CD). 3 Click SUB. INPpUiTortH rUHSE: .14► PPM 4 Click REC EDIT. DISC TRACK D. SKIP 12 345 6 7 8 9 >1 ENTER E. EXIT INPUT SUB USER $) 44 IP* 144 5 Click a recording component (e.g., TAPE). PLAYS FI MEMI RECORDER Mar; 741111 EMI The control buttons for both components appear. "PLAYER" for the playback component, and "RECORDER" for the recording component. The arrow indicates the operative component. arrow FUNCTION I SOUND I. I SETUP PLAYER CD Liij, REC RDERI TAPE -.a 1". 11.1L". A B 1.11 034 REC] E. EXIT 6 Insert a blank tape into the recording component (tape deck, etc.) and adjust the recording level, if necessary. 7 Click REC to start recording, then click the play button (110-) on the PLAYER control. Recording starts. Do not click any RECORDER controls while recording. This will cut off the source being recorded. FUNCTION I SOUND SETUP PLAYER RECORDER A B CD .22j TAPE I EXIT To stop recording Click the recording component's • control. To control the recorder after recording Click RECORDER. RECORDER becomes the operative component and you can use the RECORDER controls to rewind and playback the recording (etc.). Click PLAYER to operate the playback component. To return to the main menu Click EXIT. Digital recording If you connect your CD player and DAT(or MD) deck using digital connections (see page 12) and specify the OPTICAL jacks for both components (see page 25), the previous operations will let you make digital recordings from CD to DAT (or MD). Notes • Signals input to the DIGITAL input jacks cannot be recorded through analog connections (i.e., to record a CD onto a cassette tape, the CD player must be connected to the receiver's analog (L and R) input terminals). • If you leave the REC EDIT menu by clicking FUNCTION, SOUND, or EXIT, recording continues, but control returns to the PLAYER side, even if you previously clicked RECORDER. • Some tape decks require that you press the • REC and IPbuttons simultaneously to start recording. To perform one-button recording from the on-screen display, be sure to record the recording signal as shown in steps 1 to 7 of "Registering IR codes" (pages 19 to 21). • When you record on a component connected to the DAT/ MD REC OUT, TAPE REC OUT or VIDEO 1, 2 OUT jacks, sound adjustments do not affect the recording. (continued) 29
-
 1
1 -
2
-
3
-
4
-
5
-
6
-
7
-
8
-
9
-
10
-
11
-
12
-
13
-
14
-
15
-
16
-
17
-
18
-
19
-
20
-
21
-
22
-
23
-
 24
24 -
 25
25 -
 26
26 -
 27
27 -
 28
28 -
 29
29 -
 30
30 -
 31
31 -
 32
32 -
 33
33 -
 34
34 -
35
-
36
-
37
-
38
-
39
-
40
-
41
-
42
-
43
-
44
-
45
-
46
-
47
-
48
-
49
-
50
-
51
-
52
-
53
-
54
-
55
-
56
-
57
-
58
-
59
-
60
-
61
-
62
 |
 |
