TP-Link AC2300 Archer C2300EU V1 User Guide - Page 102
System Log, Enable Remote Management for Specified Devices
 |
View all TP-Link AC2300 manuals
Add to My Manuals
Save this manual to your list of manuals |
Page 102 highlights
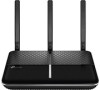
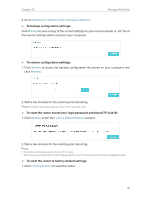
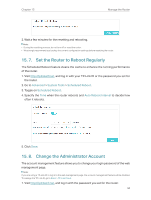
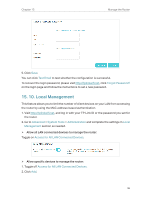
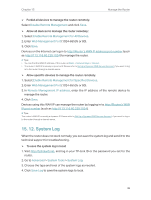
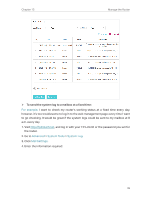
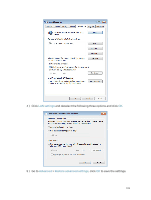
Chapter 15 Manage the Router ¾¾ Forbid all devices to manage the router remotely: Select Disable Remote Management and click Save. ¾¾ Allow all devices to manage the router remotely: 1. Select Enable Remote Management for All Devices. 2. Enter Web Management Port (1024-65535 or 80). 3. Click Save. Devices on the Internet can log in to http://Router's WAN IP address:port number (such as http://113.116.60.229:1024) to manage the router. Tips: • You can find the WAN IP address of the router on Basic > Network Maps > Internet. • The router's WAN IP is usually a dynamic IP. Please refer to Set Up a Dynamic DNS Service Account if you want to log in to the router through a domain name. ¾¾ Allow specific devices to manage the router remotely: 1. Select Enable Remote Management for Specified Devices. 2. Enter Web Management Port (1024-65535 or 80). 3. In Remote Management IP address, enter the IP address of the remote device to manage the router. 4. Click Save. Devices using this WAN IP can manage the router by logging in to http://Router's WAN IP:port number (such as http://113.116.60.229:1024). Tips: The router's WAN IP is usually a dynamic IP. Please refer to Set Up a Dynamic DNS Service Account if you want to log in to the router through a domain name. 15. 12. System Log When the router does not work normally, you can save the system log and send it to the technical support for troubleshooting. ¾¾ To save the system log in local: 1. Visit http://tplinkwifi.net, and log in your TP-Link ID or the password you set for the router. 2. Go to Advanced > System Tools > System Log. 3. Choose the type and level of the system logs as needed. 4. Click Save Log to save the system logs to local. 98
-
 1
1 -
2
-
3
-
4
-
5
-
6
-
7
-
8
-
9
-
10
-
11
-
12
-
13
-
14
-
15
-
16
-
17
-
18
-
19
-
20
-
21
-
22
-
23
-
24
-
25
-
26
-
27
-
28
-
29
-
30
-
31
-
32
-
33
-
34
-
35
-
36
-
37
-
38
-
39
-
40
-
41
-
42
-
43
-
44
-
45
-
46
-
47
-
48
-
49
-
50
-
51
-
52
-
53
-
54
-
55
-
56
-
57
-
58
-
59
-
60
-
61
-
62
-
63
-
64
-
65
-
66
-
67
-
68
-
69
-
70
-
71
-
72
-
73
-
74
-
75
-
76
-
77
-
78
-
79
-
80
-
81
-
82
-
83
-
84
-
85
-
86
-
87
-
88
-
89
-
90
-
91
-
92
-
93
-
94
-
95
-
96
-
 97
97 -
 98
98 -
 99
99 -
 100
100 -
 101
101 -
 102
102 -
 103
103 -
 104
104 -
 105
105 -
 106
106 -
 107
107 -
108
-
109
-
110
-
111
-
112
-
113
-
114
-
115
-
116
-
117
-
118
-
119
-
120
 |
 |