TP-Link TL-PS110U User Guide - Page 44
Setting Up a Macintosh Computer, ATALK_PS, Generic PPD - printer support list
 |
UPC - 845973031008
View all TP-Link TL-PS110U manuals
Add to My Manuals
Save this manual to your list of manuals |
Page 44 highlights
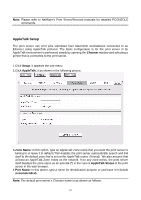
-xxxxxx-1, where xxxxxx represents the last six digits of the device's Node ID. For example: ATALK_PS-40EEED-1. You may also change the to a name you like for identification purpose in this option. The print server will append the last six digits to the name you specify. 5. Printer Type: In this option, the LaserWriter of printer type by default (recommended). 6.Data Format: In this option, data format includes ASCII, TBCP and BCP. Setting Up a Macintosh Computer 1. At a Macintosh computer, from the Apple menu, select Chooser. 2. The Chooser window then displays an Apple Zone list. Select the Zone name that you specified when configuring the PRINT SERVER. Note: If you select a Zone that the PRINT SERVER doesn't belong to, as you specified in the previous section, no print server will be displayed in the Step 4. 3. If you are using a PostScript printer you can select the LaserWriter 8 icon. 4. The Chooser window then displays PRINT SERVER (s) featuring the support for AppleTalk protocol, along with its default Chooser Name in the right-hand Select A PostScript Printer dialog box. Note: 1.You may change the default Chooser name and Zone name of a PRINT SERVER by using your web browser before proceeding with this installation. Please see the previous section in this chapter for details. 2. If you use Mac OS 8.x or 9.x, please make sure your printer support PostScript. 5. Click Setup... button and choose the PPD file matching your printer, and click OK. If your printer does not appear in the PPD file list, please contact your printer vendor. You may also use the Generic PPD if you do not need any printer specific features. 6. Close the Chooser Windows. 7. Done. SNMP Setup 44
-
 1
1 -
2
-
3
-
4
-
5
-
6
-
7
-
8
-
9
-
10
-
11
-
12
-
13
-
14
-
15
-
16
-
17
-
18
-
19
-
20
-
21
-
22
-
23
-
24
-
25
-
26
-
27
-
28
-
29
-
30
-
31
-
32
-
33
-
34
-
35
-
36
-
37
-
38
-
 39
39 -
 40
40 -
 41
41 -
 42
42 -
 43
43 -
 44
44 -
 45
45 -
 46
46 -
 47
47 -
 48
48 -
 49
49 -
50
-
51
-
52
-
53
-
54
-
55
-
56
-
57
-
58
-
59
-
60
-
61
-
62
-
63
-
64
-
65
-
66
-
67
-
68
-
69
-
70
-
71
-
72
-
73
-
74
-
75
-
76
-
77
-
78
-
79
 |
 |
