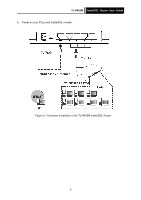
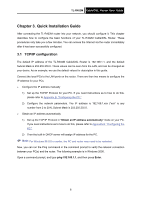
TP-Link TL-R402M User Guide - Page 17
TL-R402M, Static IP, IP Address, Subnet Mask, Default Gateway, Primary, Secondary DNS, Finish, Quick
 |
UPC - 696726402015
View all TP-Link TL-R402M manuals
Add to My Manuals
Save this manual to your list of manuals |
Page 17 highlights
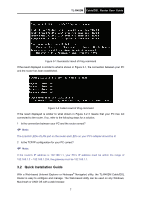
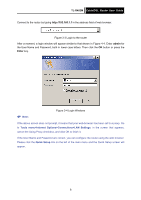
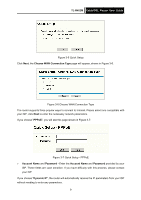
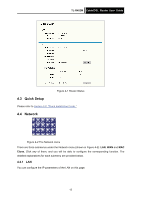
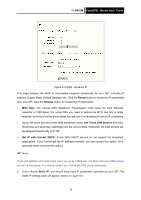
TL-R402M Cable/DSL Router User Guide If you Choose "Static IP", the Static IP settings page will appear, shown in Figure 3-8: Figure 3-8 Quick Setup - Static IP ¾ IP Address - This is the WAN IP address as seen by external users on the Internet (including your ISP). Enter the IP address into the field ¾ Subnet Mask - The Subnet Mask is used for the WAN IP address, it is usually 255.255.255.0 ¾ Default Gateway - Enter the gateway into the box if required ¾ Primary DNS - Enter the DNS Server IP address into the boxes if required ¾ Secondary DNS - If your ISP provides another DNS server, enter it into this field ) Note: The IP parameters should have been provided by your ISP. Click the Next button, then you will see the Finish page: Figure 3-9 Quick Setup - Finish After finishing all configurations of basic network parameters, please click Finish button to exit this Quick Setup. 10
-
 1
1 -
2
-
3
-
4
-
5
-
6
-
7
-
8
-
9
-
10
-
11
-
 12
12 -
 13
13 -
 14
14 -
 15
15 -
 16
16 -
 17
17 -
 18
18 -
 19
19 -
 20
20 -
 21
21 -
 22
22 -
23
-
24
-
25
-
26
-
27
-
28
-
29
-
30
-
31
-
32
-
33
-
34
-
35
-
36
-
37
-
38
-
39
-
40
-
41
-
42
-
43
-
44
-
45
-
46
-
47
-
48
-
49
-
50
-
51
-
52
-
53
-
54
-
55
-
56
-
57
-
58
-
59
-
60
-
61
 |
 |
