TP-Link TL-R402M User Guide - Page 52
Cable/DSL Router User Guide - installation
 |
UPC - 696726402015
View all TP-Link TL-R402M manuals
Add to My Manuals
Save this manual to your list of manuals |
Page 52 highlights
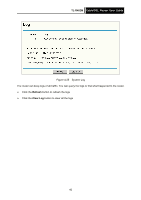
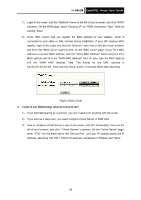
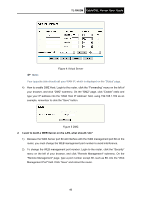
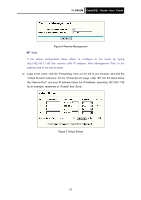
TL-R402M Cable/DSL Router User Guide 1) Login to the router, click the "Network" menu on the left of your browser, and click "WAN" submenu. On the WAN page, select "Dynamic IP" for "WAN Connection Type", finish by clicking "Save". 2) Some ISPs require that you register the MAC address of your adapter, which is connected to your cable or DSL modem during installation. If your ISP requires MAC register, login to the router and click the "Network" menu link on the left of your browser, and then click "MAC Clone" submenu link. On the "MAC Clone" page, if your PC's MAC address is a proper MAC address, click the "Clone MAC Address" button and your PC's MAC address will fill in the "WAN MAC Address" field. Or else, type the MAC address into the "WAN MAC Address" field. The format for the MAC address is XX-XX-XX-XX-XX-XX. Then click the "Save" button. It will take effect after rebooting. Figure 3 MAC Clone 3. I want to use Netmeeting, what do I need to do? 1) If you start Netmeeting as a sponsor, you don't need to do anything with the router. 2) If you start as a responsor, you need configure Virtual Server or DMZ Host. 3) How to configure Virtual Server: Login to the router, click the "Forwarding" menu on the left of your browser, and click " Virtual Servers" submenu. On the "Virtual Server" page, enter "1720" into the blank below the "Service Port", and your IP address below the IP Address, assuming 192.168.1.169 for an example, remember to "Enable" and "Save". 45
-
 1
1 -
2
-
3
-
4
-
5
-
6
-
7
-
8
-
9
-
10
-
11
-
12
-
13
-
14
-
15
-
16
-
17
-
18
-
19
-
20
-
21
-
22
-
23
-
24
-
25
-
26
-
27
-
28
-
29
-
30
-
31
-
32
-
33
-
34
-
35
-
36
-
37
-
38
-
39
-
40
-
41
-
42
-
43
-
44
-
45
-
46
-
 47
47 -
 48
48 -
 49
49 -
 50
50 -
 51
51 -
 52
52 -
 53
53 -
 54
54 -
 55
55 -
 56
56 -
 57
57 -
58
-
59
-
60
-
61
 |
 |
