TP-Link TL-R402M User Guide - Page 54
Virtual Server
 |
UPC - 696726402015
View all TP-Link TL-R402M manuals
Add to My Manuals
Save this manual to your list of manuals |
Page 54 highlights
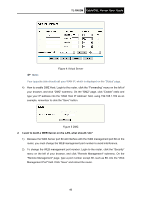
TL-R402M Cable/DSL Router User Guide ) Note: Figure 6 Remote Management If the above configuration takes effect, to configure to the router by typing http://192.168.1.1:88 (the router's LAN IP address: Web Management Port) in the address field of the web browser. 3) Login to the router, click the "Forwarding" menu on the left of your browser, and click the "Virtual Servers" submenu. On the "Virtual Server" page, enter "80" into the blank below the "Service Port", and your IP address below the IP Address, assuming 192.168.1.188 for an example, remember to "Enable" and "Save". Figure 7 Virtual Server 47
-
 1
1 -
2
-
3
-
4
-
5
-
6
-
7
-
8
-
9
-
10
-
11
-
12
-
13
-
14
-
15
-
16
-
17
-
18
-
19
-
20
-
21
-
22
-
23
-
24
-
25
-
26
-
27
-
28
-
29
-
30
-
31
-
32
-
33
-
34
-
35
-
36
-
37
-
38
-
39
-
40
-
41
-
42
-
43
-
44
-
45
-
46
-
47
-
48
-
 49
49 -
 50
50 -
 51
51 -
 52
52 -
 53
53 -
 54
54 -
 55
55 -
 56
56 -
 57
57 -
 58
58 -
 59
59 -
60
-
61
 |
 |

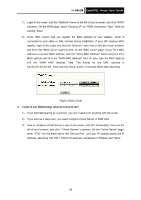
TL-R402M
Cable/DSL Router User Guide
47
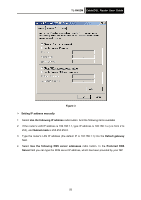
Figure 6 Remote Management
)
Note:
If the above configuration takes effect, to configure to the router by typing
http://192.168.1.1:88 (the router’s LAN IP address: Web Management Port) in the
address field of the web browser.
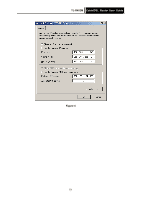
3)
Login to the router, click the “Forwarding” menu on the left of your browser, and click the
"Virtual Servers" submenu. On the "Virtual Server" page, enter “80” into the blank below
the “Service Port”, and your IP address below the IP Address, assuming 192.168.1.188
for an example, remember to “Enable” and “Save”.
Figure 7 Virtual Server