TP-Link TL-R600VPN TL-R600VPN V1 User Guide - Page 36
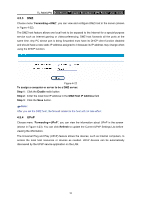
step 1, System Tools -> Remote Management
 |
View all TP-Link TL-R600VPN manuals
Add to My Manuals
Save this manual to your list of manuals |
Page 36 highlights
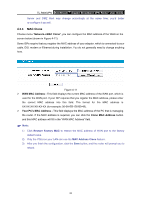
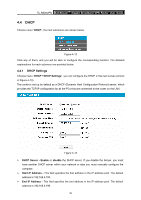
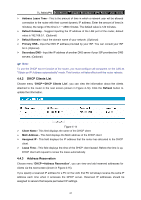
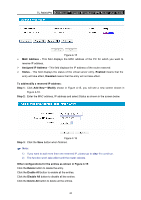
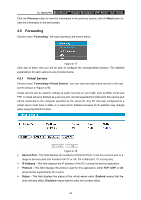
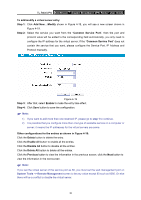
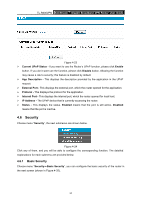
TL-R600VPN SafeStreamTM Gigabit Broadband VPN Router User Guide To add/modify a virtual server entry: Step 1: Click Add New.../Modify shown in Figure 4-18, you will see a new screen shown in Figure 4-19. Step 2: Select the service you want from the "Common Service Port", then the port and protocol value will be added to the corresponding field automatically, you only need to configure the IP address for the virtual server; If the "Common Service Port" does not contain the service that you want, please configure the Service Port, IP Address and Protocol manually. Figure 4-19 Step 3: After that, select Enable to make the entry take effect. Step 4: Click Save button to save the configuration. ) Note: 1) If you want to add more than one reserved IP, please go to step 1 to continue. 2) It is possible that you configure more than one type of available service on a computer or server; it means the IP addresses for the virtual servers are same. Other configurations for the entries as shown in Figure 4-18: Click the Delete button to delete the entry. Click the Enable All button to enable all the entries. Click the Disable All button to disable all the entries. Click the Delete All button to delete all the entries. Click the Previous button to view the information in the previous screen, click the Next button to view the information in the next screen. ) Note: If you set the virtual server of the service port as 80, you must set the web management port on System Tools -> Remote Management screen to be any value except 80 such as 8080. Or else there will be a conflict to disable the virtual server. 30
-
 1
1 -
2
-
3
-
4
-
5
-
6
-
7
-
8
-
9
-
10
-
11
-
12
-
13
-
14
-
15
-
16
-
17
-
18
-
19
-
20
-
21
-
22
-
23
-
24
-
25
-
26
-
27
-
28
-
29
-
30
-
 31
31 -
 32
32 -
 33
33 -
 34
34 -
 35
35 -
 36
36 -
 37
37 -
 38
38 -
 39
39 -
 40
40 -
 41
41 -
42
-
43
-
44
-
45
-
46
-
47
-
48
-
49
-
50
-
51
-
52
-
53
-
54
-
55
-
56
-
57
-
58
-
59
-
60
-
61
-
62
-
63
-
64
-
65
-
66
-
67
-
68
-
69
-
70
-
71
-
72
-
73
-
74
-
75
-
76
-
77
-
78
-
79
-
80
-
81
-
82
 |
 |
