TP-Link TL-R600VPN TL-R600VPN V1 User Guide - Page 67
Time Settings
 |
View all TP-Link TL-R600VPN manuals
Add to My Manuals
Save this manual to your list of manuals |
Page 67 highlights
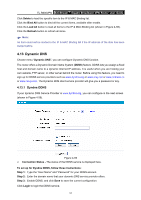
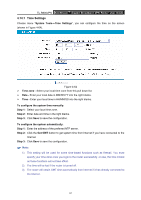
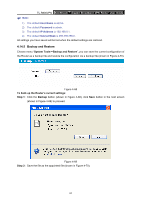
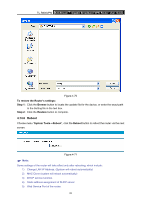
TL-R600VPN SafeStreamTM Gigabit Broadband VPN Router User Guide 4.14.1 Time Settings Choose menu "System Tools→Time Settings", you can configure the time on the screen (shown in Figure 4-64). Figure 4-64 ¾ Time zone - Select your local time zone from this pull down list. ¾ Date - Enter your local date in MM/DD/YY into the right blanks. ¾ Time - Enter your local time in HH/MM/SS into the right blanks. To configure the system time manually: Step 1: Select your local time zone. Step 2: Enter date and time in the right blanks. Step 3: Click Save to save the configuration. To configure the system automatically: Step 1: Enter the address of the preferred NTP server. Step 2: Click the Get GMT button to get system time from Internet if you have connected to the Internet. Step 3: Click Save to save the configuration. ) Note: 1). This setting will be used for some time-based functions such as firewall. You must specify your time zone once you login to the router successfully, or else, the time limited on these functions will not take effect. 2). The time will be lost if the router is turned off. 3). The router will obtain GMT time automatically from Internet if it has already connected to the Internet. 61
-
 1
1 -
2
-
3
-
4
-
5
-
6
-
7
-
8
-
9
-
10
-
11
-
12
-
13
-
14
-
15
-
16
-
17
-
18
-
19
-
20
-
21
-
22
-
23
-
24
-
25
-
26
-
27
-
28
-
29
-
30
-
31
-
32
-
33
-
34
-
35
-
36
-
37
-
38
-
39
-
40
-
41
-
42
-
43
-
44
-
45
-
46
-
47
-
48
-
49
-
50
-
51
-
52
-
53
-
54
-
55
-
56
-
57
-
58
-
59
-
60
-
61
-
 62
62 -
 63
63 -
 64
64 -
 65
65 -
 66
66 -
 67
67 -
 68
68 -
 69
69 -
 70
70 -
 71
71 -
 72
72 -
73
-
74
-
75
-
76
-
77
-
78
-
79
-
80
-
81
-
82
 |
 |
