TP-Link TL-WR710N User Guide - Page 35
Client Mode
 |
View all TP-Link TL-WR710N manuals
Add to My Manuals
Save this manual to your list of manuals |
Page 35 highlights
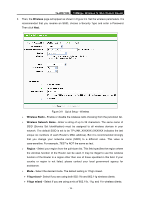
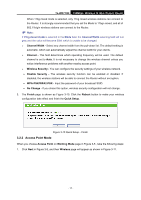
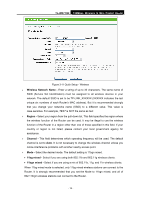
TL-WR710N 150Mbps Wireless N Mini Pocket Router ¾ Wireless Password - If the AP your router is going to connect need password, you need to fill the password in this blank. 2. Click Survey button on the Wireless page as shown in Figure 3-14, and then AP List page will appear as shown in Figure 3-15. Find the SSID of the Access Point you want to access, and click Connect in the corresponding row. For example, the third item is selected. The target network's SSID will be automatically filled into the corresponding box which is shown as the Figure 3-14. Figure 3-15 AP List ) Note: If you know the SSID of the desired AP, you can also input it into the field "SSID" manually. 3. Click the Next button in Figure 3-14. You will then see the Finish page. Because something has changed on the Wireless Repeater page, you will see the Finish page as shown in Figure 3-16. Click the Reboot button to make your wireless configuration take effect and finish the Quick Setup. Figure 3-16 Quick Setup - Finish 3.2.4 Client Mode When you choose Client on Working Mode page in Figure 3-5 , take the following steps: 1. Click Next in Figure 3-5, and then Wireless Client page will appear as shown in Figure 3-17. - 21 -
-
 1
1 -
2
-
3
-
4
-
5
-
6
-
7
-
8
-
9
-
10
-
11
-
12
-
13
-
14
-
15
-
16
-
17
-
18
-
19
-
20
-
21
-
22
-
23
-
24
-
25
-
26
-
27
-
28
-
29
-
 30
30 -
 31
31 -
 32
32 -
 33
33 -
 34
34 -
 35
35 -
 36
36 -
 37
37 -
 38
38 -
 39
39 -
 40
40 -
41
-
42
-
43
-
44
-
45
-
46
-
47
-
48
-
49
-
50
-
51
-
52
-
53
-
54
-
55
-
56
-
57
-
58
-
59
-
60
-
61
-
62
-
63
-
64
-
65
-
66
-
67
-
68
-
69
-
70
-
71
-
72
-
73
-
74
-
75
-
76
-
77
-
78
-
79
-
80
-
81
-
82
-
83
-
84
-
85
-
86
-
87
-
88
-
89
-
90
-
91
-
92
-
93
-
94
-
95
-
96
-
97
-
98
-
99
-
100
-
101
-
102
-
103
-
104
-
105
-
106
-
107
-
108
-
109
-
110
-
111
-
112
-
113
-
114
-
115
-
116
-
117
-
118
-
119
-
120
-
121
-
122
-
123
-
124
-
125
-
126
-
127
-
128
-
129
-
130
-
131
-
132
-
133
-
134
-
135
-
136
-
137
-
138
-
139
-
140
-
141
-
142
-
143
-
144
-
145
-
146
-
147
-
148
-
149
-
150
-
151
-
152
-
153
-
154
-
155
-
156
-
157
-
158
-
159
-
160
-
161
-
162
-
163
-
164
-
165
-
166
-
167
-
168
-
169
-
170
-
171
-
172
-
173
-
174
-
175
-
176
-
177
-
178
-
179
-
180
-
181
-
182
-
183
-
184
-
185
-
186
-
187
-
188
-
189
-
190
-
191
-
192
-
193
-
194
-
195
-
196
-
197
-
198
-
199
-
200
-
201
-
202
-
203
-
204
-
205
-
206
-
207
-
208
-
209
-
210
-
211
-
212
-
213
-
214
-
215
-
216
-
217
-
218
-
219
-
220
-
221
-
222
-
223
-
224
-
225
-
226
-
227
-
228
-
229
-
230
-
231
-
232
-
233
-
234
-
235
-
236
-
237
-
238
-
239
-
240
-
241
-
242
-
243
-
244
-
245
-
246
-
247
-
248
-
249
-
250
-
251
-
252
-
253
-
254
-
255
-
256
-
257
-
258
-
259
-
260
-
261
-
262
-
263
-
264
-
265
-
266
-
267
-
268
-
269
-
270
-
271
-
272
-
273
-
274
-
275
-
276
-
277
-
278
-
279
-
280
-
281
-
282
-
283
-
284
 |
 |
