TRENDnet TEW-811DRU User's Guide
TRENDnet TEW-811DRU Manual
 |
View all TRENDnet TEW-811DRU manuals
Add to My Manuals
Save this manual to your list of manuals |
TRENDnet TEW-811DRU manual content summary:
- TRENDnet TEW-811DRU | User's Guide - Page 1
TRENDnet User's Guide Cover Page - TRENDnet TEW-811DRU | User's Guide - Page 2
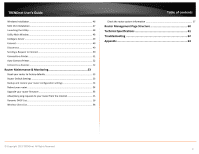
LAN Client Filters 30 © Copyright 2013 TRENDnet. All Rights Reserved. Table of contents Advanced Router Setup 31 Access your router management page 31 Change your router login password 31 Change your device name 32 Change your device URL 32 Manually configure your Internet connection 32 IPv6 - TRENDnet TEW-811DRU | User's Guide - Page 3
53 Reset your router to factory defaults 53 Router Default Settings 53 Backup and restore your router configuration settings 54 Reboot your router ...54 Upgrade your router firmware 55 Allow/deny ping requests to your router from the Internet 55 Dynamic DHCP List...56 Wireless Client - TRENDnet TEW-811DRU | User's Guide - Page 4
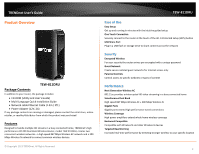
performance AC1200 Dual Band Wireless Router, model TEW-811DRU, creates two concurrent wireless networks-a high speed 867 Mbps Wireless AC network and a 300 Mbps Wireless N network to connect common wireless devices. © Copyright 2013 TRENDnet. All Rights Reserved. TEW-811DRU Ease of Use Easy Setup - TRENDnet TEW-811DRU | User's Guide - Page 5
in order to access the printer Product Hardware Features Rear View WPS Button USB Share Port Gigabit LAN Ports 1-4 (Black) Power Port Gigabit Internet Port (Yellow) On/Off Power Switch (EU only) Reset Button (Located on Bottom) © Copyright 2013 TRENDnet. All Rights Reserved. TEW-811DRU • USB - TRENDnet TEW-811DRU | User's Guide - Page 6
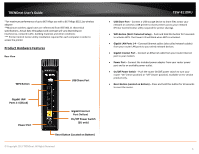
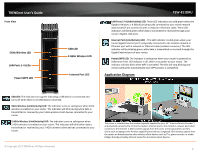
TRENDnet User's Guide Front View 5GHz Wireless LED LAN Ports 1-4 LEDs Power/WPS LED USB LED 2.4GHz Wireless LED Internet Port LED TEW-811DRU LAN Ports 1-4 (Link/Activity) LED: These LED indicators are solid green when the Gigabit LAN ports 1-4 (Black) are physically connected to your wired network - TRENDnet TEW-811DRU | User's Guide - Page 7
access, you'll need: • Computers/devices with an Ethernet port (also called network port) or wireless networking capabilities. • A modem and Internet service to your home, provided by your ISP (modem typically supplied by your ISP). • A router to connect multiple devices to the Internet. TEW-811DRU - TRENDnet TEW-811DRU | User's Guide - Page 8
Name: _________ Password 5. L2TP Type (Dynamic IP/DHCP or Static IP) L2TP Server IP address) IP Address e.g. 215.24.24.129) Subnet Mask Default Gateway Server IP DNS Servers Address 1 DNS Servers Address 2 User Name: _________ Password TEW-811DRU © Copyright 2013 TRENDnet. All Rights - TRENDnet TEW-811DRU | User's Guide - Page 9
to your modem. TEW-811DRU 6. Connect the power adapter to the router and then to a power outlet. 7. Turn on your modem. 8. Verify that the status LED indicators on the front of the router are illuminated: Power, Internet, one of the LAN ports (1,2,3,4) and Wireless Bands (2.4G,5G). 2. Turn - TRENDnet TEW-811DRU | User's Guide - Page 10
TRENDnet User's Guide Internet Setup Wizard 1. Open your web browser (e.g. Internet Explorer, Firefox, Safari, Chrome, or Opera) and go to http://tew-811dru or you can access the router management using the IP address http://192.168.10.1. Your router will prompt you for a user name and password. 3. - TRENDnet TEW-811DRU | User's Guide - Page 11
TRENDnet User's Guide 5. Click "Next" to begin the wizard . 7. Click "Apply". TEW-811DRU 6. Select "DHCP Connection (Dynamic IP Address)" and click "Next" to continue. Note: Dynamic IP (DHCP) is typical for most Internet services. You can verify your settings with your Internet Service Provider. - TRENDnet TEW-811DRU | User's Guide - Page 12
TRENDnet User's Guide Wireless Setup Wizard 1. Open your web browser (e.g. Internet Explorer, Firefox, Safari, Chrome, or Opera) and go to http://tew-811dru or you can access the router management using the IP address http://192.168.10.1. Your router will prompt you for a user name and password. 3. - TRENDnet TEW-811DRU | User's Guide - Page 13
TRENDnet User's Guide 5. Select which wireless network you would like to configure, then click "Next". TEW-811DRU 7. Select the type of wireless security for your wireless network. Click Next. It is strongly recommended to use wireless security to protect your wireless network. See page 15 for - TRENDnet TEW-811DRU | User's Guide - Page 14
TRENDnet User's Guide 9. Verify your wireless settings are correct and click "Apply". TEW-811DRU Connect additional wired of your router to ensure the physical cable connection from your computer or device. Note: If you encounter issues connecting to your network, there may be a problem with your - TRENDnet TEW-811DRU | User's Guide - Page 15
WPA encryption. Only when all wireless clients disconnect to the network and a wireless client with WPA2 encryption connects your wireless network will then change to WPA2 encryption. © Copyright 2013 TRENDnet. All Rights Reserved. TEW-811DRU Note: WPA2 encryption supports 802.11n speeds and WPA - TRENDnet TEW-811DRU | User's Guide - Page 16
network" on page 15), you can set up wireless security. 1. Log into your router management page (see "Access your router management page" on page 31). 2. Click on the wireless band Wireless (2.4GHz or 5GHz) you would like to configure. TEW-811DRU 4. Click on the Security Mode drop-down list - TRENDnet TEW-811DRU | User's Guide - Page 17
key needed for a computer to connect to the router wirelessly o You can define up to 4 passwords or 4 keys. Only one key can be active Protocol), © Copyright 2013 TRENDnet. All Rights Reserved. TEW-811DRU • WPA Encryption: called Remote Authentication Dial-In User Service or RADIUS. Note: This - TRENDnet TEW-811DRU | User's Guide - Page 18
to the User's Manual/Guide of your wireless client device to determine how to search and connect to this router's wireless network. See the "Appendix" on page 63 for general information on connecting to a wireless network. TEW-811DRU Connect wireless devices using WPS WPS (Wi-Fi Protected Setup) is - TRENDnet TEW-811DRU | User's Guide - Page 19
activate WPS on your router. 1. Log into your router management page (see "Access your router management page" on page 31). 2. Click on the wireless band Wireless (2.4GHz or 5GHz) you would like to configure and click on WPS. TEW-811DRU PIN (Personal Identification Number) Wireless (2.4GHz or 5GHz - TRENDnet TEW-811DRU | User's Guide - Page 20
network. o Off: The router will operate in 802.11n mode only, non-802.11n wireless clients will not be able to connect when this option is selected. TEW-811DRU When applying the 802.11 n-mode setting on 2.4GHz, please keep in mind the following: • Wireless devices that support 802.11n are backwards - TRENDnet TEW-811DRU | User's Guide - Page 21
keep the default setting - Auto. © Copyright 2013 TRENDnet. All Rights Reserved. TEW-811DRU Guest Network Wireless (2.4GHz or 5GHz) > Guest Network Creating an isolated and separate wireless guest network (2.4GHz or 5GHz) allows wireless clients to connect to your network for Internet access only - TRENDnet TEW-811DRU | User's Guide - Page 22
settings (Default: 192.168.10.1 / 255.255.255.0) TEW-811DRU • DHCP router. It is recommended to leave this setting enabled. © Copyright 2013 TRENDnet. All Rights Reserved. • Hostname: Enter a name of the device you will assign the DHCP reservation rule. • MAC Address: Enter the MAC (Media Access - TRENDnet TEW-811DRU | User's Guide - Page 23
device uses an older standard, the performance of the entire wireless network may be slower. If you are still experiencing low or no signal consider repositioning the wireless devices, installing additional access points or wireless extenders. © Copyright 2013 TRENDnet. All Rights Reserved. 23 - TRENDnet TEW-811DRU | User's Guide - Page 24
By default, your router functions in Access Point mode to allow wireless client devices to connect and access your network resources and access the Internet using a single SSID. The diagram below shows your router in Access Point mode and clients connecting to your router using a single SSID. TEW - TRENDnet TEW-811DRU | User's Guide - Page 25
client connecting to SSID 2. TEW-811DRU Wireless bridging using WDS (Wireless Distribution System) Wireless (2.4GHz or 5GHz) > Basic Wireless bridging using WDS allows the device to create a wireless bridge with other WDS supported wireless routers and access points configured in WDS mode to - TRENDnet TEW-811DRU | User's Guide - Page 26
security and key on all WDS supported devices. See page 15 for configuring wireless security settings. To configure WDS bridging between TEW-811DRU routers: 1. Log into your router management page (see "Access your router management page" on page 31). 2. Click on Wireless (2.4GHz or 5GHz) and click - TRENDnet TEW-811DRU | User's Guide - Page 27
. The destination wireless device will send a response called Clear to Send (CTS). The RTS Threshold defines the smallest data packet size allowed to initiate the RTS/CTS function. Default Value: 2347 (range: 1-2347) © Copyright 2013 TRENDnet. All Rights Reserved. TEW-811DRU • Short Preamble - TRENDnet TEW-811DRU | User's Guide - Page 28
TRENDnet User's Guide Access Control Filters Access control basics MAC Address Filters Wired LAN MAC Address Filters Advanced > Filter Every network device has a unique, 12-digit MAC (Media Access 11:22:AA:BB:CC) TEW-811DRU Note: MAC filter can be configured to allow access to the listed MAC address - TRENDnet TEW-811DRU | User's Guide - Page 29
TRENDnet User's Guide Wireless MAC Address Filters Wireless (2.4GHz or 5GHz) > Security Every network device has a unique, 12-digit MAC (Media Access Control) address. Using MAC filters, you can allow or deny specific computers and other devices from using this router's wireless network. 1. Log into - TRENDnet TEW-811DRU | User's Guide - Page 30
2013 TRENDnet. All Rights Reserved. TEW-811DRU Protocol/IP Filters (LAN Client Filters) Advanced > Access Control You may want to block computers or devices on your network access to specific ports (used or required by a specific application) to the Internet. 1. Log into your router management - TRENDnet TEW-811DRU | User's Guide - Page 31
2013 TRENDnet. All Rights Reserved. Note: If you change the router login password, you will need to access the router management page using the User Name "admin" and the new password instead of the default password "admin". If you reset the device to defaults, you will need to access the router - TRENDnet TEW-811DRU | User's Guide - Page 32
TRENDnet User's Guide Change your device name Administrator > Management 1. Log into your router management page (see "Access your router management router. TEW-811DRU Manually configure your Internet connection Network > WAN Setting 1. Log into your router management page (see "Access your router - TRENDnet TEW-811DRU | User's Guide - Page 33
. 3. Review the IPv6 Internet Connection settings and enter information settings specified by your ISP. In WAN IPv6 Setting section, enter your IPv6 settings provided by your ISP (Internet Service Provider) to configure your router's IPv6 WAN settings. Click Apply to save settings. TEW-811DRU In - TRENDnet TEW-811DRU | User's Guide - Page 34
using your new router IP address. (e.g. Instead of using the default http://192.168.10.1 your new router IP address will use the following format using your new IP address http://(new.ipaddress.here) to access your router management page. You can also use the default login URL http://tew-811dru 34 - TRENDnet TEW-811DRU | User's Guide - Page 35
leave this setting enabled. 1. Log into your router management page (see "Access your router management page" on page 31). 2. Click on Network, and click on LAN Setting. 3. Review the DHCP Server settings. Click Apply to save settings. TEW-811DRU Set up DHCP reservation Network > LAN Setting DHCP - TRENDnet TEW-811DRU | User's Guide - Page 36
Enabled to enable UPnP or Disabled to disable UPnP. TEW-811DRU Enable/disable Application Layer Gateways (ALG) Advanced > ALG You may want to configure your router to allow computers the use of specific high layer applications or service sessions to pass through. Application Layer Gateways (ALG - TRENDnet TEW-811DRU | User's Guide - Page 37
one of the DDNS available service providers list under Server Address. (e.g. dyndns.com, no-ip.com, etc.) 2. Log into your router management page (see "Access your router management page" on page 31). 3. Click on Administrator and click on Management. TEW-811DRU 4. Review the DDNS Settings section - TRENDnet TEW-811DRU | User's Guide - Page 38
TRENDnet User's Guide Set your router date and time Administrator > Time 1. Log into your router management page (see "Access your router management page" on page 31). 2. Click on Administrator, and click on Time. 3. Review the Time settings. Click Apply to save settings. • Time Configuration: - TRENDnet TEW-811DRU | User's Guide - Page 39
into your router management page (see "Access your router management page" on page 31). 3. Click on Advanced, and click on DMZ. 4. Select Enable in the DMZ Settings section. 5. Enter the IP address you assigned to the computer or network device to expose to the Internet. TEW-811DRU Virtual Server - TRENDnet TEW-811DRU | User's Guide - Page 40
1. Setup DynDNS service (see Identify Your Network section page 37). 2. Access TRENDnet IP © Copyright 2013 TRENDnet. All Rights Reserved. TEW-811DRU Special Applications Advanced supports UPnP first, before configuring this feature. 1. Log into your router management page (see "Access your router - TRENDnet TEW-811DRU | User's Guide - Page 41
DNS service (see "Identify your network over the Internet" section on page 37). 1. Log into your router management page (see "Access your router management page" on page 31). 2. Click on Advanced, and click on Gaming. 3. Click on Enabled under Gaming Function section. TEW-811DRU 3. Review the - TRENDnet TEW-811DRU | User's Guide - Page 42
. 1. Log into your router management page (see "Access your router management page" on page 31). 2. Click on Network, and click on QoS. 3. Review the QoS settings. 4. Review the Inbound/Outbound Class Setting section. TEW-811DRU • Enable QoS: Enable or Disable the Quality of service through the - TRENDnet TEW-811DRU | User's Guide - Page 43
TRENDnet User's Guide 6. Review the QoS Rule List TEW-811DRU Add static routes to your router Advanced > Routing You may want set up your router to route computers or router management page (see "Access your router management page" on page 31). 2. Click on Advanced, and click on Routing. 3. Review - TRENDnet TEW-811DRU | User's Guide - Page 44
1. Log into your router management page (see "Access your router management page" on page 31). 2. Click on Administrator, and click on File Sharing. 3. Review the setting on Samba Server Information section. Click Apply to save settings TEW-811DRU 4. Review the administrator settings required - TRENDnet TEW-811DRU | User's Guide - Page 45
Samba Server Information section. Click Apply to save settings TEW-811DRU 5. Review the User Account List section. Click Apply to save settings • User Name: Enter the user name to be used to access your files. • Password: Enter the password for the user name. • Permission: Select the permission you - TRENDnet TEW-811DRU | User's Guide - Page 46
TRENDnet User's Guide Print Share Utility Installation Windows Installation 1. For each computer that requires access to USB printer, insert the Utility CD-ROM into your computer's CD-ROM Drive. 2. Click Install Utility TEW-811DRU 3. Follow the installation instructions and click Finish when - TRENDnet TEW-811DRU | User's Guide - Page 47
TRENDnet User's Guide MAC OS X Installation 1. Insert the included CD-ROM into your computer's CD-ROM drive. TEW-811DRU 5. You will be prompted for your password to allow the installation. Enter your password and click OK. 2. Open the CD contents and locate the "TRENDnet USB Control Center Utility - TRENDnet TEW-811DRU | User's Guide - Page 48
TRENDnet User's Guide Launching the Utility Windows OS Upon completing the software installation, a desktop shortcut is automatically created. You double click the icon to start the utility or open the utility if it is already running. Windows OS TEW-811DRU If the utility is already running and - TRENDnet TEW-811DRU | User's Guide - Page 49
TRENDnet User's Guide TEW-811DRU Displays the software/driver version and support contact information. Configure Server Select the Configure Server button will open the router's management page in your web browser. message that the USB device is "Manually connected by ". Windows - TRENDnet TEW-811DRU | User's Guide - Page 50
TRENDnet User's Guide TEW-811DRU MAC OS X If another computer is currently connected to the device, a message will appear next to the USB device displaying a message that the USB device is "Manually connected by ". Windows OS MAC OS X If a USB device is currently being used - TRENDnet TEW-811DRU | User's Guide - Page 51
TRENDnet User's Guide • Accept: Clicking this option will disconnect your computer from the device and allow the requesting computer to connect to the device. TEW-811DRU Connect to a Printer Note: This function applies to stand-alone USB printers or USB multi-function printers. It is required that - TRENDnet TEW-811DRU | User's Guide - Page 52
TRENDnet User's Guide Auto-Connect Printer When a USB printer is connected and selected in avoid the complexity of having to manually connect and disconnect from the printer for each computer when multiple computers are sending print jobs to the USB printer. TEW-811DRU Connect to a Scanner Note: - TRENDnet TEW-811DRU | User's Guide - Page 53
and click on Settings Management. Router Default Settings Administrator User Name Administrator Password Router IP Address Router Subnet Mask DHCP Server IP Range Wireless 2.4GHz Wireless 2.4GHz Encryption Wireless 5Ghz Wireless 5GHz Encryption TEW-811DRU admin Please refer sticker or device - TRENDnet TEW-811DRU | User's Guide - Page 54
settings default download folder. (Default Filename: .cfg) To restore your router configuration: 1. Log into your router management page (see "Access your router management page" on page 31). 2. Click on Administrator and click on Settings Management. TEW-811DRU Reboot your router Administrator - TRENDnet TEW-811DRU | User's Guide - Page 55
connection. • Any interruptions during the firmware upgrade process may permanently damage your router. 1. Log into your router management page (see "Access your router management page" on page 31). 2. Click on Administrator and click on Upload Firmware. TEW-811DRU 3. Depending on your web browser - TRENDnet TEW-811DRU | User's Guide - Page 56
IP addresses automatically from the DHCP server on your router. 1. Log into your router management page (see "Access your router management page" on page 31). 2. Click on Network, and click on DHCP Client List. TEW-811DRU Wireless Client List Wireless (2.4GHz or 5GHz)> Station List You can view the - TRENDnet TEW-811DRU | User's Guide - Page 57
, wireless and wired network settings, router MAC address, and firmware version. 1. Log into your router management page (see "Access your router management page" on page 31). 2. Click on Administrator and click on Status. System Info Internet Configurations TEW-811DRU • Firmware Version - TRENDnet TEW-811DRU | User's Guide - Page 58
TRENDnet User's Guide LAN Information 5GHz Wireless LAN TEW-811DRU • MAC Address - The current MAC address of your router's wireless or interface configuration. • IP Address - Displays your router's current IP address. • Subnet Mask - Displays your router's current subnet mask. 2.4GHz Wireless - TRENDnet TEW-811DRU | User's Guide - Page 59
TRENDnet User's Guide IPv6 Status Administrator > IPv6 Status You can view the current IPv6 status on your router. 1. Log into your router management page (see "Access your router management page" on page 31). 2. Click on Administrator, and click on IPv6 Status TEW-811DRU View your router log - TRENDnet TEW-811DRU | User's Guide - Page 60
• Gaming • Filter (Protocol/IP Filters) • Schedule • Advanced Network TEW-811DRU Administrator • Management o Password o Remote management o Dynamic DNS • Upload Firmware • Settings Management • File Sharing • Time • System Log • Status • IPv6 © Copyright 2013 TRENDnet. All Rights Reserved. 60 - TRENDnet TEW-811DRU | User's Guide - Page 61
in) Weight 290 g (10.2 oz) © Copyright 2013 TRENDnet. All Rights Reserved. TEW-811DRU Temperature Operation: 0°~ 40°C (32°F~ 104°F), Storage: -20°~ 60°C (-4°F~140 °F) Humidity Max. 85% (non-condensing) Certifications CE, FCC Wireless Frequency 2.4 GHz: 2.412~2.462 (FCC) and 2.412~2.472 - TRENDnet TEW-811DRU | User's Guide - Page 62
manufacturer for assistance. TEW-811DRU Q: I am not sure what type of Internet Account Type I have for my Cable/DSL connection. How do I find out? Answer: Contact your Internet Service Provider (ISP) for the correct information. Q: The Wizard does not appear when I access the router. What should - TRENDnet TEW-811DRU | User's Guide - Page 63
TRENDnet User's Guide display the wired or wireless IP address settings. Note: en0 is typically the wired Ethernet and en1 is typically the wireless Airport interface. Graphical settings displayed. © Copyright 2013 TRENDnet. All Rights Reserved. TEW-811DRU Note: If you are experiencing difficulties - TRENDnet TEW-811DRU | User's Guide - Page 64
TRENDnet User's Guide In MAC 10.4, from the Configure IPv4, drop-down list, Advanced button. 3. On the Ethernet tab, the Ethernet ID is your MAC Address. TEW-811DRU How to connect to a wireless network using the built-in Windows utility? Note: Please note that although the following procedures - TRENDnet TEW-811DRU | User's Guide - Page 65
and/or operational frequency bands are country dependent and are firmware programmed at the factory to match the intended destination. The firmware setting is not accessible by the end user. RoHS This product is RoHS compliant. © Copyright 2013 TRENDnet. All Rights Reserved. TEW-811DRU Europe - EU - TRENDnet TEW-811DRU | User's Guide - Page 66
TRENDnet User's Guide Česky [Czech] TRENDnet tímto prohlašuje, že tento TEW-811DRU je ve shodě se základními požadavky a dalšími příslušnými ustanoveními směrnice 1999/5/ES, 2006/95/ES, a 2009/125/ES. Dansk [Danish] Undertegnede TRENDnet erklærer herved, at følgende udstyr TEW811DRU overholder - TRENDnet TEW-811DRU | User's Guide - Page 67
TRENDnet User's Guide Limited Warranty TRENDnet warrants its products against defects in material and workmanship, under normal use and service, for the following lengths of time from the date of purchase. TEW-811DRU - 3 Years Warranty AC/DC Power Adapter, Cooling Fan, and Power Supply carry 1 year - TRENDnet TEW-811DRU | User's Guide - Page 68
-
 1
1 -
 2
2 -
 3
3 -
 4
4 -
 5
5 -
 6
6 -
 7
7 -
8
-
9
-
10
-
11
-
12
-
13
-
14
-
15
-
16
-
17
-
18
-
19
-
20
-
21
-
22
-
23
-
24
-
25
-
26
-
27
-
28
-
29
-
30
-
31
-
32
-
33
-
34
-
35
-
36
-
37
-
38
-
39
-
40
-
41
-
42
-
43
-
44
-
45
-
46
-
47
-
48
-
49
-
50
-
51
-
52
-
53
-
54
-
55
-
56
-
57
-
58
-
59
-
60
-
61
-
62
-
63
-
64
-
65
-
66
-
67
-
68
 |
 |

TRENDnet User’s Guide
Cover Page