TRENDnet TEW-811DRU User's Guide - Page 26
Wireless 2.4GHz, Basic, Wireless Distribution System WDS, Apply, Cancel
 |
View all TRENDnet TEW-811DRU manuals
Add to My Manuals
Save this manual to your list of manuals |
Page 26 highlights
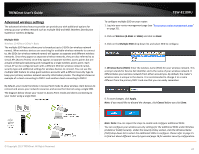
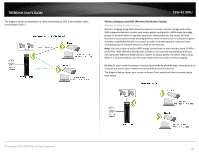
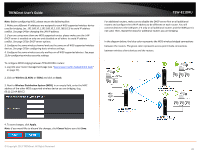
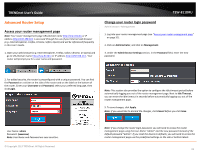
TRENDnet User's Guide Note: Before configuring WDS, please ensure the following first: 1. Make sure different IP addresses are assigned to each WDS supported wireless device used for bridging. (ex. 192.168.10.1,192.168.10.2, 192.168.10.3) to avoid IP address conflict. See page 34 for changing the LAN IP address. 2. If you are using more than one WDS supported router, please make sure the LAN DHCP server is enabled on only one and disabled on all others to avoid IP address conflict. See page 35 for DHCP server options. 3. Configure the same wireless channel and use the same on all WDS supported wireless devices. See page 20 for configuring basic wireless settings. 4. Configure the same wireless security and key on all WDS supported devices. See page 15 for configuring wireless security settings. To configure WDS bridging between TEW-811DRU routers: 1. Log into your router management page (see "Access your router management page" on page 31). 2. Click on Wireless (2.4GHz or 5GHz) and click on Basic. 3. Next to Wireless Distribution System (WDS), in an empty field, enter the MAC address of the other WDS supported wireless device you are bridging. (e.g. 00:11:22:AA:BB:CC) TEW-811DRU For additional routers, make sure to disable the DHCP server first on all additional routers and configure the LAN IP address to be different on each router. You will connect devices to the LAN ports 1-4 only on all additional routers and the WAN port is not used. Then, repeat the steps for additional routers you are bridging. In the diagram below, the blue color represents the WDS wireless bridged connections between the routers. The green color represents access point mode connections between wireless client devices and the routers. . 4. To save changes, click Apply. Note: If you would like to discard the changes, click Cancel before you click Save. © Copyright 2013 TRENDnet. All Rights Reserved. 26
-
 1
1 -
2
-
3
-
4
-
5
-
6
-
7
-
8
-
9
-
10
-
11
-
12
-
13
-
14
-
15
-
16
-
17
-
18
-
19
-
20
-
 21
21 -
 22
22 -
 23
23 -
 24
24 -
 25
25 -
 26
26 -
 27
27 -
 28
28 -
 29
29 -
 30
30 -
 31
31 -
32
-
33
-
34
-
35
-
36
-
37
-
38
-
39
-
40
-
41
-
42
-
43
-
44
-
45
-
46
-
47
-
48
-
49
-
50
-
51
-
52
-
53
-
54
-
55
-
56
-
57
-
58
-
59
-
60
-
61
-
62
-
63
-
64
-
65
-
66
-
67
-
68
 |
 |
