TRENDnet TEW-811DRU User's Guide - Page 30
Doman/URL Filters, Protocol/IP Filters (LAN Client Filters), LAN IP Address Range
 |
View all TRENDnet TEW-811DRU manuals
Add to My Manuals
Save this manual to your list of manuals |
Page 30 highlights
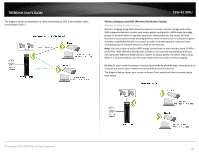
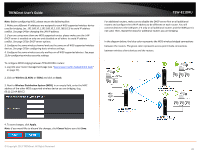
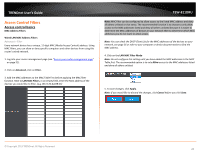
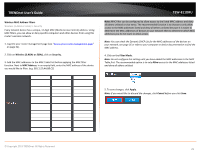
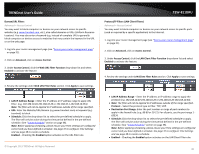
TRENDnet User's Guide Doman/URL Filters Advanced > Access Control You may want to block computers or devices on your network access to specific websites (e.g. www.trendnet.com, etc.), also called domains or URLs (Uniform Resource Locators). You may also enter a keyword (e.g. instead of complete URL to generally block computers or devices access to websites that may contain the keyword in the URL or on the web page. 1. Log into your router management page (see "Access your router management page" on page 31). 2. Click on Advanced, click on Access Control. 3. Under Access Control, click the Web URL Filter Function drop-down list and select Enabled to activate the feature. 4. Review the settings under Web URL Filter Rules section. Click Apply to save settings. • LAN IP Address Range - Enter the IP address or IP address range to apply URL Filter (e.g. 192.168.10.20-192.168.10.20 or 192.168.10.1-192.168.10.254). Note: The filter will not be applied to IP addresses outside of the range specified. • URL: Enter the Website/URL/domain (e.g.www.trendnet.com) or keyword (e.g. trendnet) to block. • Schedule: Click the drop-down list to select the pre-defined schedule to apply. The filter will only be active during the time period defined in the pre-defined schedule. (See "Create Schedule" section on page 38). Note: Before applying scheduling, please ensure your Time settings are configured correct and you have defined a schedule. See page 37 to configure Time Settings and see page 38 to create a schedule. Enabled - Checking the Enabled option activates on the URL filter rule. © Copyright 2013 TRENDnet. All Rights Reserved. TEW-811DRU Protocol/IP Filters (LAN Client Filters) Advanced > Access Control You may want to block computers or devices on your network access to specific ports (used or required by a specific application) to the Internet. 1. Log into your router management page (see "Access your router management page" on page 31). 2. Click on Advanced, click on Access Control. 3. Under Access Control, click the LAN Client Filter Function drop-down list and select Enabled to activate the feature. 4. Review the settings under LAN Client Filter Rules section. Click Apply to save settings. • LAN IP Address Range - Enter the IP address or IP address range to apply the protocol (e.g. 192.168.10.20-192.168.10.20 or 192.168.10.20-192.168.10.30). • Note: The filter will not be applied to IP addresses outside of the range specified. Protocol - Select the protocol type to filter. TCP, UDP. • Destination Port Range: Enter the port number or range of port numbers to apply in the firewall rule. (e.g. 80-80 or 20-21). For all ports, use the port range 1 65534. • Schedule: Click the drop-down list to select the pre-defined schedule to apply. The filter will only be active during the time period defined in the pre-defined schedule. (See "Create Schedule" section on page 38). Note: Before applying scheduling, please ensure your Time settings are configured correct and you have defined a schedule. See page 37 to configure Time Settings and see page 38 to create a schedule. • Enabled - Checking the Enabled option activates on the LAN Client Filter rule. 30
-
 1
1 -
2
-
3
-
4
-
5
-
6
-
7
-
8
-
9
-
10
-
11
-
12
-
13
-
14
-
15
-
16
-
17
-
18
-
19
-
20
-
21
-
22
-
23
-
24
-
 25
25 -
 26
26 -
 27
27 -
 28
28 -
 29
29 -
 30
30 -
 31
31 -
 32
32 -
 33
33 -
 34
34 -
 35
35 -
36
-
37
-
38
-
39
-
40
-
41
-
42
-
43
-
44
-
45
-
46
-
47
-
48
-
49
-
50
-
51
-
52
-
53
-
54
-
55
-
56
-
57
-
58
-
59
-
60
-
61
-
62
-
63
-
64
-
65
-
66
-
67
-
68
 |
 |
