Toshiba Portege M700 PPM70C-03W0GC Users Manual Canada; English - Page 126
Changing Ultra Slim Bay modules, Removing a module
 |
View all Toshiba Portege M700 PPM70C-03W0GC manuals
Add to My Manuals
Save this manual to your list of manuals |
Page 126 highlights
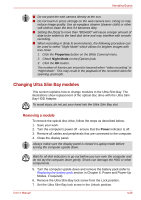
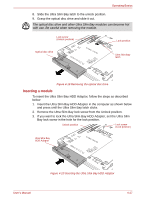
Operating Basics ■ Do not point the web camera directly at the sun. ■ Do not touch or press strongly on the web camera lens. Doing so may reduce image quality. Use an eyeglass cleaner (cleaner cloth) or other soft cloth to clean the lens if it becomes dirty. ■ Setting the [Size] to more than "800x600" will cause a larger amount of data to be written to the hard disk drive and may interfere with smooth recording. ■ When recording in dimly lit environments, the following procedure can be used to select "Night Mode" which allows for brighter images with less noise. 1. Click the Properties button on the [Web Camera] menu. 2. Check Night Mode on the [Options] tab. 3. Click the OK button. The number of frames per second is lowered when "video recording" in "Night Mode". This may result in the playback of the recorded video file seeming unsmooth. Changing Ultra Slim Bay modules This section explains how to change modules in the Ultra Slim Bay. The illustrations show replacement of the optical disc drive with the Ultra Slim Bay HDD Adaptor. To avoid injury, do not put your hand into the Ultra Slim Bay slot. Removing a module To remove the optical disc drive, follow the steps as described below: 1. Save your work. 2. Turn the computer's power off - ensure that the Power indicator is off. 3. Remove all cables and peripherals that are connected to the computer. 4. Close the display panel. Always make sure the display panel is closed in Laptop mode before turning the computer upside down. Wait for all disk indicators to go out before you turn over the computer and do not lay the computer down gently. Shock can damage the HDD or other components. 5. Turn the computer upside down and remove the battery pack (refer to Replacing the battery pack section in Chapter 6, Power and Power-Up Modes, if required). 6. Remove the Ultra Slim Bay lock screw from the Lock position. 7. Set the Ultra Slim Bay lock screw in the Unlock position. User's Manual 4-26
-
 1
1 -
2
-
3
-
4
-
5
-
6
-
7
-
8
-
9
-
10
-
11
-
12
-
13
-
14
-
15
-
16
-
17
-
18
-
19
-
20
-
21
-
22
-
23
-
24
-
25
-
26
-
27
-
28
-
29
-
30
-
31
-
32
-
33
-
34
-
35
-
36
-
37
-
38
-
39
-
40
-
41
-
42
-
43
-
44
-
45
-
46
-
47
-
48
-
49
-
50
-
51
-
52
-
53
-
54
-
55
-
56
-
57
-
58
-
59
-
60
-
61
-
62
-
63
-
64
-
65
-
66
-
67
-
68
-
69
-
70
-
71
-
72
-
73
-
74
-
75
-
76
-
77
-
78
-
79
-
80
-
81
-
82
-
83
-
84
-
85
-
86
-
87
-
88
-
89
-
90
-
91
-
92
-
93
-
94
-
95
-
96
-
97
-
98
-
99
-
100
-
101
-
102
-
103
-
104
-
105
-
106
-
107
-
108
-
109
-
110
-
111
-
112
-
113
-
114
-
115
-
116
-
117
-
118
-
119
-
120
-
 121
121 -
 122
122 -
 123
123 -
 124
124 -
 125
125 -
 126
126 -
 127
127 -
 128
128 -
 129
129 -
 130
130 -
 131
131 -
132
-
133
-
134
-
135
-
136
-
137
-
138
-
139
-
140
-
141
-
142
-
143
-
144
-
145
-
146
-
147
-
148
-
149
-
150
-
151
-
152
-
153
-
154
-
155
-
156
-
157
-
158
-
159
-
160
-
161
-
162
-
163
-
164
-
165
-
166
-
167
-
168
-
169
-
170
-
171
-
172
-
173
-
174
-
175
-
176
-
177
-
178
-
179
-
180
-
181
-
182
-
183
-
184
-
185
-
186
-
187
-
188
-
189
-
190
-
191
-
192
-
193
-
194
-
195
-
196
-
197
-
198
-
199
-
200
-
201
-
202
-
203
-
204
-
205
-
206
-
207
-
208
-
209
-
210
-
211
-
212
-
213
-
214
-
215
-
216
-
217
-
218
-
219
-
220
-
221
-
222
-
223
-
224
-
225
-
226
-
227
-
228
-
229
-
230
-
231
-
232
-
233
-
234
-
235
-
236
-
237
-
238
-
239
-
240
-
241
-
242
-
243
-
244
-
245
-
246
-
247
-
248
-
249
-
250
-
251
-
252
-
253
-
254
-
255
-
256
-
257
-
258
-
259
-
260
-
261
-
262
-
263
-
264
-
265
-
266
-
267
-
268
-
269
-
270
-
271
-
272
-
273
-
274
-
275
-
276
-
277
-
278
-
279
-
280
-
281
-
282
 |
 |
