Toshiba Portege M700 PPM70C-03W0GC Users Manual Canada; English - Page 45
Front with the display open, Ultra Slim Bay lock, screw unlock, position, Reserve Pen
 |
View all Toshiba Portege M700 PPM70C-03W0GC manuals
Add to My Manuals
Save this manual to your list of manuals |
Page 45 highlights
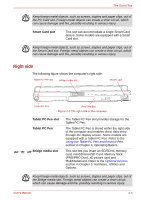
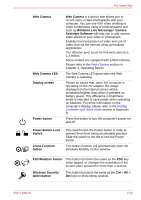
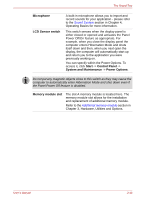
The Grand Tour Ultra Slim Bay lock screw (unlock position) Reserve Pen Unlock position is used for changing the Ultra Slim Bay. To unlock the Ultra Slim Bay latch, please move the Ultra Slim Bay Lock screw to unlock position. For more information on how to remove or insert, please refer to the Changing Ultra Slim Bay modules in Chapter 4. Reserve Pen is contained in the Reserve Pen case of Underside. Reserve Pen enables data entry directly through display screen. Some models are equipped with a Reserve Pen. Refer to the Using the Tablet PC Pen and Reserve Pen section in Chapter 4, Operating Basics. Front with the display open This section shows the computer with the display panel open. In order to open the display, lift the display panel up and position it at a comfortable viewing angle for you. Web Camera LED Microphone Display screen Web Camera Display hinge Fingerprint Sensor Power button Lock Switch Power button Stereo speaker (Left) Stereo speaker (Right) Memory module slot (Not shown) LCD Sensor switch (Not shown) Keyboard Cross Function button ESC/Rotation button Windows Security tablet TOSHIBA Assist button button Touch Pad TOSHIBA Presentation button Touch Pad control buttons Figure 2-6 The front of the computer with the display panel open User's Manual 2-9
-
 1
1 -
2
-
3
-
4
-
5
-
6
-
7
-
8
-
9
-
10
-
11
-
12
-
13
-
14
-
15
-
16
-
17
-
18
-
19
-
20
-
21
-
22
-
23
-
24
-
25
-
26
-
27
-
28
-
29
-
30
-
31
-
32
-
33
-
34
-
35
-
36
-
37
-
38
-
39
-
 40
40 -
 41
41 -
 42
42 -
 43
43 -
 44
44 -
 45
45 -
 46
46 -
 47
47 -
 48
48 -
 49
49 -
 50
50 -
51
-
52
-
53
-
54
-
55
-
56
-
57
-
58
-
59
-
60
-
61
-
62
-
63
-
64
-
65
-
66
-
67
-
68
-
69
-
70
-
71
-
72
-
73
-
74
-
75
-
76
-
77
-
78
-
79
-
80
-
81
-
82
-
83
-
84
-
85
-
86
-
87
-
88
-
89
-
90
-
91
-
92
-
93
-
94
-
95
-
96
-
97
-
98
-
99
-
100
-
101
-
102
-
103
-
104
-
105
-
106
-
107
-
108
-
109
-
110
-
111
-
112
-
113
-
114
-
115
-
116
-
117
-
118
-
119
-
120
-
121
-
122
-
123
-
124
-
125
-
126
-
127
-
128
-
129
-
130
-
131
-
132
-
133
-
134
-
135
-
136
-
137
-
138
-
139
-
140
-
141
-
142
-
143
-
144
-
145
-
146
-
147
-
148
-
149
-
150
-
151
-
152
-
153
-
154
-
155
-
156
-
157
-
158
-
159
-
160
-
161
-
162
-
163
-
164
-
165
-
166
-
167
-
168
-
169
-
170
-
171
-
172
-
173
-
174
-
175
-
176
-
177
-
178
-
179
-
180
-
181
-
182
-
183
-
184
-
185
-
186
-
187
-
188
-
189
-
190
-
191
-
192
-
193
-
194
-
195
-
196
-
197
-
198
-
199
-
200
-
201
-
202
-
203
-
204
-
205
-
206
-
207
-
208
-
209
-
210
-
211
-
212
-
213
-
214
-
215
-
216
-
217
-
218
-
219
-
220
-
221
-
222
-
223
-
224
-
225
-
226
-
227
-
228
-
229
-
230
-
231
-
232
-
233
-
234
-
235
-
236
-
237
-
238
-
239
-
240
-
241
-
242
-
243
-
244
-
245
-
246
-
247
-
248
-
249
-
250
-
251
-
252
-
253
-
254
-
255
-
256
-
257
-
258
-
259
-
260
-
261
-
262
-
263
-
264
-
265
-
266
-
267
-
268
-
269
-
270
-
271
-
272
-
273
-
274
-
275
-
276
-
277
-
278
-
279
-
280
-
281
-
282
 |
 |
