Toshiba Satellite A660-BT3G25X Maintenance Manual - Page 95
Procedure 1, E-SATA device check, Procedure 2, Windows Application check, Procedure 3, Connection
 |
View all Toshiba Satellite A660-BT3G25X manuals
Add to My Manuals
Save this manual to your list of manuals |
Page 95 highlights
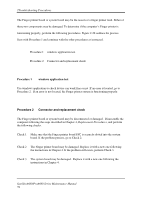
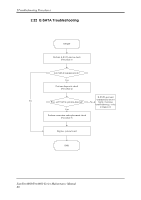
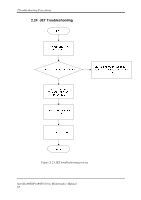
2Troubleshooting Procedures Figure 2-21 E-SATA troubleshooting process To determine if the computer's E-SATA system is functioning properly, perform the following procedures. Figure 2-21 outlines the process. Start with Procedure 1 and continue with the other procedures as instructed. Procedure 1: E-SATA device check Procedure 2: Windows Application check Procedure 3: Connection and replacement check Procedure 1 E-SATA device check Connect an E-SATA device to the computer's E-SATA port, and then boot the computer for Windows7. The computer should automatically detect the E-SATA device. Check whether the device can transmit data to the computer. If the device is able to communicate with the computer, the problem may be intermittent or connections may be faulty. Go to Procedure 2. If communication is impaired, there may be a faulty connection. Go to Procedure 3. Procedure 2 Windows Application check Run the Windows Application, which will automatically execute the E-SATA port test for transmission, Tests and Diagnostics for more information on how to run the program. If an error is located, go to Procedure 3. If an error does not occur, the E-SATA port is functioning properly. Procedure 3 Connection and replacement check The transmission cable may be damaged or the connections may be loose. Perform Check 1: Check 1 Make sure the transmission cable is firmly plugged into both the E-SATA compatible device and the E-SATA port of the computer. If the cable is connected correctly, go to Check 2. Check 2 Make sure the E-SATA port is firmly secured to the system board of the computer. If the malfunction persists, go to Check 3. Check 3 The transmission cable may be damaged. Replace with a good cable. If the malfunction persists, go to Check 4 Check 4 The system board may be damaged. Replace it with a new one following the instructions in Chapter 4. SatelliteA660/ProA660 Series Maintenance Manual 61
-
 1
1 -
2
-
3
-
4
-
5
-
6
-
7
-
8
-
9
-
10
-
11
-
12
-
13
-
14
-
15
-
16
-
17
-
18
-
19
-
20
-
21
-
22
-
23
-
24
-
25
-
26
-
27
-
28
-
29
-
30
-
31
-
32
-
33
-
34
-
35
-
36
-
37
-
38
-
39
-
40
-
41
-
42
-
43
-
44
-
45
-
46
-
47
-
48
-
49
-
50
-
51
-
52
-
53
-
54
-
55
-
56
-
57
-
58
-
59
-
60
-
61
-
62
-
63
-
64
-
65
-
66
-
67
-
68
-
69
-
70
-
71
-
72
-
73
-
74
-
75
-
76
-
77
-
78
-
79
-
80
-
81
-
82
-
83
-
84
-
85
-
86
-
87
-
88
-
89
-
 90
90 -
 91
91 -
 92
92 -
 93
93 -
 94
94 -
 95
95 -
 96
96 -
 97
97 -
 98
98 -
 99
99 -
 100
100 -
101
-
102
-
103
-
104
-
105
-
106
-
107
-
108
-
109
-
110
-
111
-
112
-
113
-
114
-
115
-
116
-
117
-
118
-
119
-
120
-
121
-
122
-
123
-
124
-
125
-
126
-
127
-
128
-
129
-
130
-
131
-
132
-
133
-
134
-
135
-
136
-
137
-
138
-
139
-
140
-
141
-
142
-
143
-
144
-
145
-
146
-
147
-
148
-
149
-
150
-
151
-
152
-
153
-
154
-
155
-
156
-
157
-
158
-
159
-
160
-
161
-
162
-
163
-
164
-
165
-
166
-
167
-
168
-
169
-
170
-
171
-
172
-
173
-
174
-
175
-
176
-
177
-
178
-
179
-
180
-
181
-
182
-
183
-
184
-
185
-
186
-
187
-
188
-
189
-
190
-
191
-
192
-
193
-
194
-
195
-
196
-
197
-
198
-
199
-
200
-
201
-
202
-
203
-
204
-
205
-
206
-
207
-
208
-
209
-
210
-
211
-
212
-
213
-
214
-
215
-
216
-
217
-
218
-
219
-
220
-
221
-
222
-
223
-
224
-
225
-
226
-
227
-
228
-
229
-
230
-
231
-
232
-
233
-
234
-
235
-
236
-
237
-
238
-
239
-
240
-
241
-
242
-
243
-
244
-
245
-
246
-
247
-
248
-
249
-
250
-
251
-
252
-
253
-
254
-
255
-
256
-
257
-
258
-
259
-
260
-
261
-
262
-
263
-
264
-
265
-
266
-
267
-
268
-
269
-
270
-
271
-
272
-
273
-
274
-
275
-
276
-
277
-
278
-
279
-
280
-
281
-
282
-
283
-
284
-
285
-
286
-
287
-
288
-
289
-
290
-
291
-
292
-
293
-
294
-
295
-
296
-
297
-
298
-
299
-
300
-
301
 |
 |