Xerox XDM6325D-WU User Manual - Page 7
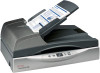
The Xerox DocuMate 632 Scanner, Universal Serial Bus USB port
 |
View all Xerox XDM6325D-WU manuals
Add to My Manuals
Save this manual to your list of manuals |
Page 7 highlights
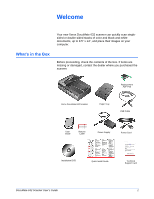
Welcome The Xerox DocuMate 632 Scanner ADF cover release Input Tray Output tray Paper Stop Scanner lock (on side of scanner) Status light Destination Selector buttons LED Number Duplex button Simplex button Power switch Power jack USB port ADF cable ADF cover release-Opens the cover on the ADF. Input tray-Holds documents in place. Paper guide on the input tray adjusts to fit the document width. Output tray-Holds documents after being scanned through the Automatic Document Feeder (ADF). Paper Stop-Keeps scanned documents on the output tray. Status light-Shows the scanner's status. A steady green light indicates the scanner is available to scan. A rapidly flashing green light indicates the scanner is preparing to scan or scanning. Refer to the Troubleshooting section for additional details. Destination Selector buttons-Selects the scan setting for the Simplex and Duplex buttons. Press to cycle through the settings. LED Number-Shows the current scan setting for the Simplex and Duplex scanning buttons. A scan setting includes resolution, file type, brightness, color or black and white, destination, and so on. Duplex button-Press to scan a two-sided document. Simplex button-Press to scan a one-sided document. Scanner lock-Locks the scanner's scan head in place to protect it. Push the lock tab down to unlock the lock. The scanner must be unlocked to scan. Always lock the scanner before moving it. ADF cable-Connects the ADF to the scanner body. The cable provides power to the ADF and must be plugged in for it to operate. Power switch-On/Off power switch. Power jack-Connects the power cord to the scanner. Universal Serial Bus (USB) port-Connects the scanner to the computer. 2 DocuMate 632 Scanner User's Guide
-
 1
1 -
 2
2 -
 3
3 -
 4
4 -
 5
5 -
 6
6 -
 7
7 -
 8
8 -
 9
9 -
 10
10 -
 11
11 -
 12
12 -
13
-
14
-
15
-
16
-
17
-
18
-
19
-
20
-
21
-
22
-
23
-
24
-
25
-
26
-
27
-
28
-
29
-
30
-
31
-
32
-
33
-
34
-
35
-
36
-
37
-
38
-
39
-
40
-
41
-
42
-
43
-
44
-
45
-
46
-
47
-
48
-
49
-
50
-
51
-
52
-
53
-
54
-
55
-
56
-
57
-
58
-
59
-
60
-
61
-
62
-
63
-
64
-
65
-
66
-
67
-
68
-
69
-
70
-
71
-
72
-
73
-
74
-
75
-
76
-
77
-
78
-
79
-
80
-
81
-
82
-
83
-
84
-
85
-
86
-
87
-
88
-
89
-
90
-
91
-
92
-
93
-
94
-
95
-
96
-
97
-
98
-
99
-
100
-
101
-
102
-
103
-
104
-
105
-
106
-
107
-
108
-
109
-
110
-
111
-
112
-
113
-
114
-
115
-
116
-
117
-
118
-
119
-
120
-
121
-
122
-
123
-
124
-
125
-
126
-
127
-
128
-
129
-
130
-
131
-
132
-
133
 |
 |
