Yamaha AW16G Owner's Manual - Page 10
About the CD-RW drive, Installing the CD-RW drive - used
 |
View all Yamaha AW16G manuals
Add to My Manuals
Save this manual to your list of manuals |
Page 10 highlights
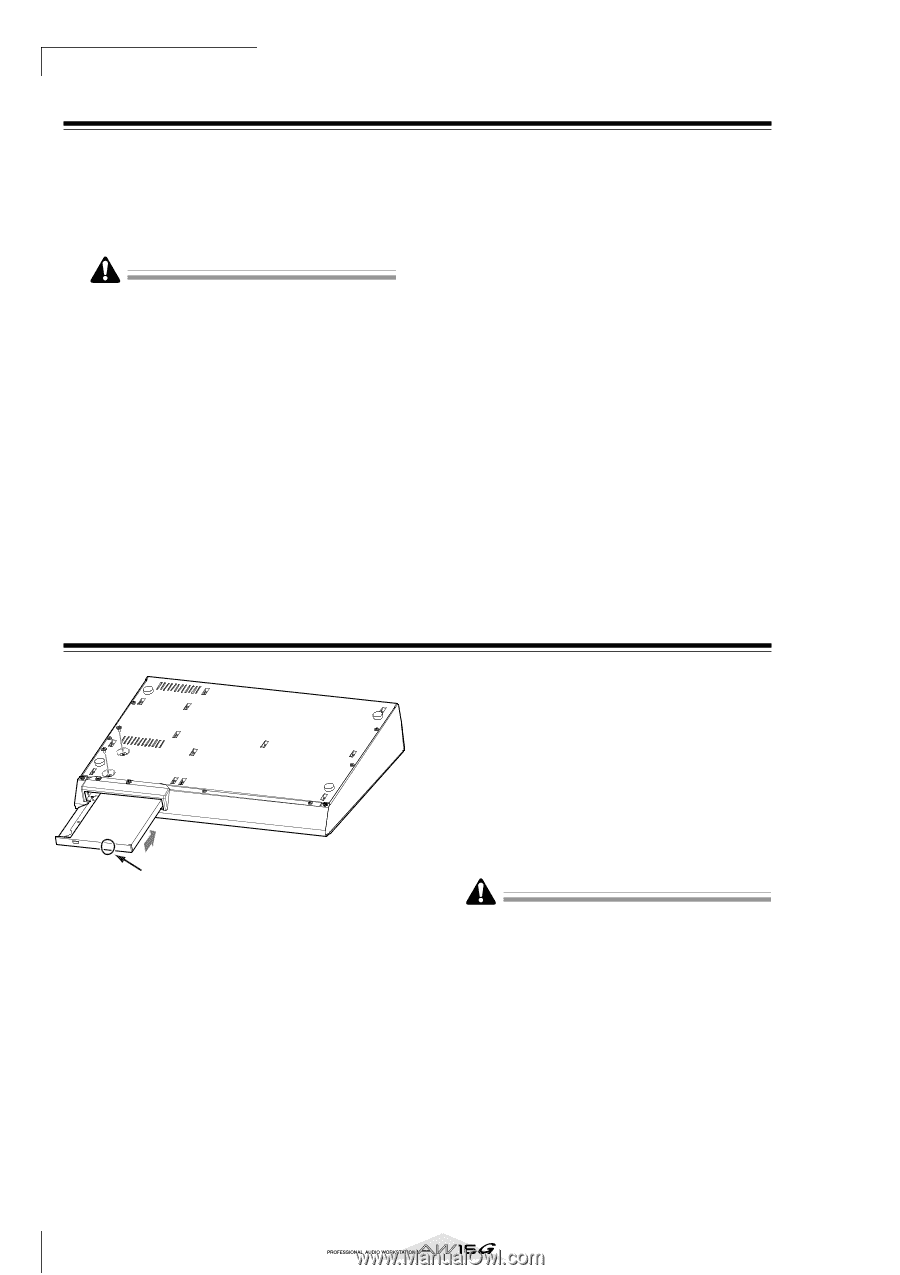
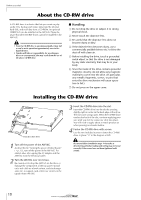
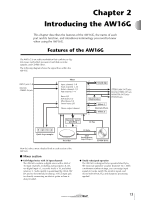
Before you start About the CD-RW drive A CD-RW drive is a device that lets you create or play audio CDs, backup and restore data from the internal hard disk, and read data from a CD-ROM. An optional CDRW16G can be installed in the AW16G. Please be aware that other CD-RW drives cannot be installed in the AW16G. • Even if a CD-RW drive is operating normally, it may fail a read or write operation approximately once in five hundred times. • Yamaha will take no responsibility for any damages, direct or consequential, that may result from the use of the above CD-RW drive. ■ Handling 1 Do not drop the drive or subject it to strong physical shock. B Never touch the objective lens. C Be careful that the objective lens does not become dusty or dirty. D If the objective lens becomes dusty, use a commercially available blower etc. to blow the dust off with clean air. E Before installing the drive, touch a grounded metal object so that the drive is not damaged by any static electricity that may be in your body. F Since the inside of the drive contains powerful magnetic circuitry, do not allow any magnetic material to come near the drive. (In particular, any metallic fragments, screws, or pins that enter the drive mechanism will cause operation to fail.) G Do not press on the upper cover. Installing the CD-RW drive 4 3 Push the drive here. 1 Turn off the power of the AW16G. As described in "Turning the power off (shut down)" (→ p. 12), turn off the power of the AW16G. For safety's sake, also unplug the AC adaptor and the AW16G from the electrical outlet. 2 Turn the AW16G over on its face. Be careful not to drop the AW16G on the floor, or damage the components of the top panel. Spread out a soft cloth on a level surface, and stack magazines etc. to support each of the four corners of the upside-down AW16G. 3 Insert the CD-RW drive into the slot. Insert the CD-RW drive into the slot by pressing slightly right of center on the back edge of the drive. The slot cover swings open. When the CD-RW drive reaches the back of the slot, continue applying pressure until you feel the connector click into place. You will need to apply about as much pressure as when pressing an elevator button. 4 Fasten the CD-RW drive with screws. Use the two included screws to fasten the CD-RW drive in place ("4" in the diagram at left). Be sure to follow installation steps 1-4 exactly as directed. In particular, reading and writing may not occur correctly if the screws have not been tightened sufficiently. 10
-
 1
1 -
2
-
3
-
4
-
 5
5 -
 6
6 -
 7
7 -
 8
8 -
 9
9 -
 10
10 -
 11
11 -
 12
12 -
 13
13 -
 14
14 -
 15
15 -
16
-
17
-
18
-
19
-
20
-
21
-
22
-
23
-
24
-
25
-
26
-
27
-
28
-
29
-
30
-
31
-
32
-
33
-
34
-
35
-
36
-
37
-
38
-
39
-
40
-
41
-
42
-
43
-
44
-
45
-
46
-
47
-
48
-
49
-
50
-
51
-
52
-
53
-
54
-
55
-
56
-
57
-
58
-
59
-
60
-
61
-
62
-
63
-
64
-
65
-
66
-
67
-
68
-
69
-
70
-
71
-
72
-
73
-
74
-
75
-
76
-
77
-
78
-
79
-
80
-
81
-
82
-
83
-
84
-
85
-
86
-
87
-
88
-
89
-
90
-
91
-
92
-
93
-
94
-
95
-
96
-
97
-
98
-
99
-
100
-
101
-
102
-
103
-
104
-
105
-
106
-
107
-
108
-
109
-
110
-
111
-
112
-
113
-
114
-
115
-
116
-
117
-
118
-
119
-
120
-
121
-
122
-
123
-
124
-
125
-
126
-
127
-
128
-
129
-
130
-
131
-
132
-
133
-
134
-
135
-
136
-
137
-
138
-
139
-
140
-
141
-
142
-
143
-
144
-
145
-
146
-
147
-
148
-
149
-
150
-
151
-
152
-
153
-
154
-
155
-
156
-
157
-
158
-
159
-
160
-
161
-
162
-
163
-
164
-
165
-
166
-
167
-
168
-
169
-
170
-
171
-
172
-
173
-
174
-
175
-
176
-
177
-
178
-
179
-
180
-
181
-
182
-
183
-
184
-
185
-
186
-
187
-
188
-
189
-
190
-
191
-
192
-
193
-
194
-
195
-
196
-
197
-
198
-
199
-
200
-
201
-
202
-
203
-
204
-
205
-
206
-
207
-
208
-
209
-
210
-
211
-
212
-
213
-
214
-
215
-
216
-
217
-
218
-
219
 |
 |