Yamaha AW16G Owner's Manual - Page 72
Finding a location while you view the waveform
 |
View all Yamaha AW16G manuals
Add to My Manuals
Save this manual to your list of manuals |
Page 72 highlights
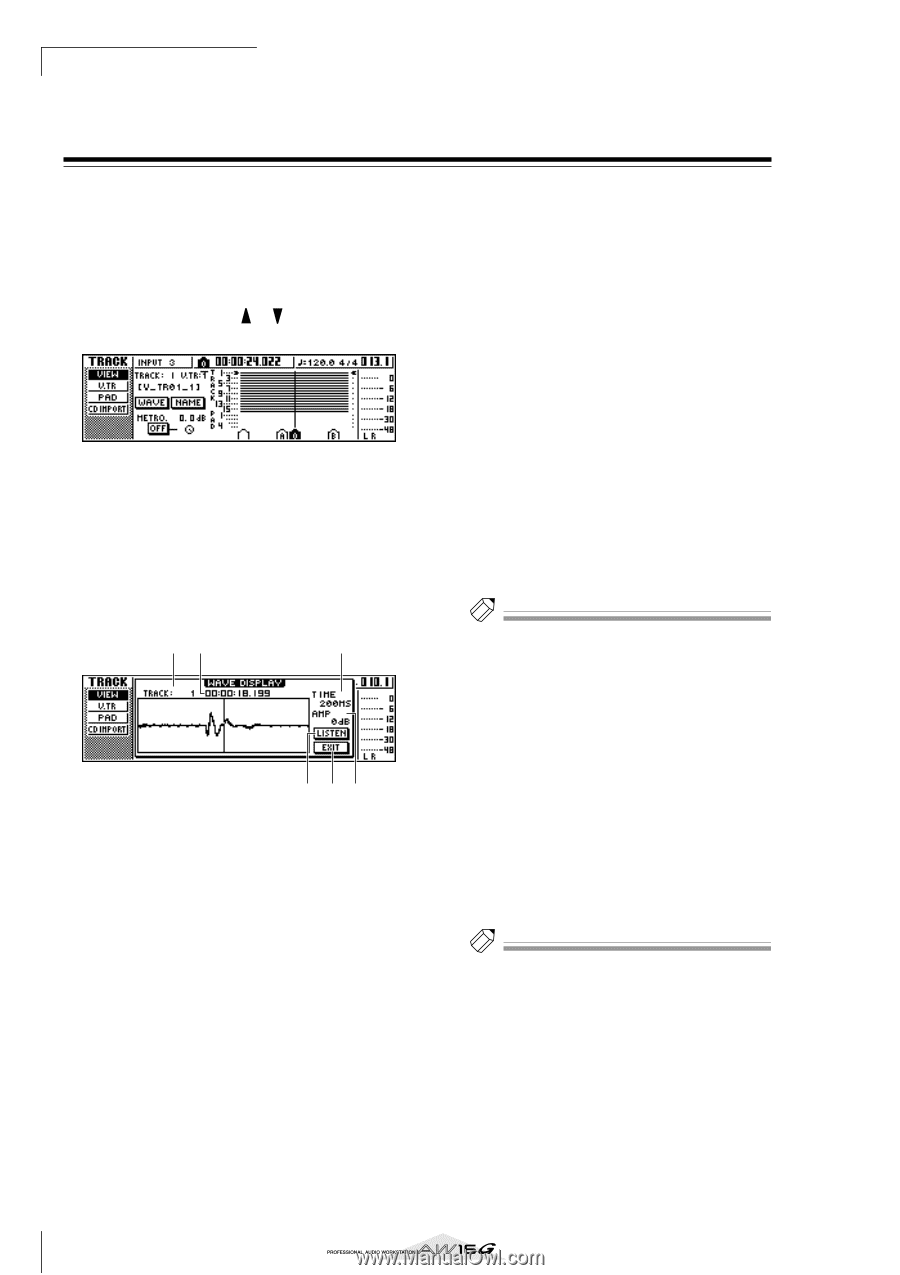
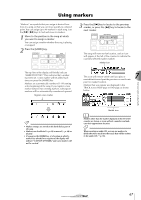
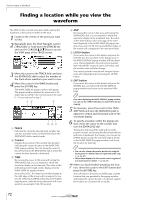
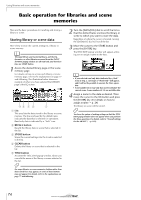
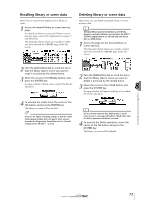
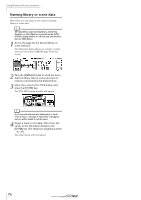
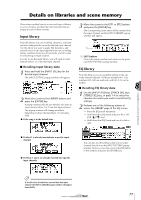
Various types of playback Finding a location while you view the waveform The AW16G lets you find a location while viewing the waveform of the sound recorded on the track. 1 Locate to the vicinity of the point you want to find. 2 Repeatedly press the Work Navigate section [TRACK] key or hold down the [TRACK] key and use the CURSOR[ ]/[ ] keys to access the VIEW page of the TRACK screen. 3 Move the cursor to the TRACK field, and turn the [DATA/JOG] dial to select the number of the track whose waveform you want to view. 4 Move the cursor to the WAVE button and press the [ENTER] key. The WAVE DISPLAY popup window will appear. This popup window displays the waveform of the audio data recorded in the current track of the track (1-16) you selected in step 3. 12 3 564 1 TRACK Indicates the currently selected track number. You can also move the cursor to this field and turn the [DATA/JOG] dial to switch tracks. B Counter Displays the location of the vertical line (pointer) indicating the current location in the WAVE DISPLAY popup window. You can move the cursor to this field and turn the [DATA/JOG] dial to move the current location forward or backward. C TIME By moving the cursor to this area and turning the [DATA/JOG] dial, you can expand or shrink the waveform display in the time axis. The value of this field indicates the length of time displayed in the WAVE DISPLAY popup window. If you select 1SEC, the distance from the left edge to the right edge of the screen will correspond to one second. Selecting SAMPLE will produce the highest magnification, and each horizontal pixel will correspond to one sample (1/44,100 second). D AMP By moving the cursor to this area and turning the [DATA/JOG] dial, you can expand or shrink the waveform display in the amplitude axis. The value of this field indicates the level range of the waveform displayed in the WAVE DISPLAY popup window. If you select 0 dB, the top and bottom edges of the screen will correspond to the maximum level. E LISTEN button If you move the cursor to this button and press the [ENTER] key, the waveform in the display area of the WAVE DISPLAY popup window will be played once. During playback, the vertical line (pointer) that indicates the current location will move, and the counter value will also change. You cannot perform conventional transport operations when playing back by pressing the LISTEN button. F EXIT button If you move the cursor to this button and press the [ENTER] key, you will exit the WAVE DISPLAY popup window and return to the previous VIEW page. Tip! Even after displaying the WAVE DISPLAY popup window, you can use the [TRACK SEL] keys to switch the track for viewing. 5 As necessary, move the cursor to the TIME/ AMP fields and turn the [DATA/JOG] dial to adjust the vertical and horizontal scale of the waveform display. 6 To specify a location within the popup window, move the cursor to the counter and turn the [DATA/JOG] dial. Turning the dial toward the right will move the pointer forward, and turning the dial toward the left will move it backward. If necessary, you can use the LISTEN button to play the waveform region shown in the WAVE DISPLAY popup window, and check the location by listening. Tip! • You can also change the pointer position by using the locate points or markers that are registered in the song (→ p. 65, 67). • The position displayed in the counter can be registered as a locate point or marker (→ p. 65, 67). 7 When you have finished specifying the location, move the cursor to the EXIT button and press the [ENTER] key. You will return to the previous VIEW page, and the location that you specified in the popup window will remain the current location. As desired, register the location as a locate point or marker. 72
-
 1
1 -
2
-
3
-
4
-
5
-
6
-
7
-
8
-
9
-
10
-
11
-
12
-
13
-
14
-
15
-
16
-
17
-
18
-
19
-
20
-
21
-
22
-
23
-
24
-
25
-
26
-
27
-
28
-
29
-
30
-
31
-
32
-
33
-
34
-
35
-
36
-
37
-
38
-
39
-
40
-
41
-
42
-
43
-
44
-
45
-
46
-
47
-
48
-
49
-
50
-
51
-
52
-
53
-
54
-
55
-
56
-
57
-
58
-
59
-
60
-
61
-
62
-
63
-
64
-
65
-
66
-
 67
67 -
 68
68 -
 69
69 -
 70
70 -
 71
71 -
 72
72 -
 73
73 -
 74
74 -
 75
75 -
 76
76 -
 77
77 -
78
-
79
-
80
-
81
-
82
-
83
-
84
-
85
-
86
-
87
-
88
-
89
-
90
-
91
-
92
-
93
-
94
-
95
-
96
-
97
-
98
-
99
-
100
-
101
-
102
-
103
-
104
-
105
-
106
-
107
-
108
-
109
-
110
-
111
-
112
-
113
-
114
-
115
-
116
-
117
-
118
-
119
-
120
-
121
-
122
-
123
-
124
-
125
-
126
-
127
-
128
-
129
-
130
-
131
-
132
-
133
-
134
-
135
-
136
-
137
-
138
-
139
-
140
-
141
-
142
-
143
-
144
-
145
-
146
-
147
-
148
-
149
-
150
-
151
-
152
-
153
-
154
-
155
-
156
-
157
-
158
-
159
-
160
-
161
-
162
-
163
-
164
-
165
-
166
-
167
-
168
-
169
-
170
-
171
-
172
-
173
-
174
-
175
-
176
-
177
-
178
-
179
-
180
-
181
-
182
-
183
-
184
-
185
-
186
-
187
-
188
-
189
-
190
-
191
-
192
-
193
-
194
-
195
-
196
-
197
-
198
-
199
-
200
-
201
-
202
-
203
-
204
-
205
-
206
-
207
-
208
-
209
-
210
-
211
-
212
-
213
-
214
-
215
-
216
-
217
-
218
-
219
 |
 |