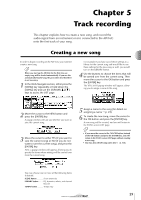
Yamaha AW16G Owner's Manual - Page 43
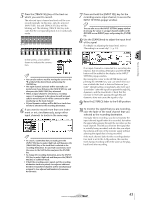
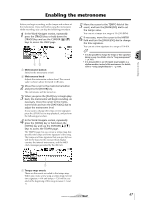
Press and hold the [INPUT SEL] key for the, recording-source input channel, to access
 |
View all Yamaha AW16G manuals
Add to My Manuals
Save this manual to your list of manuals |
Page 43 highlights
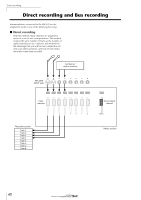
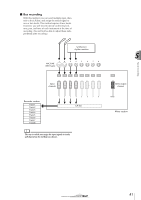
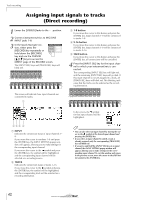
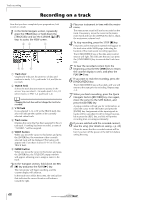
Track recording 5 Press the [TRACK SEL] key of the track on which you want to record. The selected input channel and track will be connected internally. At this time, only the selected [INPUT SEL] key and [TRACK SEL] key will be blinking red. The blinking [TRACK SEL] key indicates that the corresponding track is in record-ready mode. In the screen, a line will be drawn to indicate the connection. Tip! • You can also select a track by moving the cursor to the symbol of the desired track and pressing the [ENTER] key. • The input channel and track will be internally con- nected even if you first press the [TRACK SEL] key and then press the [INPUT SEL] key afterward. • When an input channel is selected as a recording source, its assignment to the stereo bus will automatically be turned off, and it will be connected to allow monitoring via the track channel. • EQ and dynamics settings will be flat for a track channel that is selected as the recording destination. 6 If you want to record more than one instrument or mic simultaneously, assign other input channels to tracks in the same way. Tip! • To cancel a connection that you made, press the [INPUT SEL] key to make it light red, and then press the [TRACK SEL] key of the track that is selected as the recording destination. To cancel all connections, move the cursor to the SAFE button and press the [ENTER] key. • To change the recording destination, press the [INPUT SEL] key to make it light red, and then press the [TRACK SEL] key of a different track. • If both the recording-source inputs and the recordingdestination tracks are paired, two adjacent odd-numbered/even-numbered channels will be simultaneously assigned to two adjacent odd-numbered/even-numbered tracks. 7 Press and hold the [INPUT SEL] key for the recording-source input channel, to access the INPUT SETTING popup window. Tip! You can also access the INPUT SETTING popup window by moving the cursor to an input channel number in the RECORD screen DIRECT page, and pressing the [ENTER] key. 8 Use the [GAIN] knob to adjust the input level of the signal. For details on adjusting the input level, refer to "Recording to a sound clip" (→ p. 33). 5 If an input channel is connected to a recording-destination, that recording-destination and the METER button will be added to the display in the INPUT SETTING popup window. By moving the cursor to the METER button and pressing the [ENTER] key, you can switch the location at which the level is detected between "prefader" (default setting; immediately after A/D) and "post-fader" (after the signal has passed through EQ, dynamics, and the level knob). Check that the increase in level after passing through EQ and dynamics does not cause the signal to clip. 9 Raise the [STEREO] fader to the 0 dB position. 10 To monitor the signal that you are recording, raise the fader of the track channel that you selected as the recording destination. Normally when recording, you do not monitor the input channel signal before it is recorded, but rather the signal after passing through the recorder, via the track channel. This lets you monitor the signal that is actually being recorded, and also lets you adjust the volume and tone of the monitor signal without affecting the signal that is being recorded. If the track channel fader for the recording-destination track is set to the 0 dB position, the monitor level during recording will be the same as the playback level after recording. 43
-
 1
1 -
2
-
3
-
4
-
5
-
6
-
7
-
8
-
9
-
10
-
11
-
12
-
13
-
14
-
15
-
16
-
17
-
18
-
19
-
20
-
21
-
22
-
23
-
24
-
25
-
26
-
27
-
28
-
29
-
30
-
31
-
32
-
33
-
34
-
35
-
36
-
37
-
 38
38 -
 39
39 -
 40
40 -
 41
41 -
 42
42 -
 43
43 -
 44
44 -
 45
45 -
 46
46 -
 47
47 -
 48
48 -
49
-
50
-
51
-
52
-
53
-
54
-
55
-
56
-
57
-
58
-
59
-
60
-
61
-
62
-
63
-
64
-
65
-
66
-
67
-
68
-
69
-
70
-
71
-
72
-
73
-
74
-
75
-
76
-
77
-
78
-
79
-
80
-
81
-
82
-
83
-
84
-
85
-
86
-
87
-
88
-
89
-
90
-
91
-
92
-
93
-
94
-
95
-
96
-
97
-
98
-
99
-
100
-
101
-
102
-
103
-
104
-
105
-
106
-
107
-
108
-
109
-
110
-
111
-
112
-
113
-
114
-
115
-
116
-
117
-
118
-
119
-
120
-
121
-
122
-
123
-
124
-
125
-
126
-
127
-
128
-
129
-
130
-
131
-
132
-
133
-
134
-
135
-
136
-
137
-
138
-
139
-
140
-
141
-
142
-
143
-
144
-
145
-
146
-
147
-
148
-
149
-
150
-
151
-
152
-
153
-
154
-
155
-
156
-
157
-
158
-
159
-
160
-
161
-
162
-
163
-
164
-
165
-
166
-
167
-
168
-
169
-
170
-
171
-
172
-
173
-
174
-
175
-
176
-
177
-
178
-
179
-
180
-
181
-
182
-
183
-
184
-
185
-
186
-
187
-
188
-
189
-
190
-
191
-
192
-
193
-
194
-
195
-
196
-
197
-
198
-
199
-
200
-
201
-
202
-
203
-
204
-
205
-
206
-
207
-
208
-
209
-
210
-
211
-
212
-
213
-
214
-
215
-
216
-
217
-
218
-
219
 |
 |
