Yamaha DSP-AX1 Owner's Manual - Page 23
Connecting the Front Effect Speakers, Connecting the Rear and Rear Center Speakers
 |
View all Yamaha DSP-AX1 manuals
Add to My Manuals
Save this manual to your list of manuals |
Page 23 highlights
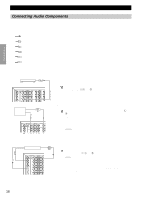
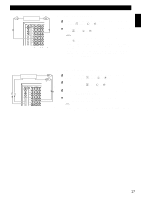
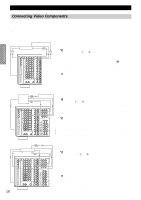
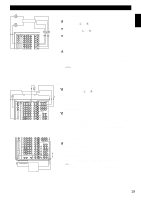
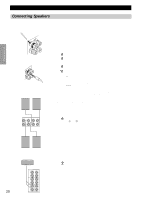
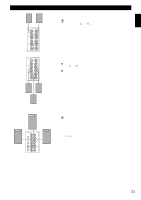
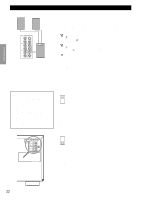
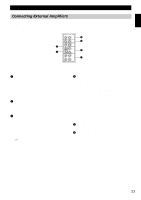
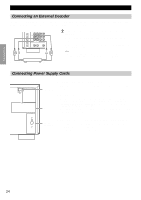
English Hookups Right Front Effect Speaker SPEAKERS + FRONT + - - REAR + + - - + + - - CENTER REAR CENTER Left Front Effect Speaker s Connecting the Front Effect Speakers Connect the + and - terminals of your right and left Front Effect speakers to the L and R FRONT + and - terminals on this unit. SPEAKERS + FRONT + - - REAR + + - - + + - - CENTER REAR CENTER s Connecting the Rear and Rear Center Speakers 1 Connect the + and - terminals of your right and left Rear speakers to the L and R REAR + and - terminals on this unit. 2 Connect the + terminal of your Rear Center speaker to the REAR CENTER + terminal and the - terminal of your Rear Center speaker to REAR CENTER - terminal. Right Rear Speaker Left Rear Speaker Rear Center Speaker Subwoofer system Right Subwoofer system PREOUT/MAIN IN IN REMOTE 1 OUT REMOTE 2 IN MONO RB- REAR CTR 2320 RS 232C CTRL OUT +5V 100Ω 20mA FRONT REAR (SURROUND) SUB WOOFER SPLIT CENTER IN CENTER OUT MAIN IN MAIN OUT Left Subwoofer system s Connecting a Front Subwoofer Connect the signal input jack on your subwoofer to the PRE OUT/ MAIN IN SUBWOOFER MONO jack. By connecting two Subwoofers to the SUBWOOFER SPLIT jacks, this unit can reproduce subtle directional changes in the low frequency sounds. When you use two Subwoofers, connect both of them to the SUBWOOFER SPLIT jacks using pin plugs. Caution: • The SUBWOOFER jacks (output) have a built-in high cut-off filter (90 Hz). When using a powered subwoofer, set the high cut-off frequency to "MAX" on your Subwoofer. 21
-
 1
1 -
2
-
3
-
4
-
5
-
6
-
7
-
8
-
9
-
10
-
11
-
12
-
13
-
14
-
15
-
16
-
17
-
 18
18 -
 19
19 -
 20
20 -
 21
21 -
 22
22 -
 23
23 -
 24
24 -
 25
25 -
 26
26 -
 27
27 -
 28
28 -
29
-
30
-
31
-
32
-
33
-
34
-
35
-
36
-
37
-
38
-
39
-
40
-
41
-
42
-
43
-
44
-
45
-
46
-
47
-
48
-
49
-
50
-
51
-
52
-
53
-
54
-
55
-
56
-
57
-
58
-
59
-
60
-
61
-
62
-
63
-
64
-
65
-
66
-
67
-
68
-
69
-
70
-
71
-
72
-
73
-
74
-
75
-
76
-
77
-
78
-
79
-
80
-
81
-
82
-
83
-
84
-
85
-
86
-
87
-
88
 |
 |
