Yamaha DSP-AX1 Owner's Manual - Page 65
Adjusting the Levels of the Effect Speakers, Setting the Sleep Timer, To set the Sleep Timer
 |
View all Yamaha DSP-AX1 manuals
Add to My Manuals
Save this manual to your list of manuals |
Page 65 highlights
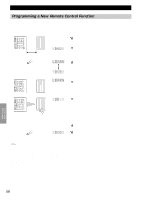
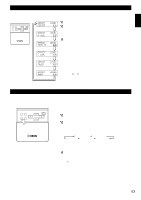
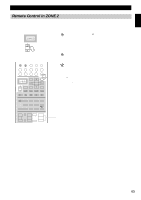
English Adjusting the Levels of the Effect Speakers You can adjust the volume level of each effect speaker (Center, Right Rear, Rear Center, Left Rear, Front Effect, and Subwoofer) while listening to a music source. Center 1 Set PARAMETER/SET MENU to PARAMETER. ON SCREEN LEVEL SLEEP TEST PARAMETER % SET MENU % Right Rear 2 Press LEVEL to select the speaker(s) you want to adjust. Each time you press this button the selected speaker changes and appears in the front panel display only as follows: Center, Right Rear, Rear Center, Left Rear, Front Effect Speakers, and Subwoofer Rear Center 3 Adjust the speaker volume level using the + or - on the remote control. Left Rear You can adjust the Center, Right Rear, Rear Center, Left Rear, Front Effect Speakers from +10 dB to -10 dB. You can adjust the Subwoofer from 0 dB down to -20 dB. Front Subwoofer Notes: • You cannot adjust the left and right speakers independently. • When you adjust the speaker level using LEVEL, the settings you made using the Dolby Surround Test and DSP Test change. • When PARAMETER/SET MENU is set to SET MENU, you cannot adjust the speaker level using LEVEL. However, each time you press LEVEL the current level setting of each speaker appears. Select the speaker level you want to check using % or . % Setting the Sleep Timer Use this feature to automatically turn off the main unit after the amount of time you set. The Sleep Timer is useful when you plan to fall asleep while the main unit is reproducing or recording a source. The Sleep Timer also automatically turns off external components connected to AC OUTLETS. The Sleep Timer can only be set using the remote control. ON SCREEN LEVEL SLEEP TEST PARAMETER % SET MENU % s To set the Sleep Timer 1 Select a source using INPUT SELECTOR and start playback (or select a broadcast station) on the source component. 2 Press SLEEP repeatedly to set the amount of time before the main unit automatically turns off. Each time you press SLEEP, the front panel display changes as shown below. After a few seconds the display returns to the previous indication. = SLEEP 120 min = SLEEP 90 min SLEEP OFF + SLEEP 30 min + SLEEP 60 min+ s To cancel the Sleep Timer 1 Press SLEEP repeatedly until "SLEEP OFF" appears in the front panel display. After a few seconds, the display returns to the previous indication. Note: • The Sleep Timer setting can also be canceled by turning off the main unit using STANDBY on the remote control (or STANDBY/ON on the front panel) or disconnecting the AC Power Cord from the AC outlet. 63
-
 1
1 -
2
-
3
-
4
-
5
-
6
-
7
-
8
-
9
-
10
-
11
-
12
-
13
-
14
-
15
-
16
-
17
-
18
-
19
-
20
-
21
-
22
-
23
-
24
-
25
-
26
-
27
-
28
-
29
-
30
-
31
-
32
-
33
-
34
-
35
-
36
-
37
-
38
-
39
-
40
-
41
-
42
-
43
-
44
-
45
-
46
-
47
-
48
-
49
-
50
-
51
-
52
-
53
-
54
-
55
-
56
-
57
-
58
-
59
-
 60
60 -
 61
61 -
 62
62 -
 63
63 -
 64
64 -
 65
65 -
 66
66 -
 67
67 -
 68
68 -
 69
69 -
 70
70 -
71
-
72
-
73
-
74
-
75
-
76
-
77
-
78
-
79
-
80
-
81
-
82
-
83
-
84
-
85
-
86
-
87
-
88
 |
 |
