Yamaha DSP-AX1 Owner's Manual - Page 62
Operating the Macro Feature, Programming a Macro, MACRO, MACRO ON/OFF
 |
View all Yamaha DSP-AX1 manuals
Add to My Manuals
Save this manual to your list of manuals |
Page 62 highlights
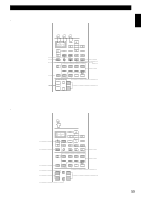
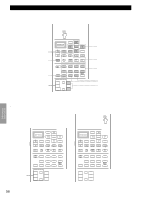
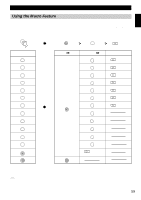
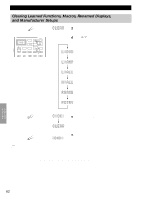
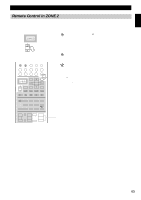
Advanced Operation % % Remote Control Features s Operating the Macro Feature MACRO ON/OFF TRANSMIT RE-NAME CLEAR LEARN MACRO MACRO OFF ON SYSTEM POWER STANDBY V-AUX TAPE PHONO D-TV CBL/SAT TUNER MD CD VCR 1 VCR 2 VCR 3 LD DVD TITLE 6CH INPUT % ENTER Macro buttons 1 Set MACRO ON/OFF to ON. 2 Press a Macro button. Notes: • When you are finished using the Macro feature, set MACRO ON/ OFF to OFF. • While the main unit is carrying out a macro program, the main unit does not receive any other button's function until the macro is complete (the TRANSMIT indicator stops flashing). • Continue to aim the remote control at the equipment the macro is operating until the macro program is complete. % % s Programming a Macro You can use the Macro feature to transmit many remote control commands by pressing a single button. MACRO SYSTEM POWER STANDBY V-AUX TAPE PHONO D-TV CBL/SAT TUNER MD CD VCR 1 VCR 2 VCR 3 LD DVD 6CH INPUT flashes alternately SYSTEM POWER STANDBY V-AUX TAPE PHONO D-TV CBL/SAT TUNER MD CD VCR 1 VCR 2 VCR 3 LD DVD TITLE 1 6CH INPUT % SOURCE % DISPLAY MENU % SELECT SEARCH ! POWER / REC STOP ! ENTER % SOUND - CHAPTER + $ PAUSE $ 2 PLAY *# 3 indicates the number of macrosteps you entered flashes alternately % % 1 Press MACRO using a ball point pen or similar object. • If you do not initiate the procedure within 30 seconds, the macro programming process is canceled. 2 Press the macro button on which you want to program the Macro. • If you want to change the source component, use SOURCE SELECT %/ or the input buttons. When you use input buttons, input is selected as a Macro step, whereas SOURCE SELECT %/ only changes the component. • The display window shows the button you chose for programming the macro and the component name in alternation. 3 Press the buttons of the functions that you want to include in the macro sequence in order. • You can set up to 10 Macro steps (10 functions). (ex) 1 MCR 1 : DVD input 2 MCR 2 : DVD › 3 MCR 3 : DVD # MACRO 4 Press MACRO again when the sequence you want to program is complete. • After you set 10 steps, "FULL" is displayed. Notes: • "NG" appears in the display window when programming is not done correctly. • "ERROR" appears in the display window in the following conditions: when pressing more than one button at once; and when MACRO ON/OFF is switched to another position. 60
-
 1
1 -
2
-
3
-
4
-
5
-
6
-
7
-
8
-
9
-
10
-
11
-
12
-
13
-
14
-
15
-
16
-
17
-
18
-
19
-
20
-
21
-
22
-
23
-
24
-
25
-
26
-
27
-
28
-
29
-
30
-
31
-
32
-
33
-
34
-
35
-
36
-
37
-
38
-
39
-
40
-
41
-
42
-
43
-
44
-
45
-
46
-
47
-
48
-
49
-
50
-
51
-
52
-
53
-
54
-
55
-
56
-
 57
57 -
 58
58 -
 59
59 -
 60
60 -
 61
61 -
 62
62 -
 63
63 -
 64
64 -
 65
65 -
 66
66 -
 67
67 -
68
-
69
-
70
-
71
-
72
-
73
-
74
-
75
-
76
-
77
-
78
-
79
-
80
-
81
-
82
-
83
-
84
-
85
-
86
-
87
-
88
 |
 |
